Introduction
Command-line interfaces (CLIs) are essential tools for cloud developers and DevOps engineers. They enable automation, scripting, and efficient management of cloud resources. This guide covers the installation and configuration of all major cloud provider CLIs and essential DevOps tools.
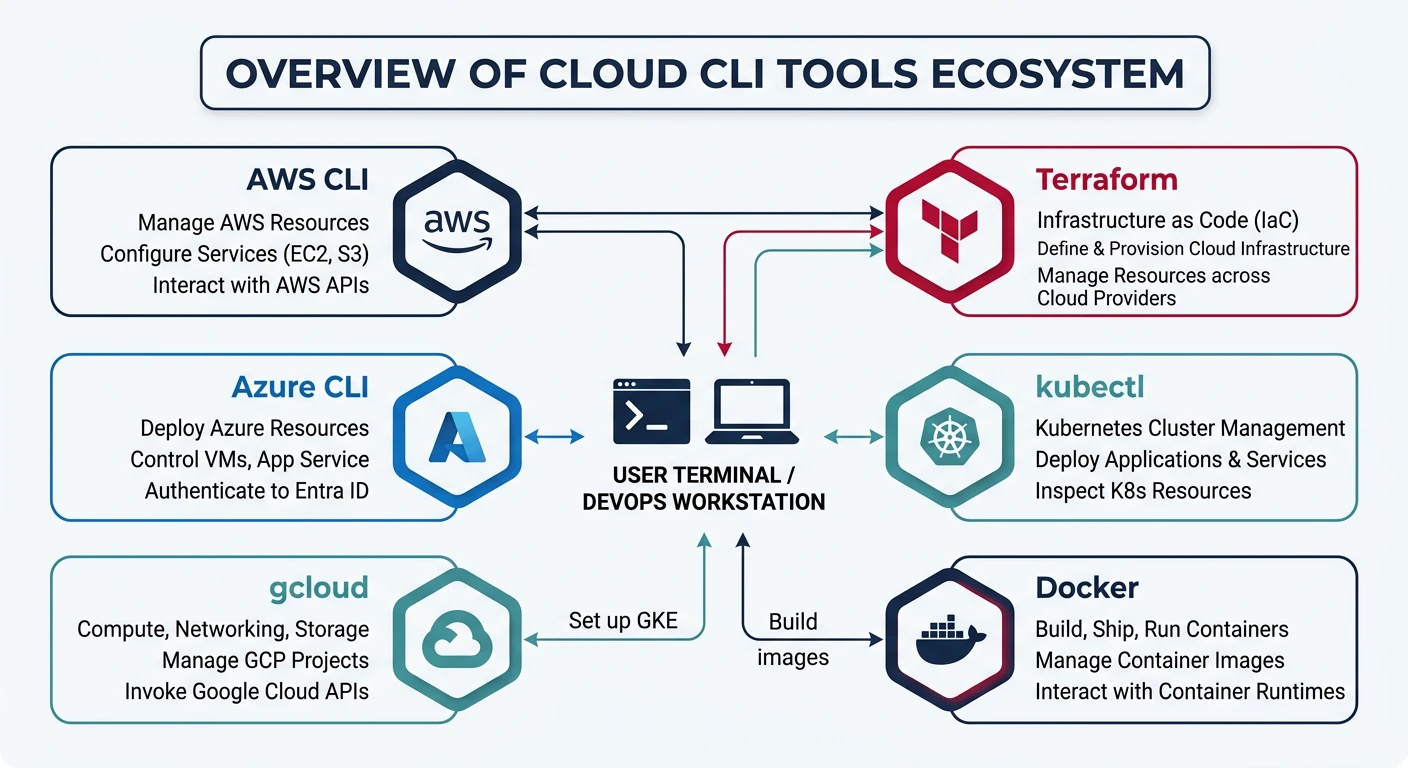
- AWS CLI + SAM CLI - Amazon Web Services management
- Azure CLI + Functions Core Tools - Microsoft Azure management
- Google Cloud SDK (gcloud) - Google Cloud Platform management
- Terraform - Infrastructure as Code across all providers
- kubectl + Helm - Kubernetes cluster management
- Docker - Container runtime and management
Cloud Computing Mastery
Cloud Computing Fundamentals
IaaS, PaaS, SaaS, deployment modelsCLI Tools & Setup
AWS CLI, Azure CLI, gcloud, TerraformCompute Services
VMs, containers, auto-scaling, spot instancesStorage Services
Object, block, file storage, data lifecycleDatabase Services
RDS, DynamoDB, Cosmos DB, cachingNetworking & CDN
VPCs, load balancers, DNS, content deliveryServerless Computing
Lambda, Functions, event-driven architectureContainers & Kubernetes
Docker, EKS, AKS, GKE, orchestrationIdentity & Security
IAM, RBAC, encryption, complianceMonitoring & Observability
CloudWatch, Azure Monitor, loggingDevOps & CI/CD
Pipelines, infrastructure as code, GitOpsPrerequisites
Before installing cloud CLI tools, ensure you have:
- Administrator/sudo access on your system
- Internet connection for downloading packages
- Cloud provider accounts (free tiers available for all providers)
- Python 3.8+ (for some tools)
Python Installation Check
Many cloud CLIs require Python. Verify your installation:
# Check Python version
python --version
python3 --version

# Check pip (Python package manager)
pip --version
pip3 --version

# If Python not installed, download from python.org
# Or use package manager:
# macOS: brew install python3
# Ubuntu: sudo apt install python3 python3-pip
# Windows: Download from python.org or use winget
winget install Python.Python.3.11
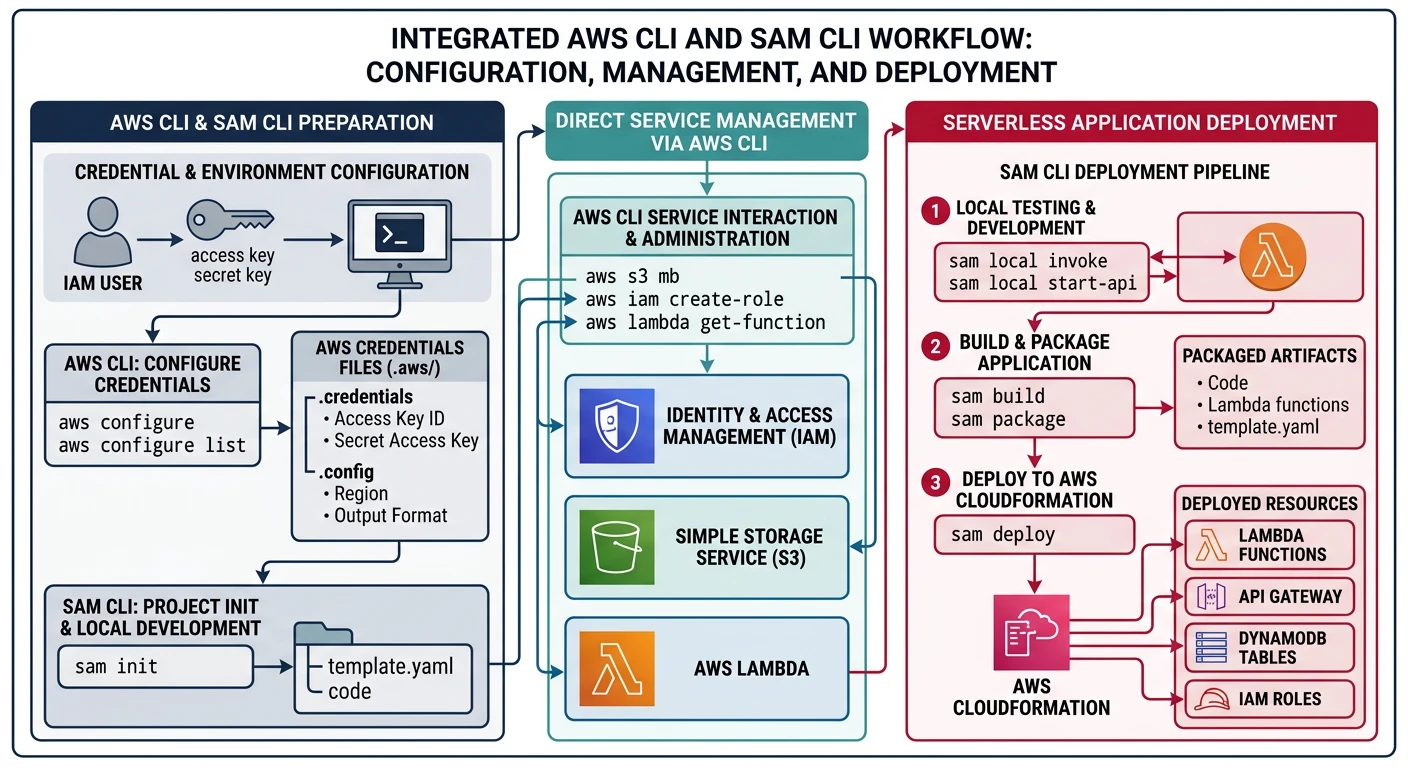
AWS CLI & SAM CLI
The AWS Command Line Interface is a unified tool to manage your AWS services. AWS SAM CLI extends this for serverless application development.
AWS CLI v2 Installation
Windows
# Option 1: MSI Installer (Recommended)
# Download from: https://awscli.amazonaws.com/AWSCLIV2.msi
# Run the installer and follow prompts

# Option 2: Using winget
winget install Amazon.AWSCLI

# Option 3: Using Chocolatey
choco install awscli

# Verify installation
aws --version
# aws-cli/2.15.0 Python/3.11.6 Windows/10 exe/AMD64
macOS
# Option 1: Official Package (Recommended)
curl "https://awscli.amazonaws.com/AWSCLIV2.pkg" -o "AWSCLIV2.pkg"
sudo installer -pkg AWSCLIV2.pkg -target /

# Option 2: Using Homebrew
brew install awscli

# Verify installation
aws --version
# aws-cli/2.15.0 Python/3.11.6 Darwin/23.0.0 source/arm64
Linux
# Option 1: Official Installer (All distributions)
curl "https://awscli.amazonaws.com/awscli-exe-linux-x86_64.zip" -o "awscliv2.zip"
unzip awscliv2.zip
sudo ./aws/install

# Option 2: Using snap (Ubuntu/Debian)
sudo snap install aws-cli --classic

# Option 3: Using pip
pip3 install awscli --upgrade --user

# Verify installation
aws --version
AWS CLI Configuration
# Interactive configuration (prompts for credentials)
aws configure

# You'll be prompted for:
# AWS Access Key ID [None]: AKIAIOSFODNN7EXAMPLE
# AWS Secret Access Key [None]: wJalrXUtnFEMI/K7MDENG/bPxRfiCYEXAMPLEKEY
# Default region name [None]: us-east-1
# Default output format [None]: json

# Configure named profile for multiple accounts
aws configure --profile production
aws configure --profile development

# List configured profiles
aws configure list-profiles

# Use specific profile
aws s3 ls --profile production

# Set default profile via environment variable
export AWS_PROFILE=production  # Linux/macOS
$env:AWS_PROFILE="production"  # PowerShell
AWS SAM CLI Installation
AWS SAM (Serverless Application Model) CLI is used for building, testing, and deploying serverless applications.
# Windows (using MSI)
# Download from: https://github.com/aws/aws-sam-cli/releases
# Or using Chocolatey:
choco install aws-sam-cli

# macOS (using Homebrew)
brew install aws-sam-cli

# Linux (using pip)
pip3 install aws-sam-cli

# Verify installation
sam --version
# SAM CLI, version 1.100.0
# Common AWS CLI commands
aws sts get-caller-identity          # Verify credentials
aws s3 ls                            # List S3 buckets
aws ec2 describe-instances           # List EC2 instances
aws lambda list-functions            # List Lambda functions
aws cloudformation list-stacks       # List CloudFormation stacks

# Get help for any command
aws s3 help
aws ec2 describe-instances help
Azure CLI & Tools
The Azure CLI is a cross-platform command-line tool for managing Azure resources. Azure Functions Core Tools enable local development of serverless functions.

Azure CLI Installation
Windows
# Option 1: MSI Installer (Recommended)
# Download from: https://aka.ms/installazurecliwindows

# Option 2: Using winget
winget install Microsoft.AzureCLI

# Option 3: Using Chocolatey
choco install azure-cli

# Option 4: Using PowerShell
$ProgressPreference = 'SilentlyContinue'
Invoke-WebRequest -Uri https://aka.ms/installazurecliwindows -OutFile .\AzureCLI.msi
Start-Process msiexec.exe -Wait -ArgumentList '/I AzureCLI.msi /quiet'
Remove-Item .\AzureCLI.msi

# Verify installation
az --version
# azure-cli 2.55.0
macOS
# Using Homebrew (Recommended)
brew update
brew install azure-cli

# Verify installation
az --version
Linux
# Ubuntu/Debian - One-liner install
curl -sL https://aka.ms/InstallAzureCLIDeb | sudo bash

# Manual installation (Ubuntu/Debian)
sudo apt-get update
sudo apt-get install ca-certificates curl apt-transport-https lsb-release gnupg

# Add Microsoft signing key
curl -sL https://packages.microsoft.com/keys/microsoft.asc | gpg --dearmor | sudo tee /etc/apt/trusted.gpg.d/microsoft.gpg > /dev/null

# Add repository
AZ_REPO=$(lsb_release -cs)
echo "deb [arch=amd64] https://packages.microsoft.com/repos/azure-cli/ $AZ_REPO main" | sudo tee /etc/apt/sources.list.d/azure-cli.list

# Install
sudo apt-get update
sudo apt-get install azure-cli

# RHEL/CentOS/Fedora
sudo rpm --import https://packages.microsoft.com/keys/microsoft.asc
sudo dnf install azure-cli

# Verify installation
az --version
Azure CLI Configuration
# Login to Azure (opens browser for authentication)
az login

# Login with service principal (for automation)
az login --service-principal \
  --username APP_ID \
  --password PASSWORD \
  --tenant TENANT_ID

# List subscriptions
az account list --output table

# Set default subscription
az account set --subscription "My Subscription Name"
az account set --subscription "xxxxxxxx-xxxx-xxxx-xxxx-xxxxxxxxxxxx"

# Show current subscription
az account show

# Configure defaults (region, resource group)
az configure --defaults location=eastus
az configure --defaults group=myResourceGroup

# Enable auto-upgrade
az config set auto-upgrade.enable=yes
Azure Functions Core Tools
# Windows (using npm - requires Node.js)
npm install -g azure-functions-core-tools@4 --unsafe-perm true

# Windows (using Chocolatey)
choco install azure-functions-core-tools

# macOS (using Homebrew)
brew tap azure/functions
brew install azure-functions-core-tools@4

# Linux (Ubuntu/Debian)
curl https://packages.microsoft.com/keys/microsoft.asc | gpg --dearmor > microsoft.gpg
sudo mv microsoft.gpg /etc/apt/trusted.gpg.d/microsoft.gpg
sudo sh -c 'echo "deb [arch=amd64] https://packages.microsoft.com/repos/microsoft-ubuntu-$(lsb_release -cs)-prod $(lsb_release -cs) main" > /etc/apt/sources.list.d/dotnetdev.list'
sudo apt-get update
sudo apt-get install azure-functions-core-tools-4

# Verify installation
func --version
# 4.0.5000
# Common Azure CLI commands
az account show                       # Show current subscription
az group list --output table          # List resource groups
az vm list --output table             # List virtual machines
az storage account list               # List storage accounts
az webapp list --output table         # List web apps
az functionapp list                   # List function apps

# Get help
az --help
az vm --help
az vm create --help
Google Cloud SDK (gcloud)
The Google Cloud SDK includes the gcloud CLI for managing GCP resources, gsutil for Cloud Storage, and bq for BigQuery.
Google Cloud SDK Installation
Windows
# Option 1: Interactive Installer (Recommended)
# Download from: https://cloud.google.com/sdk/docs/install
# Run GoogleCloudSDKInstaller.exe

# Option 2: Using Chocolatey
choco install gcloudsdk

# Option 3: PowerShell
(New-Object Net.WebClient).DownloadFile("https://dl.google.com/dl/cloudsdk/channels/rapid/GoogleCloudSDKInstaller.exe", "$env:Temp\GoogleCloudSDKInstaller.exe")
& $env:Temp\GoogleCloudSDKInstaller.exe

# After installation, open new terminal
gcloud --version
# Google Cloud SDK 458.0.0
# bq 2.0.98
# core 2024.01.05
# gcloud-crc32c 1.0.0
# gsutil 5.27
macOS
# Option 1: Interactive Installer
curl https://sdk.cloud.google.com | bash

# Restart shell or run:
exec -l $SHELL

# Option 2: Using Homebrew
brew install --cask google-cloud-sdk

# Add to PATH (add to ~/.zshrc or ~/.bash_profile)
source "$(brew --prefix)/share/google-cloud-sdk/path.zsh.inc"
source "$(brew --prefix)/share/google-cloud-sdk/completion.zsh.inc"

# Verify installation
gcloud --version
Linux
# Option 1: Interactive Installer (All distributions)
curl https://sdk.cloud.google.com | bash

# Restart shell
exec -l $SHELL

# Option 2: Package Manager (Debian/Ubuntu)
echo "deb [signed-by=/usr/share/keyrings/cloud.google.gpg] https://packages.cloud.google.com/apt cloud-sdk main" | sudo tee -a /etc/apt/sources.list.d/google-cloud-sdk.list
curl https://packages.cloud.google.com/apt/doc/apt-key.gpg | sudo apt-key --keyring /usr/share/keyrings/cloud.google.gpg add -
sudo apt-get update
sudo apt-get install google-cloud-cli

# Option 3: Package Manager (RHEL/CentOS/Fedora)
sudo tee -a /etc/yum.repos.d/google-cloud-sdk.repo << EOM
[google-cloud-cli]
name=Google Cloud CLI
baseurl=https://packages.cloud.google.com/yum/repos/cloud-sdk-el8-x86_64
enabled=1
gpgcheck=1
repo_gpgcheck=0
gpgkey=https://packages.cloud.google.com/yum/doc/rpm-package-key.gpg
EOM
sudo dnf install google-cloud-cli

# Verify installation
gcloud --version
Google Cloud SDK Configuration
# Initialize gcloud (interactive setup)
gcloud init

# This will:
# 1. Authenticate with your Google account
# 2. Select or create a project
# 3. Set default region/zone

# Login (opens browser)
gcloud auth login

# Login for application default credentials
gcloud auth application-default login

# List authenticated accounts
gcloud auth list

# Set active account
gcloud config set account your-email@gmail.com

# Project configuration
gcloud projects list
gcloud config set project my-project-id

# Set default region and zone
gcloud config set compute/region us-central1
gcloud config set compute/zone us-central1-a

# View current configuration
gcloud config list

# Create named configurations for multiple projects
gcloud config configurations create production
gcloud config configurations create development
gcloud config configurations activate production
gcloud config configurations list
Additional gcloud Components
# List available components
gcloud components list

# Install additional components
gcloud components install kubectl           # Kubernetes CLI
gcloud components install gke-gcloud-auth-plugin  # GKE auth
gcloud components install cloud-run-proxy   # Cloud Run local dev
gcloud components install beta              # Beta features
gcloud components install alpha             # Alpha features

# Update all components
gcloud components update
# Common gcloud commands
gcloud auth list                      # List authenticated accounts
gcloud projects list                  # List projects
gcloud compute instances list         # List VMs
gcloud storage ls                     # List Cloud Storage buckets
gcloud functions list                 # List Cloud Functions
gcloud run services list              # List Cloud Run services

# Get help
gcloud help
gcloud compute instances --help
gcloud compute instances create --help
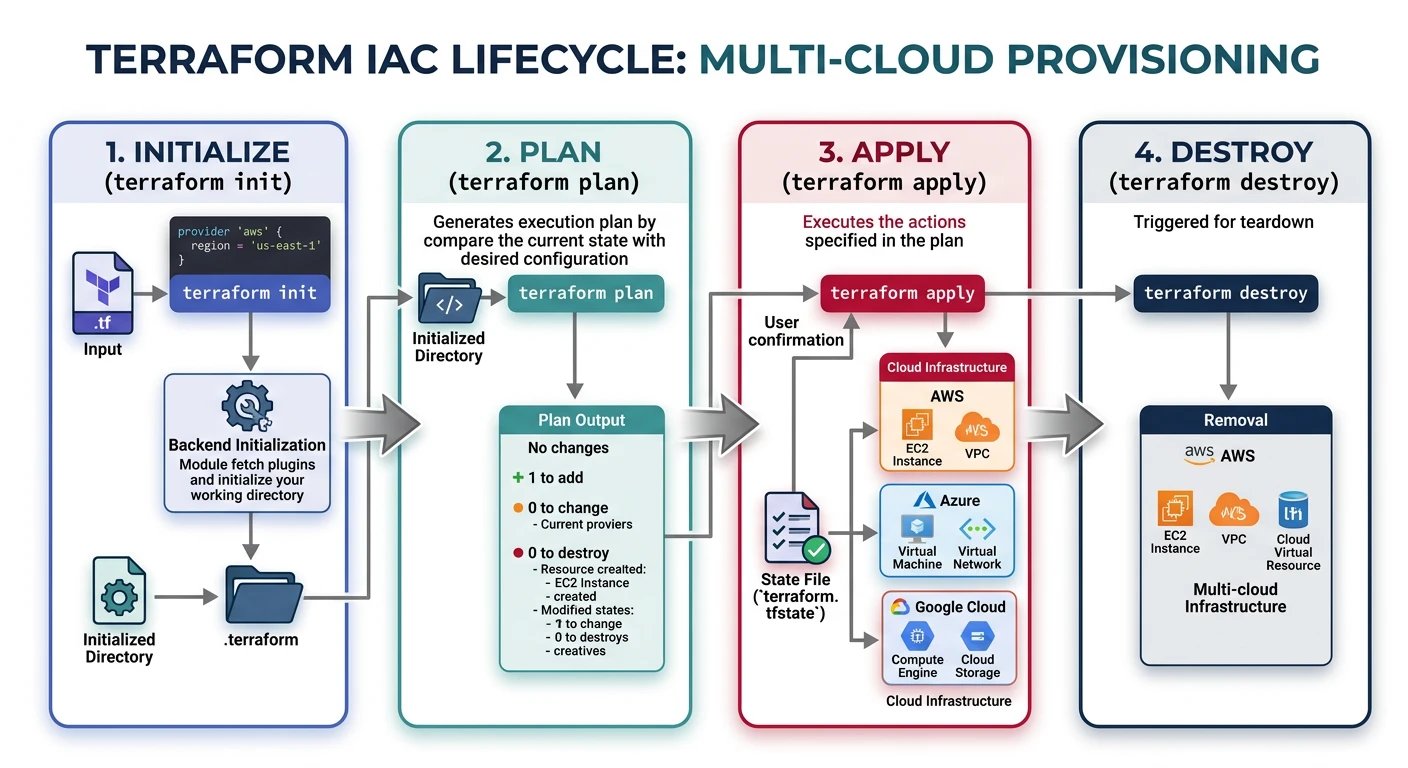
Terraform
Terraform is an Infrastructure as Code (IaC) tool that works with all major cloud providers. It uses HashiCorp Configuration Language (HCL) to define infrastructure.
Terraform Installation
Windows
# Option 1: Using winget
winget install HashiCorp.Terraform

# Option 2: Using Chocolatey
choco install terraform

# Option 3: Manual Installation
# Download from: https://www.terraform.io/downloads
# Extract to C:\terraform
# Add to PATH in System Environment Variables

# Verify installation
terraform --version
# Terraform v1.7.0
# on windows_amd64
macOS
# Using Homebrew (Recommended)
brew tap hashicorp/tap
brew install hashicorp/tap/terraform

# Verify installation
terraform --version
Linux
# Ubuntu/Debian
wget -O- https://apt.releases.hashicorp.com/gpg | sudo gpg --dearmor -o /usr/share/keyrings/hashicorp-archive-keyring.gpg
echo "deb [signed-by=/usr/share/keyrings/hashicorp-archive-keyring.gpg] https://apt.releases.hashicorp.com $(lsb_release -cs) main" | sudo tee /etc/apt/sources.list.d/hashicorp.list
sudo apt update
sudo apt install terraform

# RHEL/CentOS/Fedora
sudo yum install -y yum-utils
sudo yum-config-manager --add-repo https://rpm.releases.hashicorp.com/RHEL/hashicorp.repo
sudo yum install terraform

# Verify installation
terraform --version
Terraform Configuration
# Enable tab completion (bash)
terraform -install-autocomplete

# Create a basic configuration file (main.tf)
cat > main.tf << 'EOF'
terraform {
  required_providers {
    aws = {
      source  = "hashicorp/aws"
      version = "~> 5.0"
    }
  }
}

provider "aws" {
  region = "us-east-1"
}

resource "aws_s3_bucket" "example" {
  bucket = "my-unique-bucket-name-12345"

  tags = {
    Name        = "My bucket"
    Environment = "Dev"
  }
}
EOF

# Initialize Terraform (downloads providers)
terraform init

# Validate configuration
terraform validate

# Preview changes
terraform plan

# Apply changes
terraform apply

# Destroy resources
terraform destroy
Multi-Provider Configuration
Terraform can manage resources across multiple cloud providers in a single configuration:
# Multi-provider Terraform configuration

terraform {
  required_providers {
    aws = {
      source  = "hashicorp/aws"
      version = "~> 5.0"
    }
    azurerm = {
      source  = "hashicorp/azurerm"
      version = "~> 3.0"
    }
    google = {
      source  = "hashicorp/google"
      version = "~> 5.0"
    }
  }
}

# AWS Provider
provider "aws" {
  region  = "us-east-1"
  profile = "production"
}

# Azure Provider
provider "azurerm" {
  features {}
  subscription_id = "xxxxxxxx-xxxx-xxxx-xxxx-xxxxxxxxxxxx"
}

# GCP Provider
provider "google" {
  project = "my-project-id"
  region  = "us-central1"
}

# Now you can create resources in any provider
resource "aws_s3_bucket" "aws_bucket" {
  bucket = "my-aws-bucket"
}

resource "azurerm_storage_account" "azure_storage" {
  name                     = "myazurestorage"
  resource_group_name      = "my-resource-group"
  location                 = "eastus"
  account_tier             = "Standard"
  account_replication_type = "LRS"
}

resource "google_storage_bucket" "gcp_bucket" {
  name     = "my-gcp-bucket"
  location = "US"
}
Kubernetes Tools (kubectl & Helm)
kubectl is the Kubernetes command-line tool for deploying and managing applications on Kubernetes clusters. Helm is a package manager for Kubernetes.
kubectl Installation
Windows
# Option 1: Using winget
winget install Kubernetes.kubectl

# Option 2: Using Chocolatey
choco install kubernetes-cli

# Option 3: Using curl
curl.exe -LO "https://dl.k8s.io/release/v1.29.0/bin/windows/amd64/kubectl.exe"
# Move to a directory in PATH

# Option 4: Via Docker Desktop (includes kubectl)
# Enable Kubernetes in Docker Desktop settings

# Verify installation
kubectl version --client
macOS
# Option 1: Using Homebrew (Recommended)
brew install kubectl

# Option 2: Using curl
curl -LO "https://dl.k8s.io/release/$(curl -L -s https://dl.k8s.io/release/stable.txt)/bin/darwin/arm64/kubectl"
chmod +x ./kubectl
sudo mv ./kubectl /usr/local/bin/kubectl

# Verify installation
kubectl version --client
Linux
# Option 1: Using curl
curl -LO "https://dl.k8s.io/release/$(curl -L -s https://dl.k8s.io/release/stable.txt)/bin/linux/amd64/kubectl"
chmod +x kubectl
sudo mv kubectl /usr/local/bin/

# Option 2: Using snap
sudo snap install kubectl --classic

# Option 3: Using apt (Debian/Ubuntu)
sudo apt-get update
sudo apt-get install -y apt-transport-https ca-certificates curl
curl -fsSL https://pkgs.k8s.io/core:/stable:/v1.29/deb/Release.key | sudo gpg --dearmor -o /etc/apt/keyrings/kubernetes-apt-keyring.gpg
echo 'deb [signed-by=/etc/apt/keyrings/kubernetes-apt-keyring.gpg] https://pkgs.k8s.io/core:/stable:/v1.29/deb/ /' | sudo tee /etc/apt/sources.list.d/kubernetes.list
sudo apt-get update
sudo apt-get install -y kubectl

# Verify installation
kubectl version --client
kubectl Configuration
# Configure kubectl for AWS EKS
aws eks update-kubeconfig --region us-east-1 --name my-cluster

# Configure kubectl for Azure AKS
az aks get-credentials --resource-group myResourceGroup --name myAKSCluster

# Configure kubectl for GCP GKE
gcloud container clusters get-credentials my-cluster --zone us-central1-a

# View current context
kubectl config current-context

# List all contexts
kubectl config get-contexts

# Switch context
kubectl config use-context my-cluster-context

# View cluster info
kubectl cluster-info

# Enable bash/zsh completion
# Bash
echo 'source <(kubectl completion bash)' >> ~/.bashrc
# Zsh
echo 'source <(kubectl completion zsh)' >> ~/.zshrc
Helm Installation
# Windows
winget install Helm.Helm
# Or using Chocolatey
choco install kubernetes-helm

# macOS
brew install helm

# Linux (script)
curl https://raw.githubusercontent.com/helm/helm/main/scripts/get-helm-3 | bash

# Linux (snap)
sudo snap install helm --classic

# Verify installation
helm version
# version.BuildInfo{Version:"v3.14.0", ...}
Helm Configuration
# Add popular Helm repositories
helm repo add bitnami https://charts.bitnami.com/bitnami
helm repo add stable https://charts.helm.sh/stable
helm repo add prometheus-community https://prometheus-community.github.io/helm-charts

# Update repositories
helm repo update

# Search for charts
helm search repo nginx
helm search hub wordpress

# Install a chart
helm install my-nginx bitnami/nginx

# List installed releases
helm list

# Uninstall a release
helm uninstall my-nginx
# Common kubectl commands
kubectl get nodes                     # List nodes
kubectl get pods                      # List pods
kubectl get services                  # List services
kubectl get deployments               # List deployments
kubectl describe pod <name>           # Describe a pod
kubectl logs <pod-name>               # View pod logs
kubectl exec -it <pod> -- /bin/bash   # Shell into pod
kubectl apply -f manifest.yaml        # Apply configuration
kubectl delete -f manifest.yaml       # Delete resources
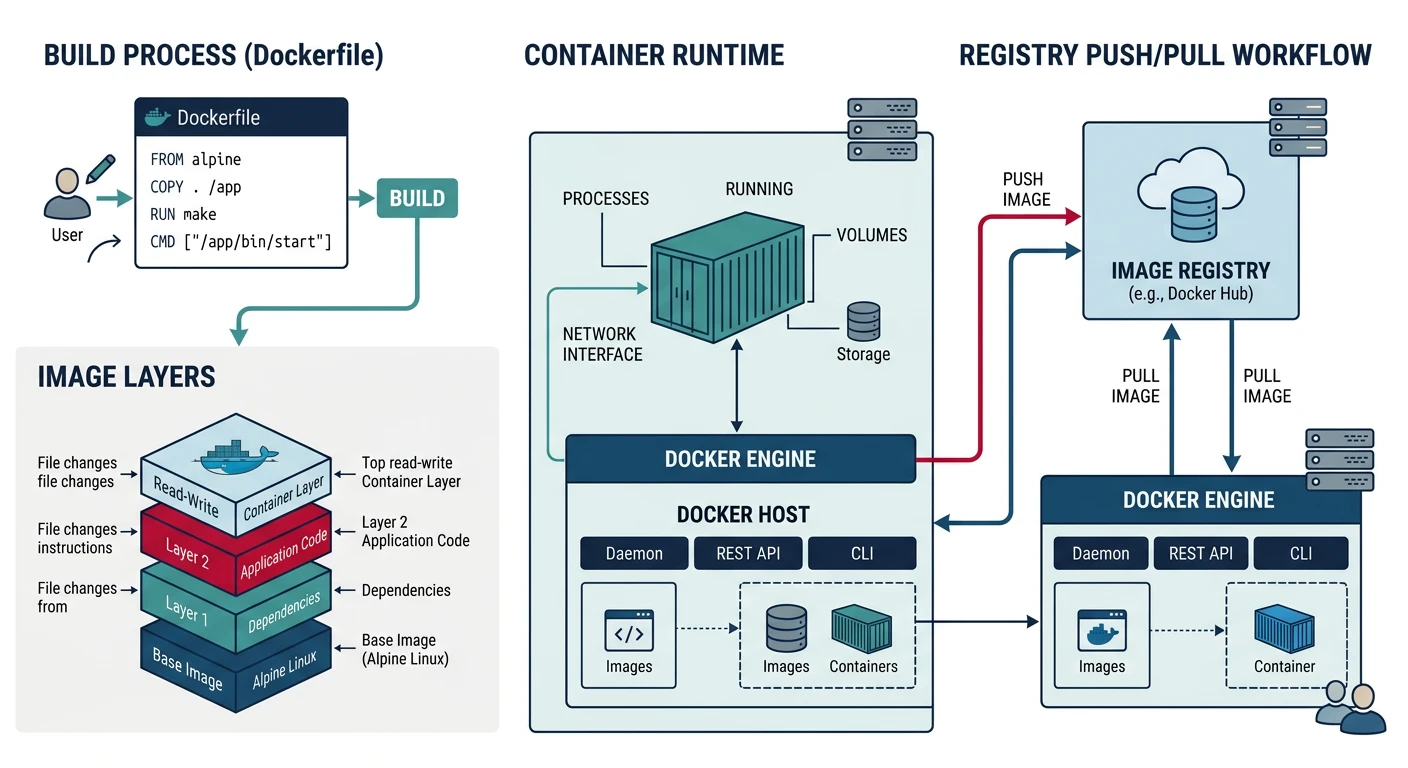
Docker
Docker is essential for containerizing applications. It's required for local development with many cloud services and Kubernetes.
Docker Installation
Windows
# Option 1: Docker Desktop (Recommended for Windows 10/11 Pro, Enterprise, Education)
# Download from: https://www.docker.com/products/docker-desktop/
# Requires WSL 2 backend

# Enable WSL 2 first (PowerShell as Admin)
wsl --install
# Restart computer

# Option 2: Using winget
winget install Docker.DockerDesktop

# After installation, start Docker Desktop
# Enable Kubernetes in Settings > Kubernetes if needed

# Verify installation
docker --version
# Docker version 24.0.7, build afdd53b

docker compose version
# Docker Compose version v2.23.3
macOS
# Option 1: Docker Desktop (Recommended)
# Download from: https://www.docker.com/products/docker-desktop/

# Option 2: Using Homebrew
brew install --cask docker

# Start Docker Desktop from Applications

# Verify installation
docker --version
docker compose version
Linux
# Ubuntu/Debian - Official Docker repository
# Remove old versions
sudo apt-get remove docker docker-engine docker.io containerd runc

# Install prerequisites
sudo apt-get update
sudo apt-get install ca-certificates curl gnupg

# Add Docker's official GPG key
sudo install -m 0755 -d /etc/apt/keyrings
curl -fsSL https://download.docker.com/linux/ubuntu/gpg | sudo gpg --dearmor -o /etc/apt/keyrings/docker.gpg
sudo chmod a+r /etc/apt/keyrings/docker.gpg

# Add repository
echo \
  "deb [arch=$(dpkg --print-architecture) signed-by=/etc/apt/keyrings/docker.gpg] https://download.docker.com/linux/ubuntu \
  $(. /etc/os-release && echo "$VERSION_CODENAME") stable" | \
  sudo tee /etc/apt/sources.list.d/docker.list > /dev/null

# Install Docker Engine
sudo apt-get update
sudo apt-get install docker-ce docker-ce-cli containerd.io docker-buildx-plugin docker-compose-plugin

# Add user to docker group (to run without sudo)
sudo usermod -aG docker $USER
newgrp docker

# Verify installation
docker run hello-world
Docker Configuration
# Configure Docker to start on boot (Linux)
sudo systemctl enable docker
sudo systemctl start docker

# Configure Docker daemon (create/edit daemon.json)
# Linux: /etc/docker/daemon.json
# macOS/Windows: Docker Desktop > Settings > Docker Engine
cat > /etc/docker/daemon.json << 'EOF'
{
  "log-driver": "json-file",
  "log-opts": {
    "max-size": "10m",
    "max-file": "3"
  },
  "default-address-pools": [
    {"base": "172.17.0.0/16", "size": 24}
  ]
}
EOF

# Restart Docker to apply changes
sudo systemctl restart docker

# Login to Docker Hub
docker login

# Login to cloud provider registries
# AWS ECR
aws ecr get-login-password --region us-east-1 | docker login --username AWS --password-stdin 123456789012.dkr.ecr.us-east-1.amazonaws.com

# Azure Container Registry
az acr login --name myregistry

# Google Container Registry
gcloud auth configure-docker
# Common Docker commands
docker ps                             # List running containers
docker ps -a                          # List all containers
docker images                         # List images
docker pull nginx                     # Pull image
docker run -d -p 80:80 nginx          # Run container
docker stop <container>               # Stop container
docker rm <container>                 # Remove container
docker rmi <image>                    # Remove image
docker build -t myapp .               # Build image
docker push myapp                     # Push to registry
docker logs <container>               # View logs
docker exec -it <container> bash      # Shell into container
Verification & Testing
After installing all tools, verify everything is working correctly:
# Create a verification script
cat > verify-cloud-tools.sh << 'EOF'
#!/bin/bash

echo "=== Cloud CLI Tools Verification ==="
echo ""

# AWS CLI
echo "AWS CLI:"
aws --version 2>/dev/null || echo "  NOT INSTALLED"
echo ""

# SAM CLI
echo "AWS SAM CLI:"
sam --version 2>/dev/null || echo "  NOT INSTALLED"
echo ""

# Azure CLI
echo "Azure CLI:"
az --version 2>/dev/null | head -1 || echo "  NOT INSTALLED"
echo ""

# Azure Functions Core Tools
echo "Azure Functions Core Tools:"
func --version 2>/dev/null || echo "  NOT INSTALLED"
echo ""

# Google Cloud SDK
echo "Google Cloud SDK:"
gcloud --version 2>/dev/null | head -1 || echo "  NOT INSTALLED"
echo ""

# Terraform
echo "Terraform:"
terraform --version 2>/dev/null | head -1 || echo "  NOT INSTALLED"
echo ""

# kubectl
echo "kubectl:"
kubectl version --client 2>/dev/null | head -1 || echo "  NOT INSTALLED"
echo ""

# Helm
echo "Helm:"
helm version --short 2>/dev/null || echo "  NOT INSTALLED"
echo ""

# Docker
echo "Docker:"
docker --version 2>/dev/null || echo "  NOT INSTALLED"
echo ""

echo "=== Verification Complete ==="
EOF

chmod +x verify-cloud-tools.sh
./verify-cloud-tools.sh
PowerShell Verification Script (Windows)
# verify-cloud-tools.ps1
Write-Host "=== Cloud CLI Tools Verification ===" -ForegroundColor Cyan
Write-Host ""

$tools = @(
    @{Name="AWS CLI"; Command="aws --version"},
    @{Name="AWS SAM CLI"; Command="sam --version"},
    @{Name="Azure CLI"; Command="az --version"},
    @{Name="Azure Functions"; Command="func --version"},
    @{Name="Google Cloud SDK"; Command="gcloud --version"},
    @{Name="Terraform"; Command="terraform --version"},
    @{Name="kubectl"; Command="kubectl version --client"},
    @{Name="Helm"; Command="helm version --short"},
    @{Name="Docker"; Command="docker --version"}
)

foreach ($tool in $tools) {
    Write-Host "$($tool.Name): " -NoNewline
    try {
        $result = Invoke-Expression $tool.Command 2>&1 | Select-Object -First 1
        Write-Host $result -ForegroundColor Green
    } catch {
        Write-Host "NOT INSTALLED" -ForegroundColor Red
    }
}

Write-Host ""
Write-Host "=== Verification Complete ===" -ForegroundColor Cyan
Test Cloud Provider Authentication
# Test AWS authentication
aws sts get-caller-identity
# Should return your AWS account ID and ARN

# Test Azure authentication
az account show
# Should show your subscription details

# Test GCP authentication
gcloud auth list
gcloud config list project
# Should show your authenticated account and project
Conclusion & Next Steps
You've now installed and configured all essential cloud CLI tools. Here's a summary of what you've set up:
| Tool | Purpose | Key Commands |
|---|---|---|
| AWS CLI | AWS resource management | aws configure, aws s3 ls |
| SAM CLI | AWS serverless development | sam init, sam deploy |
| Azure CLI | Azure resource management | az login, az vm list |
| gcloud | GCP resource management | gcloud init, gcloud compute |
| Terraform | Infrastructure as Code | terraform init, terraform apply |
| kubectl | Kubernetes management | kubectl get pods, kubectl apply |
| Helm | Kubernetes package manager | helm install, helm upgrade |
| Docker | Container management | docker build, docker run |
Now that your environment is set up, explore our other cloud computing guides:
aws --version, az upgrade, gcloud components update, terraform -upgrade