Game Development
Introduction to Game Development
Industry overview, roles, game design pipelineChoosing a Game Engine
Unity, Unreal, Godot, engine comparison, tradeoffsProgramming Basics for Games
Game loops, input handling, state machines, OOP2D Game Development
Sprites, tilemaps, platformers, 2D physics, animation3D Game Development
Meshes, materials, lighting, cameras, 3D mathPhysics & Collision Systems
Rigidbodies, colliders, raycasting, physics enginesAudio & Sound Design
Sound effects, music, spatial audio, audio middlewarePublishing Your Game
Store submission, marketing, monetization, launch strategyGame Design Fundamentals
Mechanics, dynamics, aesthetics, level design, balancingAI in Games
Pathfinding, behavior trees, state machines, NPC intelligenceMultiplayer & Networking
Client-server, peer-to-peer, netcode, synchronizationProfessional Game Dev Workflow
Version control, CI/CD, QA testing, agile for gamesBuilding a Portfolio
Showcasing projects, demo reels, job applications, indie devSprites & Sprite Sheets
A sprite is a 2D image used in games. Every character, enemy, item, and background element you see in 2D games is a sprite. Sprite sheets combine multiple sprites into a single image file for efficiency.
Sprite Fundamentals
Single Sprites vs Sprite Sheet:

Single Files (Slow):              Sprite Sheet (Fast):
┌────┐ ┌────┐ ┌────┐             ┌──────────────────────┐
│ 01 │ │ 02 │ │ 03 │    ──►     │ 01 │ 02 │ 03 │ 04 │
└────┘ └────┘ └────┘             ├────┼────┼────┼────┤
┌────┐ ┌────┐ ┌────┐             │ 05 │ 06 │ 07 │ 08 │
│ 04 │ │ 05 │ │ 06 │             └──────────────────────┘
└────┘ └────┘ └────┘              ONE file, 8 frames!
6 separate files!
Why Use Sprite Sheets?
| Benefit | Explanation |
|---|---|
| Fewer Draw Calls | GPU can render many sprites from one texture without switching |
| Less Memory | One texture atlas uses less VRAM than many small textures |
| Faster Loading | Loading 1 file is faster than loading 100 files |
| Better Organization | Related sprites stay together (all player frames in one sheet) |
// Unity: Loading a Sprite Sheet
// 1. Import your sprite sheet image
// 2. In Inspector: Set "Sprite Mode" to "Multiple"
// 3. Click "Sprite Editor" to slice the sheet
// 4. Access individual sprites:

public class SpriteSheetExample : MonoBehaviour
{
    public Sprite[] walkFrames;  // Assign in Inspector after slicing
    private SpriteRenderer spriteRenderer;
    private int currentFrame = 0;

    void Start()
    {
        spriteRenderer = GetComponent<SpriteRenderer>();
    }

    void UpdateFrame()
    {
        currentFrame = (currentFrame + 1) % walkFrames.Length;
        spriteRenderer.sprite = walkFrames[currentFrame];
    }
}
Pixel Art Tips
- Power of 2: Use dimensions like 16x16, 32x32, 64x64 for best GPU performance
- Consistent Scale: Keep all sprites at the same "pixels per unit" ratio
- Point Filtering: Disable texture smoothing to keep pixels crisp
- Pivot Points: Set sprite origins consistently (usually bottom-center for characters)
2D Animation
2D animation in games comes in two main flavors: frame-by-frame (traditional sprite animation) and skeletal (bones and rigging).
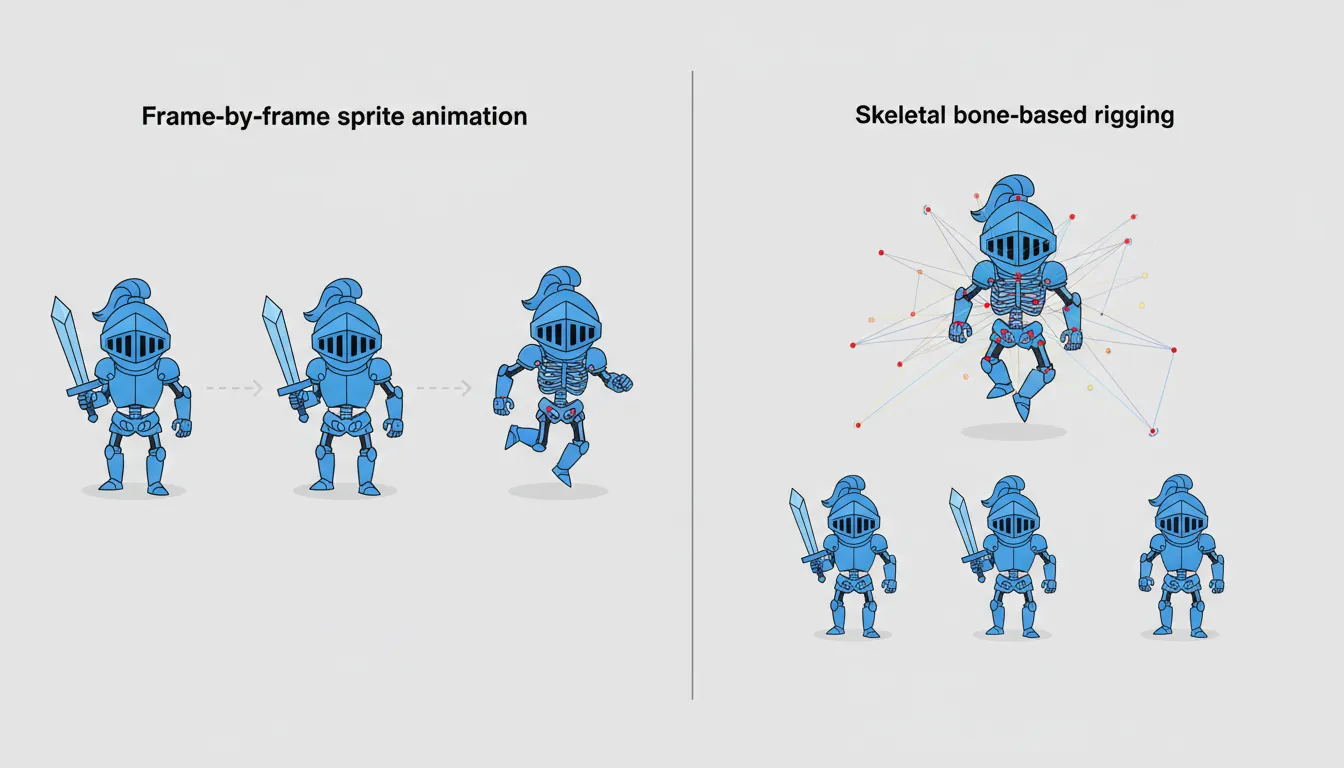
Frame-by-Frame Animation
Each frame is a separate image. Simple to understand, used in most pixel art games.
Walk Cycle (8 frames):
  Frame 1    Frame 2    Frame 3    Frame 4
   ┌─┐        ┌─┐        ┌─┐        ┌─┐
   │○│        │○│        │○│        │○│
  ─┼─┼─      ─┼─┼─      ─┴┬┴─      ─┼─┼─
   │ │        │ │       / │ \       │ │
   │ │       /   \      │   │      \   /
  ─┴─┴─     ─┘   └─    ─┘   └─     ─┘   └─

  Idle       Step L     Step R     Step L...
// Unity: Simple Frame Animation
public class FrameAnimator : MonoBehaviour
{
public Sprite[] frames;
public float frameRate = 12f; // Frames per second
private SpriteRenderer sr;
private float timer;
private int currentFrame;
void Start() => sr = GetComponent<SpriteRenderer>();
void Update()
{
timer += Time.deltaTime;
if (timer >= 1f / frameRate)
{
timer -= 1f / frameRate;
currentFrame = (currentFrame + 1) % frames.Length;
sr.sprite = frames[currentFrame];
}
}
}
// Using Unity's Animator (Preferred Method):
// 1. Create Animation Clips from sprite sequences
// 2. Create Animator Controller
// 3. Set up transitions between animations
// 4. Control via script:
public class PlayerAnimator : MonoBehaviour
{
private Animator animator;
void Start() => animator = GetComponent<Animator>();
void Update()
{
float speed = Mathf.Abs(Input.GetAxis("Horizontal"));
animator.SetFloat("Speed", speed);
if (Input.GetButtonDown("Jump"))
animator.SetTrigger("Jump");
}
}Skeletal Animation (2D Bones)
Skeletal animation uses a hierarchy of bones to deform sprites. More efficient for complex characters, allows blending and procedural movement.
| Aspect | Frame-by-Frame | Skeletal |
|---|---|---|
| Art Style | Pixel art, hand-drawn | Smooth, vector-like |
| Memory Usage | Higher (many frames) | Lower (few textures + bones) |
| Flexibility | Each frame is fixed | Blend, modify at runtime |
| Tools | Aseprite, Photoshop | Spine, DragonBones, Unity 2D Animation |
| Best For | Retro games, low frame count | Complex characters, smooth motion |
Tilemaps
A tilemap is a grid-based system for building game worlds from reusable pieces. Instead of creating one massive background image, you create small tiles and arrange them like puzzle pieces.
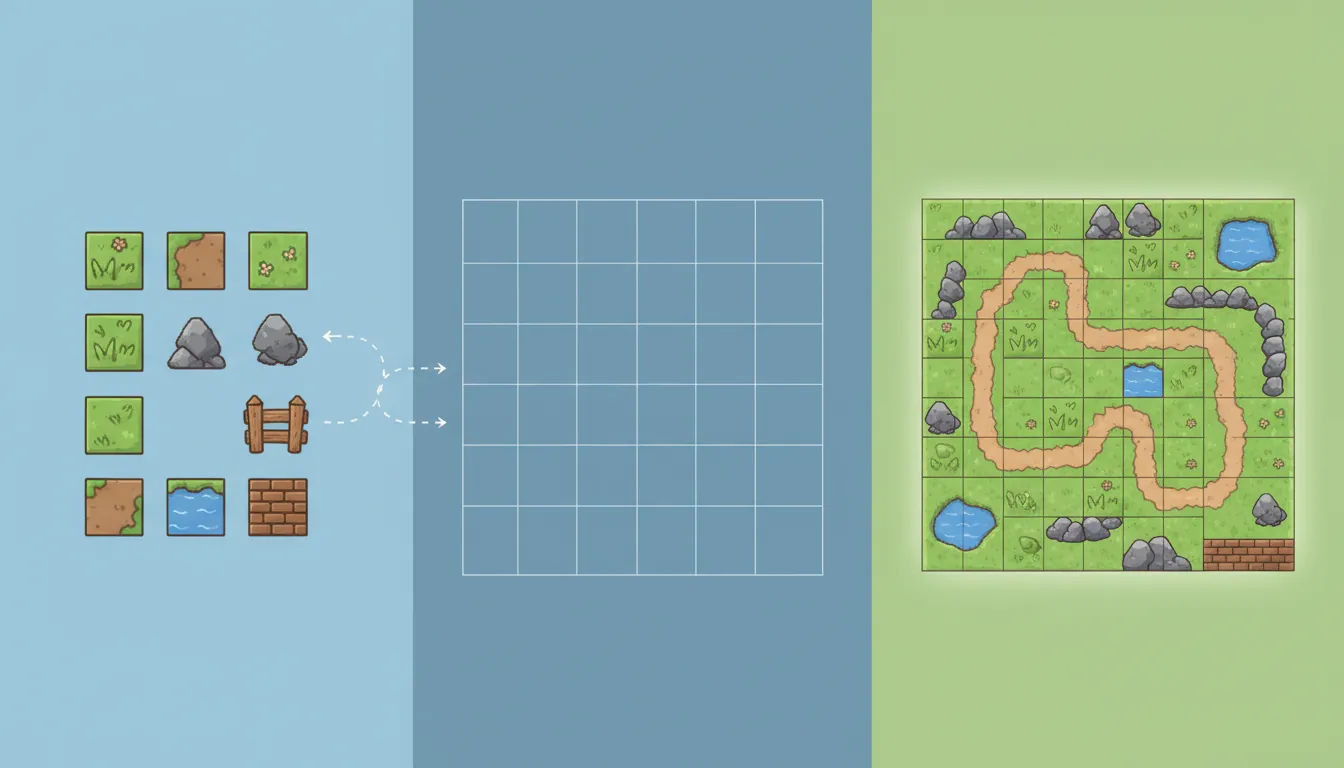
How Tilemaps Work
Tileset (Your "Palette"):
┌────┬────┬────┬────┐
│ 🟫 │ 🟩 │ 💧 │ 🌲 │
│Dirt│Grass│Water│Tree│
├────┼────┼────┼────┤
│ 🧱 │ 🪨 │ 🚪 │ 🪙 │
│Brick│Rock│Door│Coin│
└────┴────┴────┴────┘

Tilemap (Your Level):
┌────┬────┬────┬────┬────┬────┬────┬────┐
│ 🌲 │ 🌲 │ 🟩 │ 🟩 │ 💧 │ 💧 │ 🌲 │ 🌲 │
├────┼────┼────┼────┼────┼────┼────┼────┤
│ 🟩 │ 🟩 │ 🪙 │ 🟩 │ 💧 │ 🟩 │ 🟩 │ 🌲 │
├────┼────┼────┼────┼────┼────┼────┼────┤
│ 🟫 │ 🟫 │ 🧱 │ 🧱 │ 🚪 │ 🧱 │ 🧱 │ 🟫 │
└────┴────┴────┴────┴────┴────┴────┴────┘
Benefits of Tilemaps
- Memory Efficient: A 100x100 level uses the same 32 tiles as a 10x10 level
- Fast Level Design: Paint levels visually instead of hand-placing objects
- Easy Collision: Each tile can have collision data (solid, platform, hazard)
- Procedural Generation: Generate random levels by placing tiles algorithmically
// Unity: Using Tilemaps
// 1. Create a Tilemap: GameObject > 2D Object > Tilemap > Rectangular
// 2. Create a Tile Palette: Window > 2D > Tile Palette
// 3. Paint tiles in Scene view

// Scripted Tilemap Access:
using UnityEngine.Tilemaps;

public class TilemapExample : MonoBehaviour
{
    public Tilemap tilemap;
    public TileBase groundTile;

    void Start()
    {
        // Set a tile at position (3, 2)
        Vector3Int position = new Vector3Int(3, 2, 0);
        tilemap.SetTile(position, groundTile);

        // Get the tile at player position
        Vector3Int playerCell = tilemap.WorldToCell(player.position);
        TileBase tileAtPlayer = tilemap.GetTile(playerCell);
    }

    // Check if a world position has a solid tile
    public bool IsSolidAt(Vector3 worldPos)
    {
        Vector3Int cell = tilemap.WorldToCell(worldPos);
        return tilemap.GetTile(cell) != null;
    }
}
Auto-Tiling (Rule Tiles)
Rule tiles automatically select the right tile based on neighbors. Paint a blob, and the system figures out which corner, edge, and center pieces to use.
Without Auto-Tiling (Manual):    With Auto-Tiling (Automatic):
"I need corner piece here..."    "Just paint, it figures it out!"

┌─┬─┬─┐    ┌─┬─┬─┐               ┌─┬─┬─┐
│1│2│3│    │○│─│○│               Paint:     Result:
├─┼─┼─┤    ├─┼─┼─┤               ┌───────┐   ┌─────┐
│4│5│6│ →  ││ │ ││               │███████│ → │╔═══╗│
├─┼─┼─┤    ├─┼─┼─┤               │███████│   │║   ║│
│7│8│9│    │○│─│○│               └───────┘   │╚═══╝│
└─┴─┴─┘    └─┴─┴─┘                           └─────┘
Parallax Scrolling
Parallax scrolling creates depth in 2D games by moving background layers at different speeds. Objects further away move slower than objects nearby, mimicking real-world perspective.
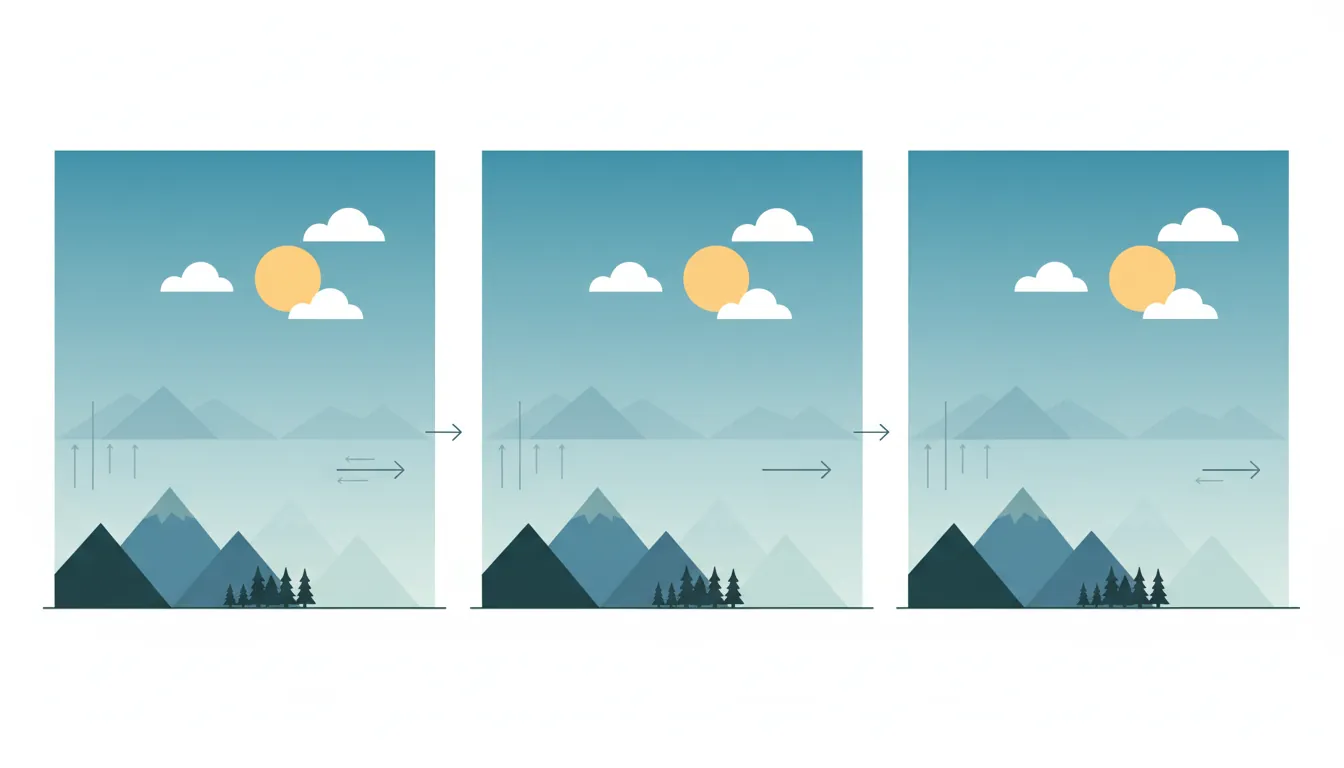
Parallax Effect:
                     Camera Movement ──────►

Layer 3 (Far):    ☁️     ☁️     ☁️        (Moves slowest)
                  ───────────────────────

Layer 2 (Mid):    🌲  🌲  🌲  🌲  🌲      (Moves medium)
                  ───────────────────────

Layer 1 (Near):   🌳🌳🌳🌳🌳🌳🌳🌳          (Moves fastest)
                  ───────────────────────

Ground:           Player on ground          (Moves with camera)
// Unity: Simple Parallax Script
public class ParallaxLayer : MonoBehaviour
{
public Transform cameraTransform;
public float parallaxFactor = 0.5f; // 0 = static, 1 = moves with camera
private Vector3 lastCameraPosition;
void Start()
{
lastCameraPosition = cameraTransform.position;
}
void LateUpdate()
{
Vector3 deltaMovement = cameraTransform.position - lastCameraPosition;
transform.position += new Vector3(
deltaMovement.x * parallaxFactor,
deltaMovement.y * parallaxFactor,
0
);
lastCameraPosition = cameraTransform.position;
}
}
// Usage: Attach to each background layer
// Far clouds: parallaxFactor = 0.1 (barely moves)
// Mid mountains: parallaxFactor = 0.3
// Near trees: parallaxFactor = 0.7 (almost moves with player)Infinite Scrolling Backgrounds
// Seamlessly looping parallax background
public class InfiniteParallax : MonoBehaviour
{
    public float textureWidth = 20f;  // Width of your background sprite

    void Update()
    {
        // When we've scrolled past the texture width, reset position
        if (transform.position.x <= -textureWidth)
        {
            transform.position += new Vector3(textureWidth * 2, 0, 0);
        }
        else if (transform.position.x >= textureWidth)
        {
            transform.position -= new Vector3(textureWidth * 2, 0, 0);
        }
    }
}
2D Collision Detection
Collision detection determines when game objects touch or overlap. In 2D, we typically use simple shapes for fast, efficient checks.
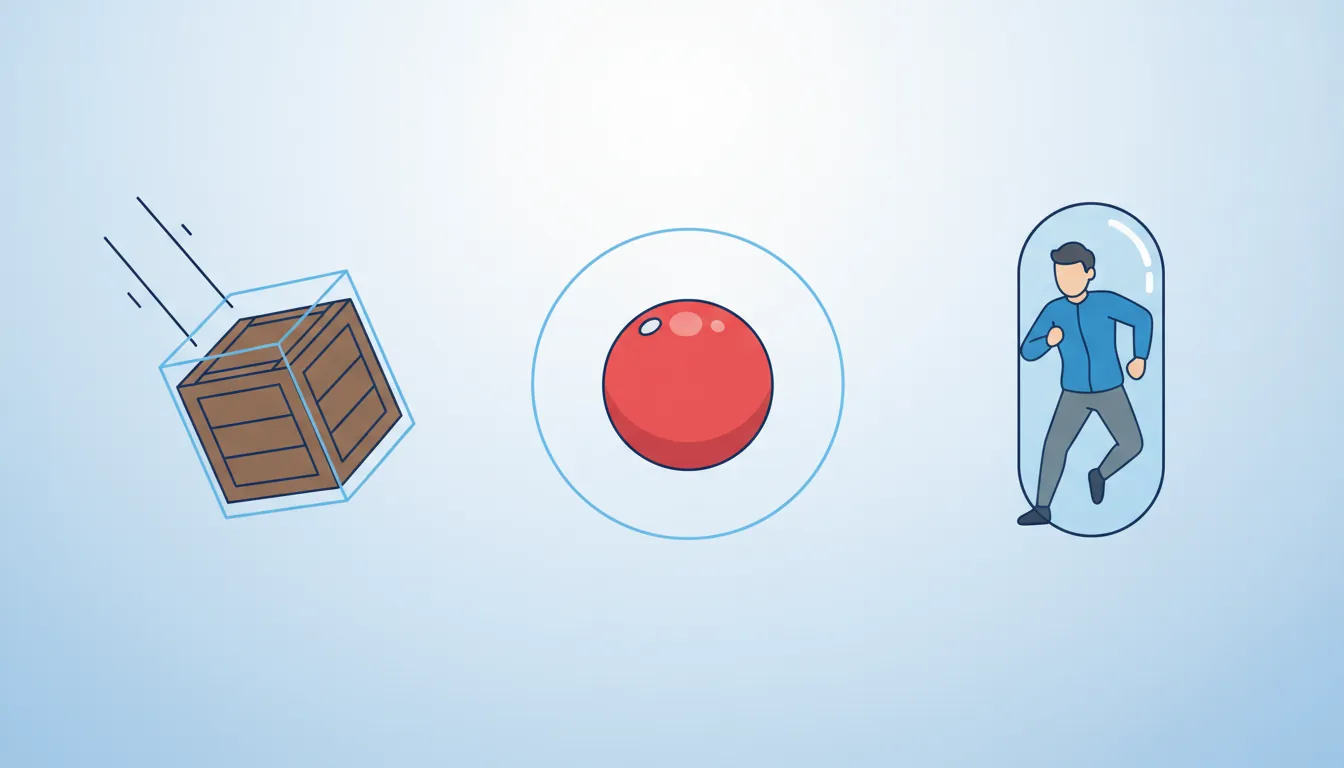
Collision Shapes
Common 2D Collision Shapes:

Box (AABB):        Circle:           Capsule:
┌─────────┐         ╭───╮           ╭─────╮
│         │        ╱     ╲          │     │
│  FAST!  │       │   ●   │         │     │
│         │        ╲     ╱          │     │
└─────────┘         ╰───╯           ╰─────╯
Most common       Balls, coins     Characters

Polygon:           Composite:
   ╱╲              ┌───┐
  ╱  ╲             │   │───╮
 ╱    ╲            │   │   │
╱──────╲           └───┴───┘
Complex shapes     Multiple boxes
Collision Detection Methods
// AABB (Axis-Aligned Bounding Box) - Fastest for rectangles
public static bool AABBCollision(Rect a, Rect b)
{
    return a.xMin < b.xMax &&
           a.xMax > b.xMin &&
           a.yMin < b.yMax &&
           a.yMax > b.yMin;
}

// Circle Collision - Fast for round objects
public static bool CircleCollision(Vector2 center1, float r1, Vector2 center2, float r2)
{
    float distanceSquared = (center2 - center1).sqrMagnitude;
    float radiusSum = r1 + r2;
    return distanceSquared <= radiusSum * radiusSum;
}

// Unity: Using Built-in 2D Physics
public class CollisionExample : MonoBehaviour
{
    // Requires Rigidbody2D and Collider2D on this object

    void OnCollisionEnter2D(Collision2D collision)
    {
        // Physical collision (objects bounce/stop)
        if (collision.gameObject.CompareTag("Enemy"))
            TakeDamage();
    }

    void OnTriggerEnter2D(Collider2D other)
    {
        // Trigger collision (objects pass through)
        if (other.CompareTag("Coin"))
        {
            CollectCoin();
            Destroy(other.gameObject);
        }
    }
}
Collision Layers
Use layers to control which objects can collide with each other:
Collision Matrix Example:
           Player  Enemy  Bullet  Pickup  Ground
Player       ✗      ✓       ✗       ✓       ✓
Enemy        ✓      ✗       ✓       ✗       ✓
Bullet       ✗      ✓       ✗       ✗       ✓
Pickup       ✓      ✗       ✗       ✗       ✗
Ground       ✓      ✓       ✓       ✗       ✗

✓ = Collides   ✗ = Ignores
Exercise: Build a Platformer Level
Goal: Create a simple platformer scene using 2D techniques.
- Import or create a tileset (ground, platforms, decorations)
- Build a small level using a Tilemap
- Add 3 parallax background layers (clouds, mountains, trees)
- Create a character with idle and walk animations (4+ frames each)
- Implement basic left/right movement and jumping
- Add collectible coins with trigger collision
Bonus Challenges:
- Add coyote time and jump buffering
- Implement one-way platforms (can jump through from below)
- Add moving platforms