Game Development
Introduction to Game Development
Industry overview, roles, game design pipelineChoosing a Game Engine
Unity, Unreal, Godot, engine comparison, tradeoffsProgramming Basics for Games
Game loops, input handling, state machines, OOP2D Game Development
Sprites, tilemaps, platformers, 2D physics, animation3D Game Development
Meshes, materials, lighting, cameras, 3D mathPhysics & Collision Systems
Rigidbodies, colliders, raycasting, physics enginesAudio & Sound Design
Sound effects, music, spatial audio, audio middlewarePublishing Your Game
Store submission, marketing, monetization, launch strategyGame Design Fundamentals
Mechanics, dynamics, aesthetics, level design, balancingAI in Games
Pathfinding, behavior trees, state machines, NPC intelligenceMultiplayer & Networking
Client-server, peer-to-peer, netcode, synchronizationProfessional Game Dev Workflow
Version control, CI/CD, QA testing, agile for gamesBuilding a Portfolio
Showcasing projects, demo reels, job applications, indie dev3D Coordinates & Transforms
Moving from 2D to 3D adds a third dimension: depth (Z-axis). Every object now has position, rotation, and scale in three dimensions, making spatial reasoning more complex but enabling immersive worlds.
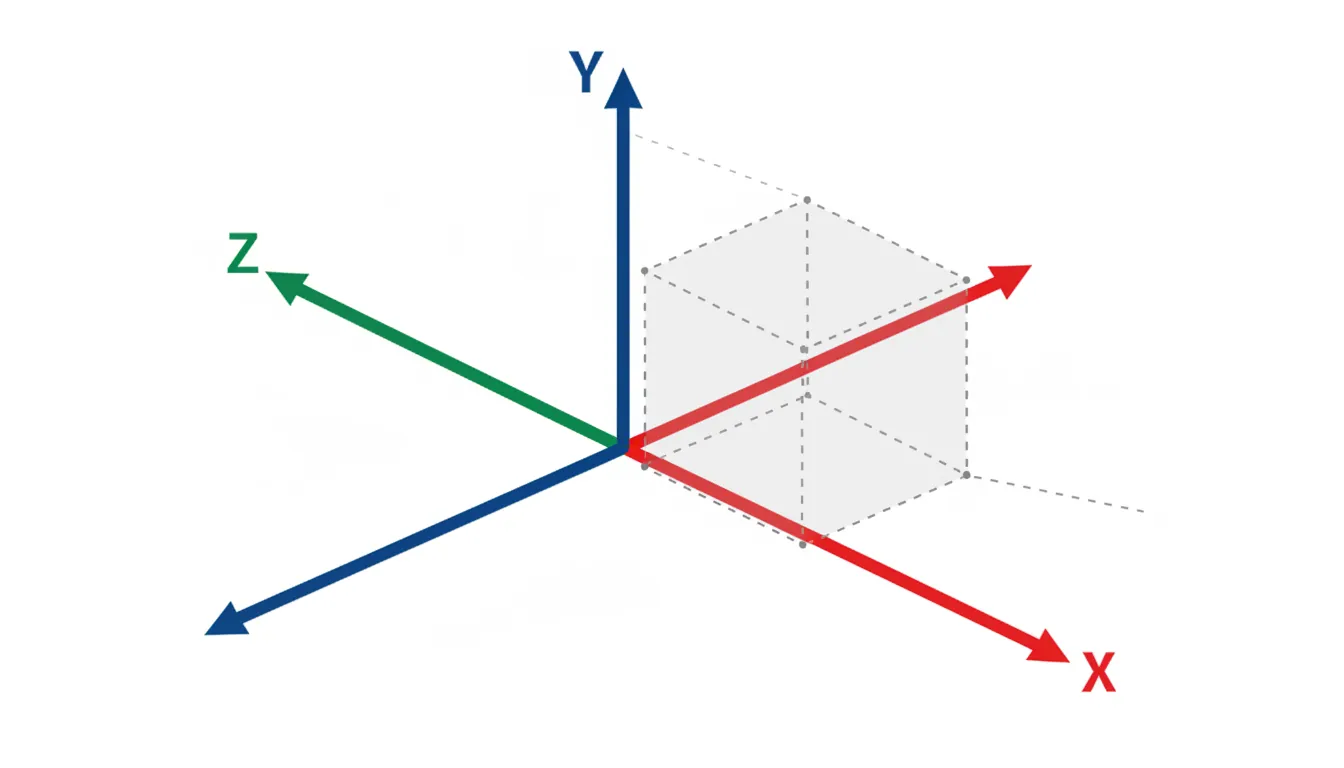
The 3D Coordinate System
3D Coordinate System (Left-Handed - Unity):
                  Y (Up)
                  │
                  │    Z (Forward)
                  │   ╱
                  │  ╱
                  │ ╱
                  │╱
    ─────────────●───────────── X (Right)
                ╱│
               ╱ │
              ╱  │
             ╱   │
(Behind)    ╱    │

Position: Where is it? (X, Y, Z)
Rotation: Which way is it facing? (Pitch, Yaw, Roll)
Scale: How big is it? (X, Y, Z)Transforms: Position, Rotation, Scale
// Unity Transform Examples
public class TransformBasics : MonoBehaviour
{
    void Start()
    {
        // Position: World coordinates
        transform.position = new Vector3(5, 0, 10);  // X=5, Y=0, Z=10

        // Local position: Relative to parent
        transform.localPosition = Vector3.zero;  // At parent's origin

        // Rotation: Euler angles (degrees) or Quaternion
        transform.rotation = Quaternion.Euler(0, 45, 0);  // Rotated 45° on Y
        transform.Rotate(0, 90, 0);  // Add 90° rotation

        // Scale: Size multiplier
        transform.localScale = new Vector3(2, 2, 2);  // Twice as big
    }

    void Update()
    {
        // Movement in world space
        transform.Translate(Vector3.forward * Time.deltaTime, Space.World);

        // Movement in local space (relative to object's facing)
        transform.Translate(Vector3.forward * Time.deltaTime, Space.Self);

        // Look at a target
        transform.LookAt(targetObject.transform);
    }
}
Vectors and Direction
// Common Vector Operations
Vector3 a = new Vector3(1, 2, 3);
Vector3 b = new Vector3(4, 5, 6);

// Distance between two points
float distance = Vector3.Distance(a, b);

// Direction from A to B (normalized)
Vector3 direction = (b - a).normalized;

// Dot product: How aligned are two directions? (-1 to 1)
float dot = Vector3.Dot(directionA, directionB);
// 1 = same direction, 0 = perpendicular, -1 = opposite

// Cross product: Perpendicular vector
Vector3 perpendicular = Vector3.Cross(forward, right);  // Returns up

// Lerp: Smooth interpolation
Vector3 midpoint = Vector3.Lerp(a, b, 0.5f);  // Halfway between
Meshes & Geometry
A mesh is the 3D shape of an object, made of vertices, edges, and faces. Every 3D model in games is a mesh.
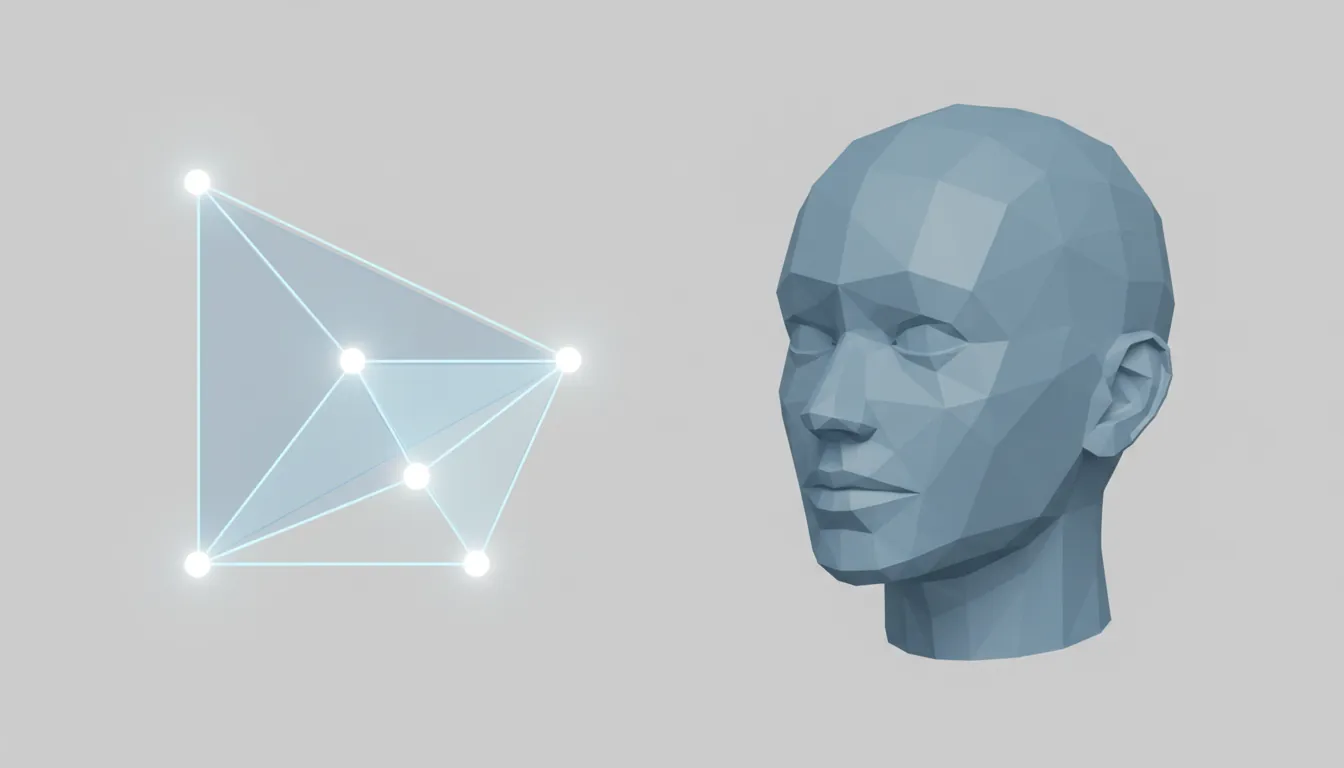
Mesh Anatomy
Mesh Components:
                Vertex
                  ●
                 ╱│╲
                ╱ │ ╲
               ╱  │  ╲
              ╱   │   ╲
             ●────│────●  ← Vertices (points in space)
              ╲   │   ╱
               ╲  │  ╱   Edge (line between vertices)
                ╲ │ ╱
                 ╲│╱
                  ●

    ┌─────────────────┐
    │                 │  ← Face (triangle or quad)
    │      FACE       │
    │   (Surface)     │
    └─────────────────┘

A cube has: 8 vertices, 12 edges, 6 faces (12 triangles)
Polygon Count and Performance
| Complexity | Triangle Count | Use Case |
|---|---|---|
| Low Poly | 50-500 tris | Mobile, stylized, background objects |
| Medium Poly | 1K-10K tris | Most game characters, props |
| High Poly | 10K-100K tris | Hero characters, close-up objects |
| Ultra High | 100K+ tris | Cinematics, Nanite (UE5), film |
Level of Detail (LOD)
LOD systems swap high-poly models for lower-poly versions as objects move further from the camera:
LOD System:
  Camera                                           Distance →
    👁️
    │
    │    LOD 0         LOD 1         LOD 2         LOD 3
    │   (Full)       (Medium)       (Low)        (Billboard)
    │   10K tris     5K tris        1K tris       Just a sprite
    │
    │    ◆◆◆◆        ◆◆◆           ◆◆            ◆
    │   ◆◆◆◆◆◆      ◆◆◆◆◆         ◆◆◆◆          ◆
    │    ◆◆◆◆        ◆◆◆           ◆◆            ◆
    │
    └────────────────────────────────────────────────►
         0m          20m           50m           100m
Materials & Textures
A material defines how a surface looks and interacts with light. A texture is an image applied to that surface. Together, they create visual detail.
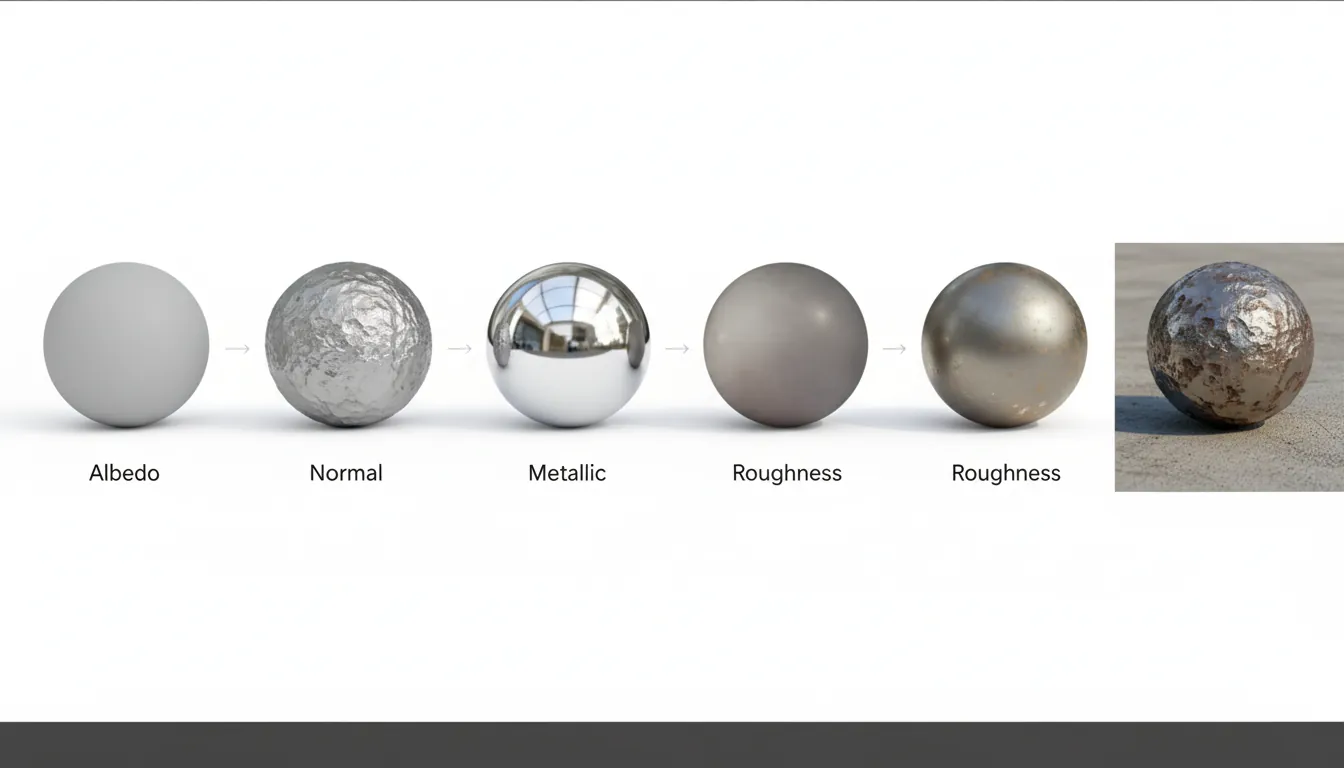
PBR (Physically Based Rendering)
Modern games use PBR materials that simulate real-world light behavior:
| Texture Map | Purpose | Example |
|---|---|---|
| Albedo (Diffuse) | Base color without lighting | The actual color of wood, skin, metal |
| Normal Map | Fake surface detail without geometry | Brick bumps, skin pores, scratches |
| Metallic | Is it metal? (0 = no, 1 = yes) | Armor plates, tools, jewelry |
| Roughness | How shiny? (0 = mirror, 1 = matte) | Polished metal vs. rough stone |
| Ambient Occlusion | Soft shadows in crevices | Dark corners, creases in cloth |
| Emission | Self-illuminating areas | Glowing buttons, neon signs, lava |
// Unity: Creating and Applying Materials
public class MaterialExample : MonoBehaviour
{
    public Texture2D albedoTexture;
    public Texture2D normalMap;

    void Start()
    {
        // Create a new material at runtime
        Material mat = new Material(Shader.Find("Standard"));

        // Set textures
        mat.SetTexture("_MainTex", albedoTexture);
        mat.SetTexture("_BumpMap", normalMap);

        // Set PBR properties
        mat.SetFloat("_Metallic", 0.0f);    // Not metal
        mat.SetFloat("_Glossiness", 0.5f);  // Semi-shiny

        // Apply to this object
        GetComponent<Renderer>().material = mat;
    }
}
Lighting Systems
Lighting is arguably the most important visual element in 3D games. It sets mood, guides players, and makes graphics look realistic or stylized.
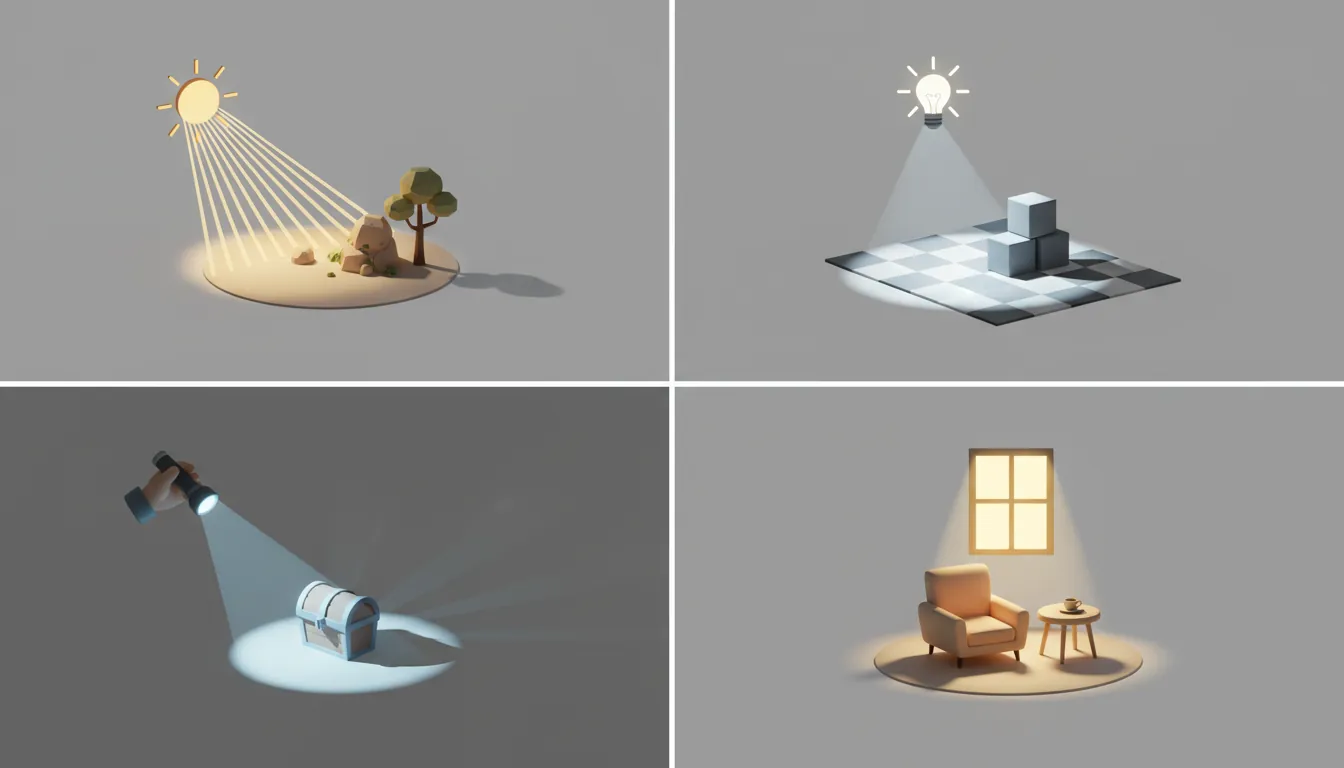
Types of Lights
Light Types:

Directional Light (Sun):        Point Light (Bulb):
     ↓ ↓ ↓ ↓ ↓                        ╱│╲
     ↓ ↓ ↓ ↓ ↓                       ╱ │ ╲
     ↓ ↓ ↓ ↓ ↓                      ╱──●──╲  ← Light source
     ↓ ↓ ↓ ↓ ↓                      ╲  │  ╱
  ───────────────                   ╲ │ ╱
  Parallel rays,                     ╲│╱
  no falloff                       Omnidirectional

Spot Light (Flashlight):        Area Light (Window):
         ╲ │ ╱                   ┌─────────┐
          ╲│╱                    │░░░░░░░░░│
           ●  ← Source           │░░░░░░░░░│
          ╱│╲                    │░░░░░░░░░│
         ╱ │ ╲                   └────│────┘
        ╱  │  ╲                       │
       ▼   ▼   ▼                Soft shadows
     Cone-shaped
Real-Time vs Baked Lighting
| Type | Description | Use When |
|---|---|---|
| Real-Time | Calculated every frame | Moving lights, dynamic objects, interiors |
| Baked | Pre-calculated into lightmaps | Static scenes, sunlight, architectural viz |
| Mixed | Baked indirect + real-time direct | Best of both worlds, most games use this |
Global Illumination
Global Illumination (GI) simulates how light bounces between surfaces, creating realistic indirect lighting:
Without GI:                    With GI:
┌─────────────┐                ┌─────────────┐
│  ☀️ Light    │                │  ☀️ Light    │
│      ↓      │                │      ↓      │
│   ██████    │                │   ██████    │ ← Lit surface
│   ██████    │                │   ██████    │
│             │                │      ↓      │ ← Light bounces!
│   ▓▓▓▓▓▓    │ ← Dark!        │   ░░░░░░    │ ← Softly lit
│   ▓▓▓▓▓▓    │                │   ░░░░░░    │
└─────────────┘                └─────────────┘
Cameras & Viewports
The camera is the player's window into the 3D world. Camera work can make or break a game's feel.
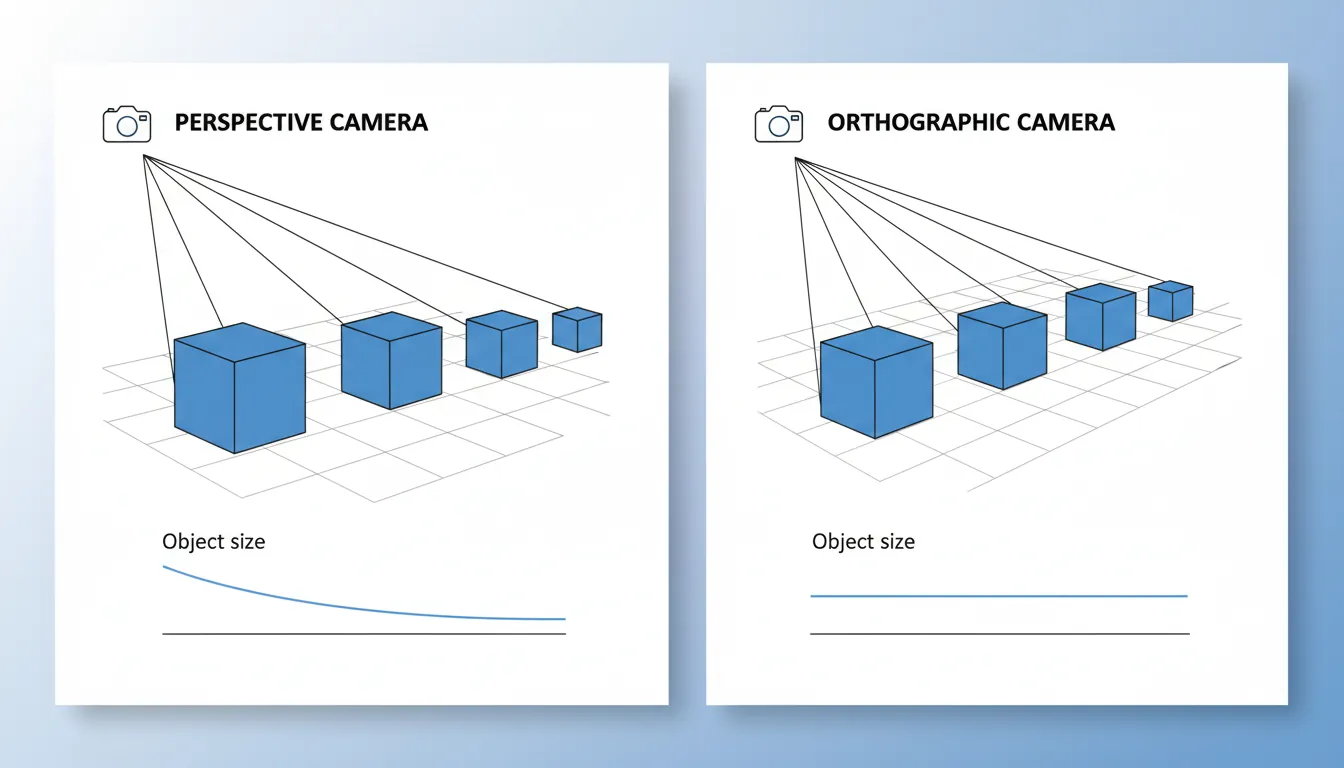
Projection Types
Perspective (3D depth):        Orthographic (No depth):
     ╱───────╲                     │───────│
    ╱         ╲                    │       │
   ╱           ╲                   │       │
  ╱    Near     ╲                  │       │
 ╱    Plane      ╲                 │       │
◄       👁️        ►                 │   👁️   │
 ╲               ╱                 │       │
  ╲    Far      ╱                  │       │
   ╲   Plane   ╱                   │───────│
    ╲         ╱
     ╲───────╱                 Good for: 2D, UI
                               isometric, strategy
Good for: FPS, TPS,
3D platformers
// Unity: Camera Controller (Third Person)
public class ThirdPersonCamera : MonoBehaviour
{
public Transform target; // Player to follow
public float distance = 5f; // Distance behind player
public float height = 2f; // Height above player
public float smoothing = 5f; // How smoothly to follow
void LateUpdate() // After player moves
{
// Calculate desired position
Vector3 desiredPosition = target.position
- target.forward * distance
+ Vector3.up * height;
// Smooth movement
transform.position = Vector3.Lerp(
transform.position,
desiredPosition,
smoothing * Time.deltaTime
);
// Look at player
transform.LookAt(target.position + Vector3.up * 1.5f);
}
}
// First Person Camera (Mouse Look)
public class FirstPersonCamera : MonoBehaviour
{
public float sensitivity = 2f;
private float rotationX = 0f;
void Start()
{
Cursor.lockState = CursorLockMode.Locked;
}
void Update()
{
float mouseX = Input.GetAxis("Mouse X") * sensitivity;
float mouseY = Input.GetAxis("Mouse Y") * sensitivity;
// Horizontal rotation (body rotates)
transform.parent.Rotate(0, mouseX, 0);
// Vertical rotation (head tilts, clamped)
rotationX -= mouseY;
rotationX = Mathf.Clamp(rotationX, -90f, 90f);
transform.localRotation = Quaternion.Euler(rotationX, 0, 0);
}
}Skeletal Animation & Rigging
Skeletal animation uses a hierarchy of "bones" to deform a 3D mesh. This is how characters walk, run, and express emotions in 3D games.
The Animation Pipeline
Animation Pipeline:

1. MODELING          2. RIGGING           3. SKINNING
   Create mesh          Add bones            Bind mesh to bones
   ┌─────┐             ┌─────┐             ┌─────┐
   │ ○   │             │ ●   │             │ ●≈≈≈│
   │ │   │      →      │ │   │      →      │ ║   │
   │┌┴─┐ │             │┌●─┐ │             │┌●═┐ │
   ││  │ │             ││  │ │             ││  │ │
   └┴──┴─┘             └●──●─┘             └●══●═┘

4. ANIMATING         5. IN-ENGINE         6. BLENDING
   Create poses         Import & play        Mix animations
   ┌─────┐             ┌─────┐             ┌─────┐
   │ ●   │             │ ●   │             │ ●   │
   │ ║╲  │             │ ║   │             │ ║   │
   │┌●═╲ │      →      │┌●═┐ │      →      │┌●═┐ │
   │   ╲╱│             ││  │ │             │ ╱╲  │
   └─────┘             └●──●─┘             └●──●─┘
   Running pose        Walking clip        Walk → Run blend
Animation Controllers
// Unity: Animator Controller
public class CharacterAnimator : MonoBehaviour
{
    private Animator animator;
    private CharacterController controller;

    void Start()
    {
        animator = GetComponent<Animator>();
        controller = GetComponent<CharacterController>();
    }

    void Update()
    {
        // Set movement speed for blend tree
        float speed = controller.velocity.magnitude;
        animator.SetFloat("Speed", speed);

        // Trigger jump animation
        if (Input.GetButtonDown("Jump"))
            animator.SetTrigger("Jump");

        // Set grounded state
        animator.SetBool("IsGrounded", controller.isGrounded);
    }
}
Animation Blend Trees
Blend Tree: Walking to Running

Speed: 0 ──────────────────────────── 1
       │                              │
       ▼                              ▼
     IDLE ──► WALK ──► JOG ──► RUN ──► SPRINT

When Speed = 0.0: 100% Idle
When Speed = 0.3: Blend of Walk
When Speed = 0.7: Blend of Jog
When Speed = 1.0: 100% Sprint

The animator smoothly blends between clips!
Exercise: Build a 3D Scene
Goal: Create a small 3D environment with proper lighting and a controllable camera.
- Create a simple scene with primitives (cubes, spheres, plane)
- Set up PBR materials (wood floor, metal objects, rough concrete)
- Add a directional light (sun) and 2 point lights (lamps)
- Implement a third-person camera that follows a cube "player"
- Add basic WASD movement relative to camera facing
- Import a free character model and set up idle/walk animations
Bonus: Add a day/night cycle by rotating the directional light