We use cookies to enhance your browsing experience, serve personalized content, and analyze our traffic.
By clicking "Accept All", you consent to our use of cookies. See our
Privacy Policy
for more information.
Phase 13 Goals: By the end of this phase, your OS will have a graphical display system. You'll draw shapes, render text, use double buffering for smooth output, and have the basics of a window manager.
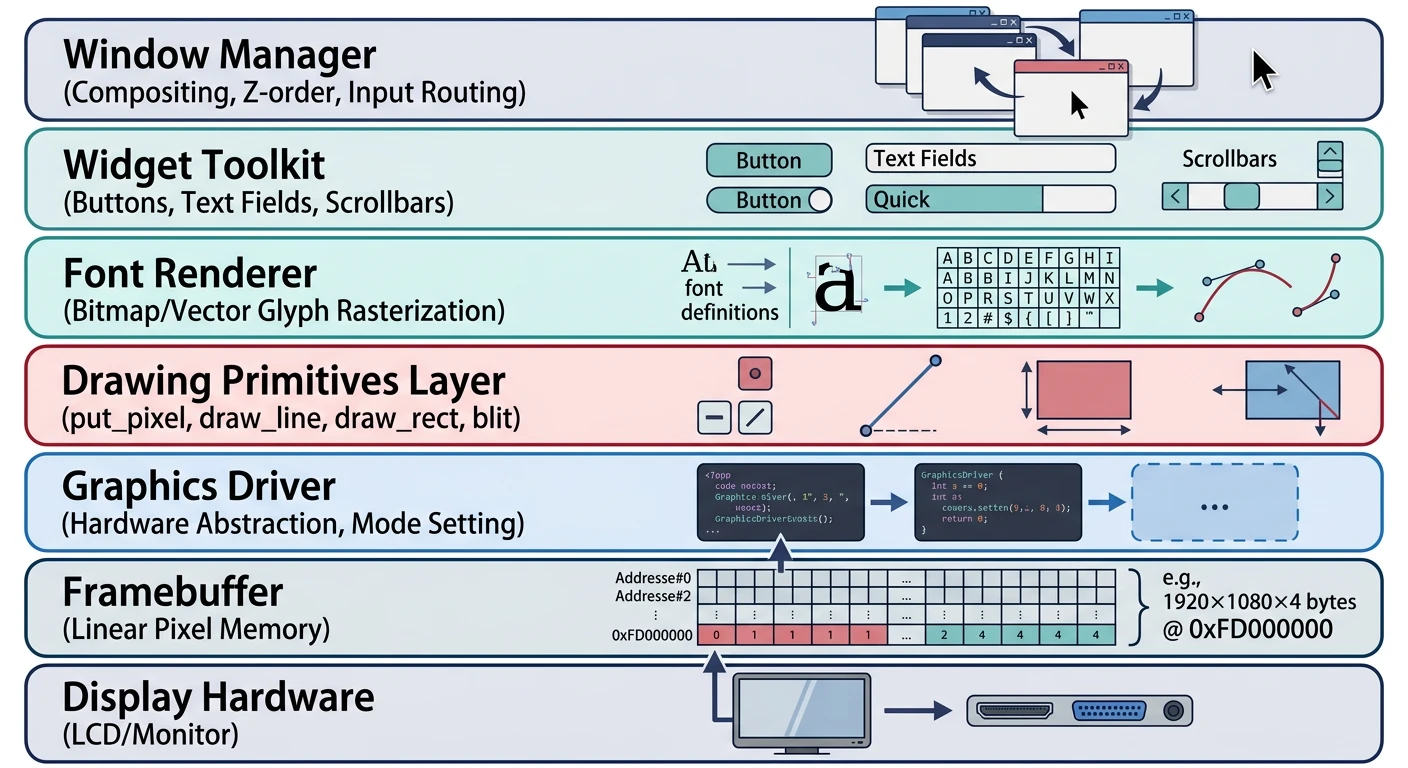
In Phase 12, we obtained a framebuffer through UEFI's Graphics Output Protocol (GOP). Now we'll transform that raw memory region into a full graphical system. Think of the framebuffer as a blank canvas—we need to build the brushes, pens, and eventually the window frames that make an operating system visual.
Graphics system architecture — each layer builds on the previous, from raw framebuffer to window management
Key Insight: A graphical system is built in layers: framebuffer access → drawing primitives → font rendering → double buffering → window management. Each layer builds on the previous.
Real-World Analogy: The Artist's Studio
Conceptual Model
Think of building a graphics system like setting up an artist's studio:
Framebuffer = The canvas (where paint actually goes)
Double buffer = A spare canvas (paint privately, then reveal)
Window manager = Arranging multiple paintings on the wall
Framebuffer Basics
The framebuffer is a region of memory that directly maps to the pixels on screen. Every byte change appears on the display. UEFI's GOP or legacy VBE (VESA BIOS Extensions) gives us the framebuffer's physical address, dimensions, and format.
Critical: Pitch vs Width! The pitch is bytes per row, not pixels. GPUs often pad rows to alignment boundaries (64, 128, or 256 bytes). Always use pitch when calculating row addresses, never width * 4. This is the #1 cause of "my graphics look garbled" bugs!
Pixel Formats
Different hardware uses different byte orderings for pixels. The two most common 32-bit formats:
Detecting Pixel Format: UEFI's GOP->Mode->Info structure includes PixelFormat (enum) and PixelInformation (bit masks). Check PixelBlueGreenRedReserved8BitPerColor for BGRX or PixelRedGreenBlueReserved8BitPerColor for RGBX.
Drawing Primitives
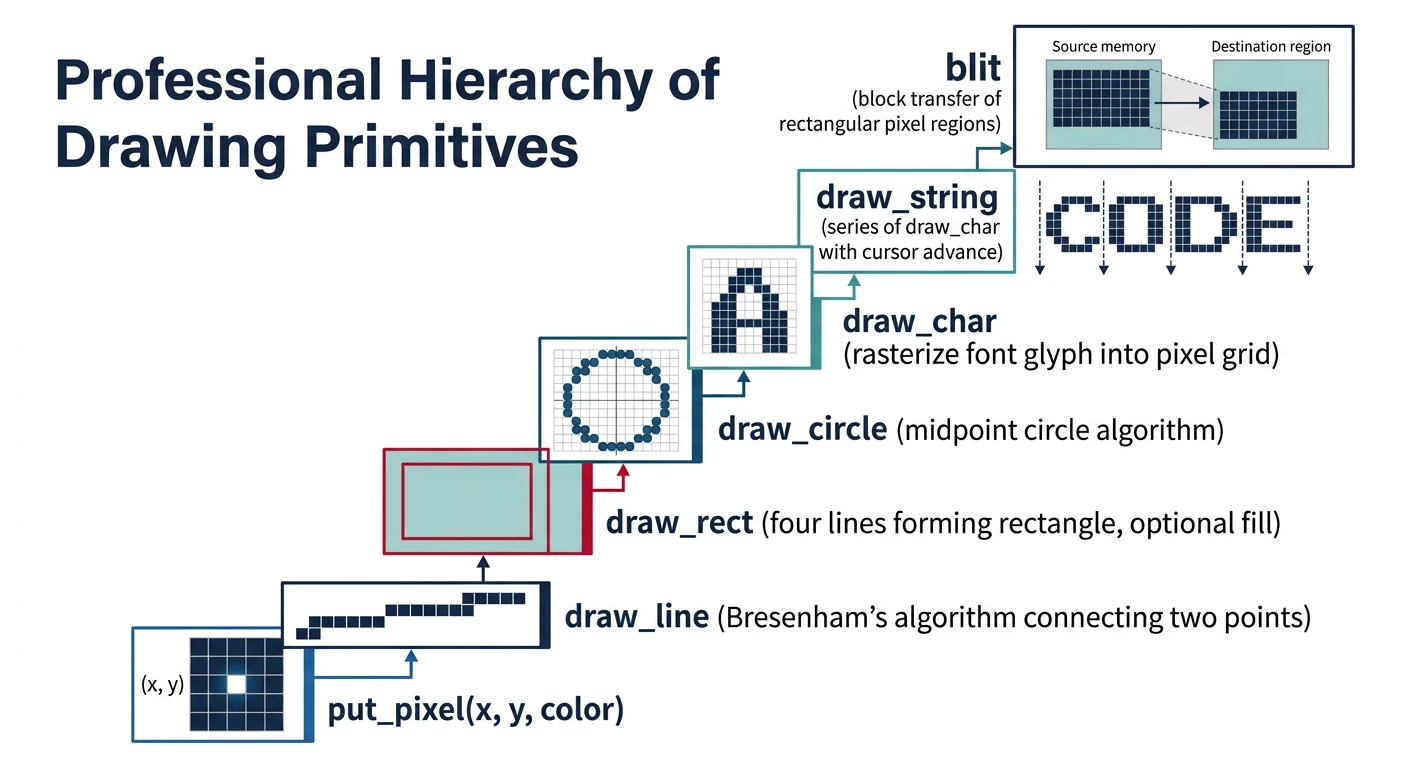
Drawing primitives are the fundamental operations from which all graphics are built. With just put_pixel(), you could technically draw anything—but basic shape functions make code cleaner and faster.
Drawing primitives hierarchy — all graphics operations build from the fundamental put_pixel() function
The put_pixel() function is the atomic drawing operation—setting one pixel's color. From this, we build lines using Bresenham's algorithm, the classic integer-only line drawing algorithm from 1962.
Bresenham's Line Algorithm
Algorithm1962
Jack Bresenham developed this algorithm at IBM for pen plotters. Its genius: it uses only integer addition and subtraction—no multiplication, division, or floating point. This made it perfect for early computers and remains efficient today.
Key insight: At each step, decide whether to move horizontally, vertically, or diagonally based on accumulated error. The algorithm chooses the pixel closest to the true line.
/* Draw a single pixel with bounds checking */
static inline void put_pixel(uint32_t x, uint32_t y, uint32_t color) {
    if (x >= fb.width || y >= fb.height) return;  // Clip to screen
    fb.buffer[y * (fb.pitch / 4) + x] = color;    // pitch/4 = pixels per row
}

/* Draw a line using Bresenham's algorithm */
void draw_line(int x0, int y0, int x1, int y1, uint32_t color) {
    int dx = abs(x1 - x0);          // Horizontal distance
    int dy = -abs(y1 - y0);         // Vertical distance (negative for error calc)
    int sx = x0 < x1 ? 1 : -1;      // X step direction
    int sy = y0 < y1 ? 1 : -1;      // Y step direction
    int err = dx + dy;              // Error accumulator

    while (1) {
        put_pixel(x0, y0, color);
        if (x0 == x1 && y0 == y1) break;  // Reached endpoint

        int e2 = 2 * err;
        if (e2 >= dy) { err += dy; x0 += sx; }  // Step horizontal
        if (e2 <= dx) { err += dx; y0 += sy; }  // Step vertical
    }
}
Performance Tip: For horizontal and vertical lines, skip Bresenham entirely. Use memset32() for horizontal lines (setting consecutive pixels) and a simple loop for vertical lines. This can be 10× faster for common UI elements like borders and separators.
/* Optimized horizontal line */
void draw_hline(int x, int y, int width, uint32_t color) {
    if (y < 0 || y >= (int)fb.height) return;
    if (x < 0) { width += x; x = 0; }
    if (x + width > (int)fb.width) width = fb.width - x;
    if (width <= 0) return;

    uint32_t* ptr = &fb.buffer[y * (fb.pitch / 4) + x];
    for (int i = 0; i < width; i++) {
        ptr[i] = color;
    }
}

/* Optimized vertical line */
void draw_vline(int x, int y, int height, uint32_t color) {
    if (x < 0 || x >= (int)fb.width) return;
    int stride = fb.pitch / 4;
    uint32_t* ptr = &fb.buffer[y * stride + x];

    for (int i = 0; i < height; i++) {
        if (y + i >= 0 && y + i < (int)fb.height) {
            *ptr = color;
        }
        ptr += stride;
    }
}
Rectangles & Fills
Rectangles are the building blocks of user interfaces—windows, buttons, panels, and text boxes are all rectangles. We need both filled rectangles and outlines.
/* Draw filled rectangle */
void fill_rect(int x, int y, int w, int h, uint32_t color) {
    // Clip to screen bounds
    if (x < 0) { w += x; x = 0; }
    if (y < 0) { h += y; y = 0; }
    if (x + w > (int)fb.width)  w = fb.width - x;
    if (y + h > (int)fb.height) h = fb.height - y;
    if (w <= 0 || h <= 0) return;

    int stride = fb.pitch / 4;
    uint32_t* row = &fb.buffer[y * stride + x];

    for (int j = 0; j < h; j++) {
        for (int i = 0; i < w; i++) {
            row[i] = color;
        }
        row += stride;  // Move to next row
    }
}

/* Draw rectangle outline */
void draw_rect(int x, int y, int w, int h, uint32_t color) {
    draw_hline(x, y, w, color);              // Top
    draw_hline(x, y + h - 1, w, color);      // Bottom
    draw_vline(x, y, h, color);              // Left
    draw_vline(x + w - 1, y, h, color);      // Right
}

/* Clear screen */
void clear_screen(uint32_t color) {
    fill_rect(0, 0, fb.width, fb.height, color);
}
For visual effects, gradients add depth to UI elements:
/* Draw rectangle with vertical gradient */
void fill_rect_gradient(int x, int y, int w, int h,
                        uint32_t top_color, uint32_t bottom_color) {
    uint8_t tr = (top_color >> 16) & 0xFF;
    uint8_t tg = (top_color >> 8) & 0xFF;
    uint8_t tb = top_color & 0xFF;
    uint8_t br = (bottom_color >> 16) & 0xFF;
    uint8_t bg = (bottom_color >> 8) & 0xFF;
    uint8_t bb = bottom_color & 0xFF;

    for (int j = 0; j < h; j++) {
        // Linear interpolation between colors
        uint8_t r = tr + (br - tr) * j / h;
        uint8_t g = tg + (bg - tg) * j / h;
        uint8_t b = tb + (bb - tb) * j / h;
        uint32_t color = make_color(r, g, b);
        draw_hline(x, y + j, w, color);
    }
}
Circles & Ellipses
Circles use the Midpoint Circle Algorithm (also called Bresenham's circle algorithm). Like line drawing, it uses only integer arithmetic by exploiting the circle's 8-way symmetry.
     CIRCLE 8-WAY SYMMETRY

     Calculate one octant, mirror to get all 8 points:

            (x, y)  →  8 symmetric points

               ╲    |    ╱
                ╲  5│6  ╱
                 ╲  │  ╱
              4  ╲╳│╳╱  7
           ───────(cx,cy)───────
              3  ╱ │ ╲  8
                ╱  │  ╲
               ╱  2│1  ╲
              ╱    │    ╲

     Point (x,y) relative to center (cx,cy) gives:

     1: (cx + x, cy + y)    5: (cx - x, cy - y)
     2: (cx + x, cy - y)    6: (cx - x, cy + y)
     3: (cx - y, cy + x)    7: (cx + y, cy - x)
     4: (cx - y, cy - x)    8: (cx + y, cy + x)
/* Draw circle outline using midpoint algorithm */
void draw_circle(int cx, int cy, int radius, uint32_t color) {
    int x = radius;
    int y = 0;
    int err = 0;

    while (x >= y) {
        // Draw all 8 symmetric points
        put_pixel(cx + x, cy + y, color);
        put_pixel(cx + y, cy + x, color);
        put_pixel(cx - y, cy + x, color);
        put_pixel(cx - x, cy + y, color);
        put_pixel(cx - x, cy - y, color);
        put_pixel(cx - y, cy - x, color);
        put_pixel(cx + y, cy - x, color);
        put_pixel(cx + x, cy - y, color);

        y++;
        err += 1 + 2 * y;
        if (2 * (err - x) + 1 > 0) {
            x--;
            err += 1 - 2 * x;
        }
    }
}

/* Draw filled circle */
void fill_circle(int cx, int cy, int radius, uint32_t color) {
    int x = radius;
    int y = 0;
    int err = 0;

    while (x >= y) {
        // Draw horizontal lines for each y
        draw_hline(cx - x, cy + y, 2 * x + 1, color);
        draw_hline(cx - x, cy - y, 2 * x + 1, color);
        draw_hline(cx - y, cy + x, 2 * y + 1, color);
        draw_hline(cx - y, cy - x, 2 * y + 1, color);

        y++;
        err += 1 + 2 * y;
        if (2 * (err - x) + 1 > 0) {
            x--;
            err += 1 - 2 * x;
        }
    }
}

/* Draw ellipse (generalized circle) */
void draw_ellipse(int cx, int cy, int rx, int ry, uint32_t color) {
    int x = 0;
    int y = ry;
    int rx2 = rx * rx;
    int ry2 = ry * ry;
    int px = 0;
    int py = 2 * rx2 * y;

    // Region 1
    int p = ry2 - rx2 * ry + rx2 / 4;
    while (px < py) {
        put_pixel(cx + x, cy + y, color);
        put_pixel(cx - x, cy + y, color);
        put_pixel(cx + x, cy - y, color);
        put_pixel(cx - x, cy - y, color);
        x++;
        px += 2 * ry2;
        if (p < 0) {
            p += ry2 + px;
        } else {
            y--;
            py -= 2 * rx2;
            p += ry2 + px - py;
        }
    }

    // Region 2
    p = ry2 * (x + 1/2) * (x + 1/2) + rx2 * (y - 1) * (y - 1) - rx2 * ry2;
    while (y >= 0) {
        put_pixel(cx + x, cy + y, color);
        put_pixel(cx - x, cy + y, color);
        put_pixel(cx + x, cy - y, color);
        put_pixel(cx - x, cy - y, color);
        y--;
        py -= 2 * rx2;
        if (p > 0) {
            p += rx2 - py;
        } else {
            x++;
            px += 2 * ry2;
            p += rx2 - py + px;
        }
    }
}
Anti-Aliasing: The algorithms above produce "jagged" edges (aliasing). For smooth edges, use Xiaolin Wu's algorithm which blends pixels based on their distance from the true line. This trades performance for visual quality—typically 2-3× slower but much smoother.
Font Rendering
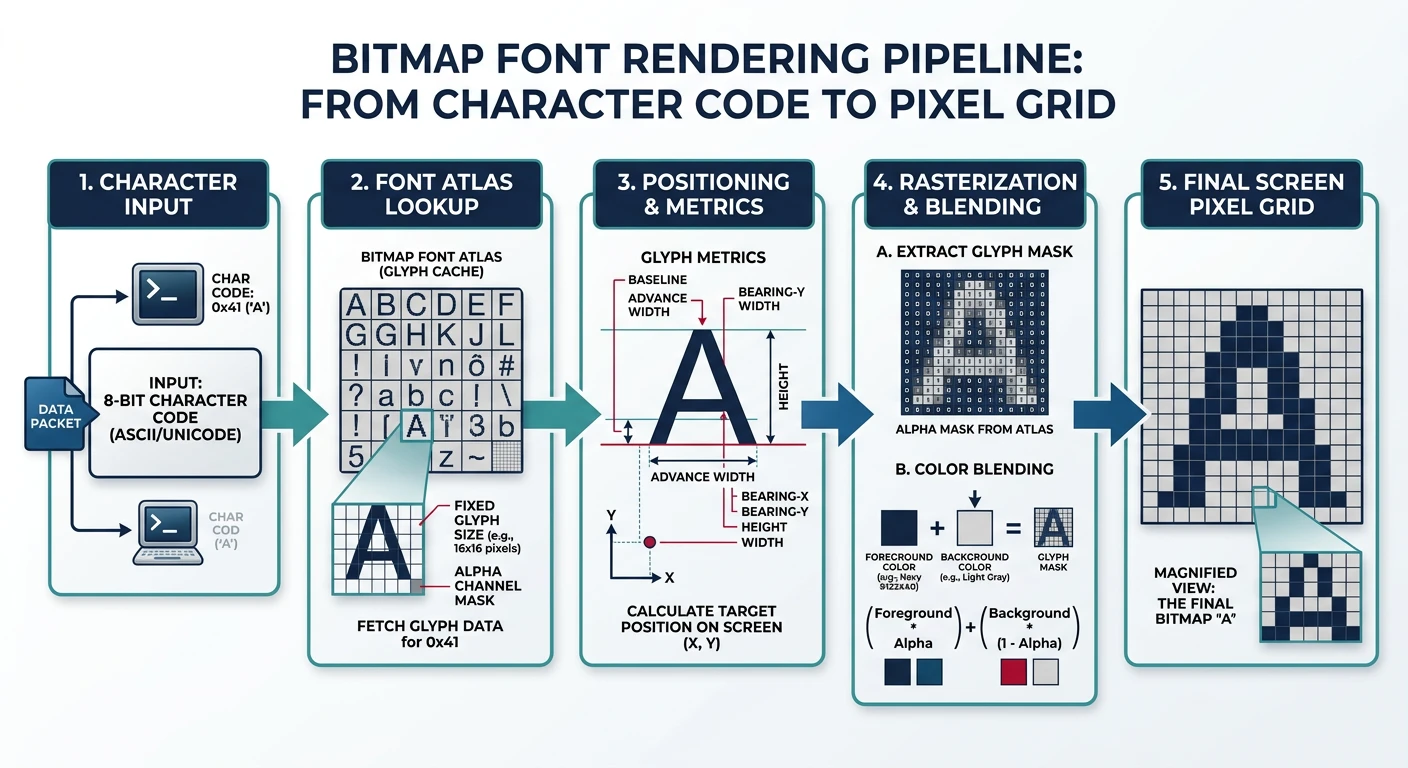
Text is everywhere in a GUI—window titles, menus, file names, terminal output. We need to convert character codes into pixels. The simplest approach: bitmap fonts, where each character is a pre-drawn pixel grid.
Font rendering pipeline — converting character codes to pixel grids using bitmap fonts (PSF format)
Bitmap Fonts
A bitmap font stores each glyph (character shape) as a grid of bits—1 for foreground, 0 for background. Simple and fast to render, but doesn't scale well (you need different fonts for different sizes).
Our choice: PSF2 (PC Screen Font version 2)—Linux console font format, simple to parse, includes Unicode mapping.
PSF2 Format
PSF2 is the font format used by the Linux console. It has a straightforward header followed by glyph bitmaps and an optional Unicode table.
     PSF2 FILE STRUCTURE

     ┌─────────────────────────────────────────────────────────┐
     │                    PSF2 Header (32 bytes)               │
     ├─────────────────────────────────────────────────────────┤
     │  magic: 0x864ab572    (identifies PSF2 format)          │
     │  version: 0           (always zero for current spec)    │
     │  header_size: 32      (offset to first glyph)           │
     │  flags: 0 or 1        (1 = Unicode table present)       │
     │  num_glyphs: 256-512  (number of glyphs)                │
     │  bytes_per_glyph: 16  (size of each glyph bitmap)       │
     │  height: 16           (glyph height in pixels)          │
     │  width: 8             (glyph width in pixels)           │
     ├─────────────────────────────────────────────────────────┤
     │                    Glyph Data                           │
     │  ┌──────────┐                                           │
     │  │ Glyph 0  │  bytes_per_glyph bytes (char 0)           │
     │  ├──────────┤                                           │
     │  │ Glyph 1  │  bytes_per_glyph bytes (char 1)           │
     │  ├──────────┤                                           │
     │  │   ...    │  (continues for num_glyphs)               │
     │  ├──────────┤                                           │
     │  │ Glyph N  │  bytes_per_glyph bytes                    │
     │  └──────────┘                                           │
     ├─────────────────────────────────────────────────────────┤
     │                Unicode Table (optional)                 │
     │  Maps glyphs to Unicode codepoints                      │
     └─────────────────────────────────────────────────────────┘
/* PSF2 Font Header */
typedef struct {
    uint32_t magic;           // PSF2 magic: 0x864ab572
    uint32_t version;         // Zero
    uint32_t header_size;     // Offset to glyph data
    uint32_t flags;           // Unicode table flag
    uint32_t num_glyphs;      // Number of glyphs
    uint32_t bytes_per_glyph; // Size of each glyph
    uint32_t height;          // Height in pixels
    uint32_t width;           // Width in pixels
} psf2_header_t;

#define PSF2_MAGIC 0x864ab572
#define PSF2_FLAG_UNICODE 0x01

/* Load PSF2 font from embedded data or file */
psf2_header_t* font = NULL;
uint8_t* font_glyphs = NULL;

int font_init(void* psf_data) {
    font = (psf2_header_t*)psf_data;

    // Validate magic number
    if (font->magic != PSF2_MAGIC) {
        return -1;  // Not a PSF2 font
    }

    // Point to glyph data (after header)
    font_glyphs = (uint8_t*)psf_data + font->header_size;

    return 0;  // Success
}

/* Get font metrics */
uint32_t font_width(void)  { return font->width; }
uint32_t font_height(void) { return font->height; }
Getting Fonts: Linux systems include PSF fonts in /usr/share/consolefonts/. Popular choices: Lat2-Terminus16.psf (8×16), ter-116n.psf (Terminus). Convert with psfaddtable or embed directly by converting to C array: xxd -i font.psf > font.h
Text Drawing
Drawing text means iterating through each glyph's bitmap, checking each bit, and drawing the foreground or background color accordingly.
/* Draw a single character at x,y */
void draw_char(int x, int y, char c, uint32_t fg, uint32_t bg) {
    if (!font) return;  // Font not loaded

    // Get pointer to this character's glyph
    uint8_t* glyph = font_glyphs + ((uint8_t)c * font->bytes_per_glyph);

    // Bytes per row (width rounded up to byte boundary)
    int bytes_per_row = (font->width + 7) / 8;

    for (uint32_t py = 0; py < font->height; py++) {
        for (uint32_t px = 0; px < font->width; px++) {
            // Get the bit for this pixel
            uint8_t byte = glyph[py * bytes_per_row + px / 8];
            uint8_t bit = (byte >> (7 - (px % 8))) & 1;

            // Draw foreground or background
            put_pixel(x + px, y + py, bit ? fg : bg);
        }
    }
}

/* Draw a null-terminated string */
void draw_string(int x, int y, const char* str, uint32_t fg, uint32_t bg) {
    int start_x = x;

    while (*str) {
        if (*str == '\n') {
            x = start_x;        // Carriage return
            y += font->height;  // Line feed
        } else if (*str == '\t') {
            x += font->width * 4;  // Tab = 4 spaces
        } else {
            draw_char(x, y, *str, fg, bg);
            x += font->width;
        }
        str++;
    }
}

/* Printf-style formatted text */
void draw_printf(int x, int y, uint32_t fg, uint32_t bg, const char* fmt, ...) {
    char buffer[256];
    va_list args;
    va_start(args, fmt);
    vsnprintf(buffer, sizeof(buffer), fmt, args);
    va_end(args);
    draw_string(x, y, buffer, fg, bg);
}
Performance: Transparent Background To draw text without a background color (transparent), skip the put_pixel when bit == 0. This is faster and allows text over images. But be careful: you must clear the area first if updating text, or old characters will show through.
/* Draw character with transparent background */
void draw_char_transparent(int x, int y, char c, uint32_t fg) {
    uint8_t* glyph = font_glyphs + ((uint8_t)c * font->bytes_per_glyph);
    int bytes_per_row = (font->width + 7) / 8;

    for (uint32_t py = 0; py < font->height; py++) {
        for (uint32_t px = 0; px < font->width; px++) {
            uint8_t byte = glyph[py * bytes_per_row + px / 8];
            uint8_t bit = (byte >> (7 - (px % 8))) & 1;

            if (bit) {  // Only draw foreground pixels
                put_pixel(x + px, y + py, fg);
            }
        }
    }
}

/* Measure string width in pixels */
int string_width(const char* str) {
    int width = 0;
    int max_width = 0;

    while (*str) {
        if (*str == '\n') {
            max_width = (width > max_width) ? width : max_width;
            width = 0;
        } else {
            width += font->width;
        }
        str++;
    }
    return (width > max_width) ? width : max_width;
}
Double Buffering
If you draw directly to video memory, users see partially drawn frames—flickering, tearing, and visual artifacts. Double buffering solves this by drawing to an off-screen buffer first, then copying the complete frame to the display.
Double buffering eliminates visual tearing by drawing to an off-screen buffer before display swap
     DOUBLE BUFFERING CONCEPT

     Without double buffering:
     ┌──────────────────────────────────────────────────────────┐
     │                      Video Memory                        │
     │  User sees: ▓▓▓▓▓▓░░░░░░░░░░░░░░  (half-drawn frame!)   │
     │             ↑ drawing in progress ↑ not drawn yet        │
     └──────────────────────────────────────────────────────────┘

     With double buffering:
     ┌──────────────────────────────────────────────────────────┐
     │  Back Buffer (RAM)                                       │
     │  ▓▓▓▓▓▓▓▓▓▓▓▓▓▓▓▓▓▓▓▓  (draw here privately)            │
     │             │                                            │
     │             ▼  gfx_flip() - copy complete frame          │
     │  Front Buffer (VRAM)                                     │
     │  ▒▒▒▒▒▒▒▒▒▒▒▒▒▒▒▒▒▒▒▒  (user sees complete frame)       │
     └──────────────────────────────────────────────────────────┘
Back Buffer
The back buffer is an ordinary block of memory (allocated from our heap) the same size as the framebuffer. All drawing operations target this buffer. When the frame is complete, we copy it to video memory.
Why Screen Tearing Happens
Visual Artifacts
Screen tearing occurs when the display refreshes mid-draw. The top half shows the old frame, the bottom half shows the new frame—creating a visible horizontal "tear" line.
Monitors refresh at fixed rates (60Hz = 60 times/second = every 16.67ms). If your frame takes 20ms to draw, the monitor grabs data before you finish.
Double buffering prevents tearing because the monitor always reads a complete frame from the front buffer while you draw to the back buffer.
/* Double-buffered graphics context */
typedef struct {
    uint32_t* front;        // Video memory (display) - GPU reads this
    uint32_t* back;         // Off-screen buffer (RAM) - we draw here
    uint32_t  width;
    uint32_t  height;
    uint32_t  pitch;        // Bytes per row
    uint32_t  size;         // Total buffer size
} graphics_t;

graphics_t gfx;

/* Initialize double-buffered graphics */
int gfx_init(uint32_t* vram, uint32_t w, uint32_t h, uint32_t pitch) {
    gfx.front = vram;
    gfx.width = w;
    gfx.height = h;
    gfx.pitch = pitch;
    gfx.size = h * pitch;

    // Allocate back buffer from kernel heap
    gfx.back = (uint32_t*)kmalloc(gfx.size);
    if (!gfx.back) {
        return -1;  // Allocation failed
    }

    // Clear back buffer to black
    memset(gfx.back, 0, gfx.size);

    return 0;
}

/* Get pointer to draw buffer */
uint32_t* gfx_buffer(void) {
    return gfx.back;
}
Page Flipping
Page flipping (or buffer swapping) copies the completed back buffer to the front buffer. The simplest approach is memcpy()—effective but not the fastest.
/* Swap buffers - copy back to front */
void gfx_flip(void) {
    memcpy(gfx.front, gfx.back, gfx.size);
}

/* V-Sync aware flip (if hardware supports it) */
void gfx_flip_vsync(void) {
    // Wait for vertical blanking interval
    // This prevents tearing but limits FPS to refresh rate
    while (inb(0x3DA) & 0x08);  // Wait for retrace end
    while (!(inb(0x3DA) & 0x08));  // Wait for retrace start

    memcpy(gfx.front, gfx.back, gfx.size);
}
Optimization: Dirty Rectangles Instead of copying the entire frame, track which regions changed ("dirty rectangles") and copy only those. At 1920×1080×4 bytes = 8MB per frame, copying takes ~2-4ms. Dirty rectangles can reduce this by 90% for typical GUIs where most of the screen doesn't change.
/* Dirty rectangle tracking */
typedef struct {
    int x, y, w, h;
} rect_t;

#define MAX_DIRTY_RECTS 32
rect_t dirty_rects[MAX_DIRTY_RECTS];
int num_dirty = 0;

/* Mark a region as needing redraw */
void gfx_mark_dirty(int x, int y, int w, int h) {
    if (num_dirty < MAX_DIRTY_RECTS) {
        dirty_rects[num_dirty].x = x;
        dirty_rects[num_dirty].y = y;
        dirty_rects[num_dirty].w = w;
        dirty_rects[num_dirty].h = h;
        num_dirty++;
    }
}

/* Optimized flip - only copy dirty regions */
void gfx_flip_dirty(void) {
    for (int i = 0; i < num_dirty; i++) {
        rect_t* r = &dirty_rects[i];

        // Clip to screen bounds
        int x = (r->x < 0) ? 0 : r->x;
        int y = (r->y < 0) ? 0 : r->y;
        int w = r->w;
        int h = r->h;
        if (x + w > (int)gfx.width)  w = gfx.width - x;
        if (y + h > (int)gfx.height) h = gfx.height - y;

        // Copy each row of the dirty rectangle
        int stride = gfx.pitch / 4;
        for (int row = y; row < y + h; row++) {
            uint32_t* src = gfx.back + row * stride + x;
            uint32_t* dst = gfx.front + row * stride + x;
            memcpy(dst, src, w * 4);
        }
    }

    num_dirty = 0;  // Clear dirty list
}

/* Modified drawing functions should mark dirty regions */
void fill_rect_tracked(int x, int y, int w, int h, uint32_t color) {
    fill_rect(x, y, w, h, color);
    gfx_mark_dirty(x, y, w, h);
}
Memory Considerations: At 1920×1080, a single back buffer uses 8MB. Triple buffering (used in games for smoother gameplay) needs 16MB. For an OS, double buffering is usually sufficient—triple buffering trades memory for marginally smoother animation.
Window Management
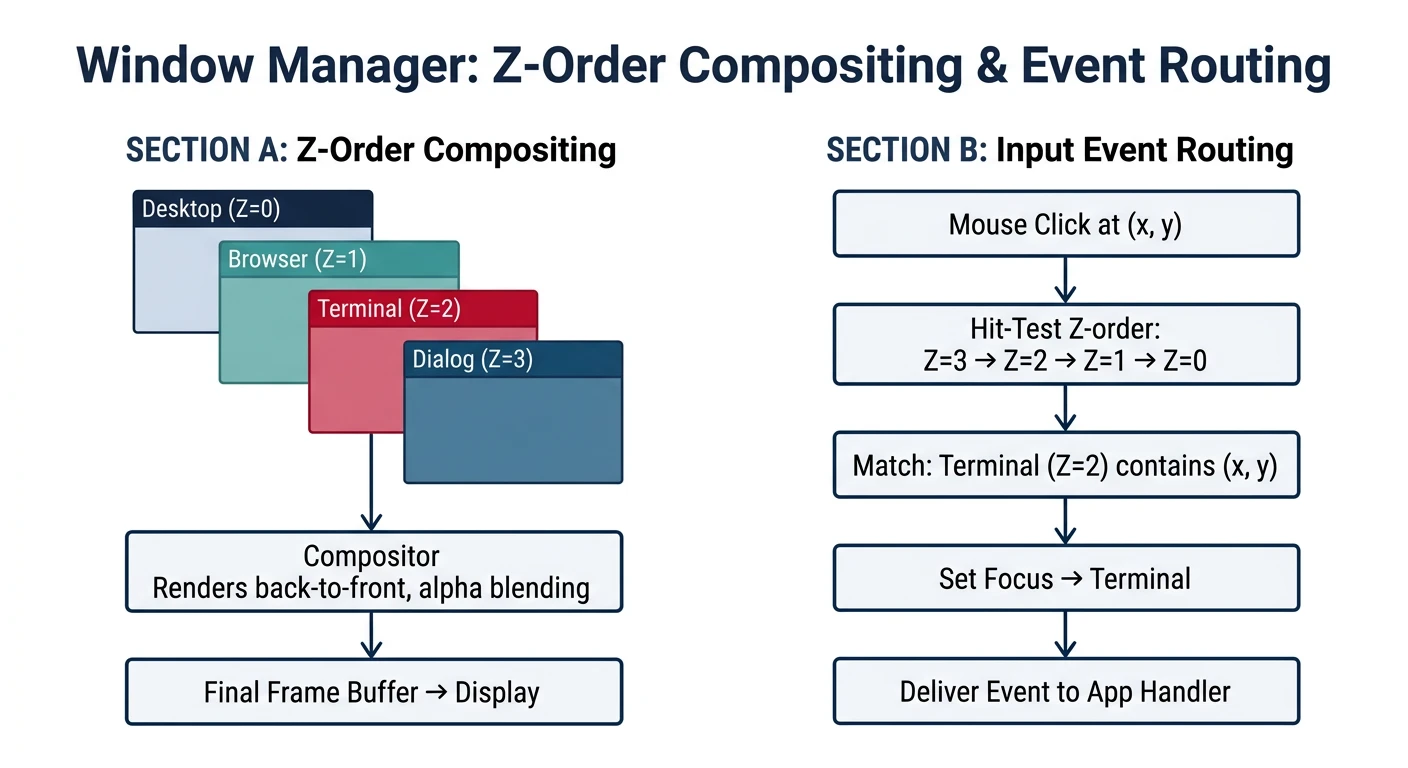
A window manager (WM) handles multiple applications sharing the screen. It tracks window positions, decides which window is on top, draws decorations (title bars, borders), and routes input to the correct window.
Each window is a data structure containing its position, size, content buffer, and metadata. Windows are typically stored in a linked list ordered by Z-order (back to front).
Window Manager Types
GUI Design
Stacking WM (Windows, macOS) – Windows overlap freely, most intuitive
Tiling WM (i3, dwm) – Windows tile to fill screen, no overlap
Compositing WM (Compiz, Wayfire) – 3D effects, transparency, shadows
We'll build a simple stacking WM, the most common type.
/* Window structure */
typedef struct window {
    uint32_t id;            // Unique identifier
    int x, y;               // Screen position
    int width, height;      // Client area size
    uint32_t* buffer;       // Window content (pixel data)
    char title[64];         // Window title
    uint32_t flags;         // Visible, focused, etc.
    struct window* next;    // Linked list (Z-order)
    void* user_data;        // Application-specific data
} window_t;

/* Window flags */
#define WIN_VISIBLE    (1 << 0)   // Window is shown
#define WIN_FOCUSED    (1 << 1)   // Has keyboard focus
#define WIN_DECORATED  (1 << 2)   // Draw title bar & border
#define WIN_MOVABLE    (1 << 3)   // Can be dragged
#define WIN_RESIZABLE  (1 << 4)   // Can be resized
#define WIN_MINIMIZED  (1 << 5)   // Hidden in taskbar

/* Window manager state */
window_t* window_list = NULL;     // Head of Z-ordered list
window_t* focused_window = NULL;  // Currently active window
uint32_t next_window_id = 1;      // ID generator

/* Create a new window */
window_t* wm_create_window(int x, int y, int w, int h, const char* title) {
    window_t* win = (window_t*)kmalloc(sizeof(window_t));
    if (!win) return NULL;

    win->id = next_window_id++;
    win->x = x;
    win->y = y;
    win->width = w;
    win->height = h;
    win->flags = WIN_VISIBLE | WIN_DECORATED | WIN_MOVABLE;
    strncpy(win->title, title, 63);
    win->title[63] = '\0';

    // Allocate window content buffer
    win->buffer = (uint32_t*)kmalloc(w * h * 4);
    if (!win->buffer) {
        kfree(win);
        return NULL;
    }
    memset(win->buffer, 0xFF, w * h * 4);  // White background

    // Add to front of window list (on top)
    win->next = window_list;
    window_list = win;

    return win;
}

/* Destroy a window */
void wm_destroy_window(window_t* win) {
    if (!win) return;

    // Remove from list
    if (window_list == win) {
        window_list = win->next;
    } else {
        for (window_t* w = window_list; w; w = w->next) {
            if (w->next == win) {
                w->next = win->next;
                break;
            }
        }
    }

    if (focused_window == win) {
        focused_window = window_list;  // Focus next window
    }

    kfree(win->buffer);
    kfree(win);
}

/* Bring window to front */
void wm_raise_window(window_t* win) {
    if (!win || win == window_list) return;

    // Remove from current position
    for (window_t* w = window_list; w; w = w->next) {
        if (w->next == win) {
            w->next = win->next;
            break;
        }
    }

    // Move to front
    win->next = window_list;
    window_list = win;
}
Compositing
Compositing combines all visible windows into a single frame. The compositor draws windows from back to front, handling occlusion (windows covering other windows) automatically through the painting order.
/* Desktop background color or pattern */
#define DESKTOP_COLOR 0x336699  // Steel blue

/* Composite all windows to framebuffer */
void wm_composite(void) {
    int stride = gfx.pitch / 4;

    // 1. Draw desktop background
    for (uint32_t i = 0; i < gfx.width * gfx.height; i++) {
        gfx.back[i] = DESKTOP_COLOR;
    }

    // 2. Count windows for back-to-front traversal
    int count = 0;
    for (window_t* w = window_list; w; w = w->next) count++;

    // 3. Build reverse list (we need back-to-front)
    window_t** stack = (window_t**)alloca(count * sizeof(window_t*));
    int idx = count - 1;
    for (window_t* w = window_list; w; w = w->next) {
        stack[idx--] = w;
    }

    // 4. Draw windows back-to-front
    for (int i = 0; i < count; i++) {
        window_t* win = stack[i];
        if (!(win->flags & WIN_VISIBLE)) continue;

        // Draw decorations (title bar, border) if enabled
        if (win->flags & WIN_DECORATED) {
            wm_draw_decorations(win);
        }

        // Blit window content to back buffer
        for (int y = 0; y < win->height; y++) {
            for (int x = 0; x < win->width; x++) {
                int screen_x = win->x + x;
                int screen_y = win->y + y;

                // Clip to screen bounds
                if (screen_x >= 0 && screen_x < (int)gfx.width &&
                    screen_y >= 0 && screen_y < (int)gfx.height) {
                    gfx.back[screen_y * stride + screen_x] =
                        win->buffer[y * win->width + x];
                }
            }
        }
    }

    // 5. Flip to display
    gfx_flip();
}
Optimization: Per-pixel compositing is slow. Modern compositors use GPU acceleration (OpenGL, Vulkan) or at minimum accelerated memcpy for window blitting. For a simple OS, the naive approach works for a few windows.
Window Decorations
Decorations are the visual chrome around a window: title bar, minimize/maximize/close buttons, resize handles, and borders. The window manager draws these, not the application.
     WINDOW DECORATION LAYOUT

     ┌───────────────────────────────────────────────────────┐
     │ ┌─────────────────────────────────────────────────┐▒│ ← Border (1px)
     │ │▓▓ Title Text ▓▓▓▓▓▓▓▓▓▓▓▓▓▓▓▓▓│ _ │ □ │ X │▓▓▓│▒│ ← Title bar (24px)
     │ ├─────────────────────────────────────────────────┤▒│   Buttons
     │ │                                                 │▒│
     │ │                                                 │▒│
     │ │              Client Area                        │▒│ ← Window content
     │ │           (Application draws here)              │▒│
     │ │                                                 │▒│
     │ │                                                 │▒│
     │ └─────────────────────────────────────────────────┘▒│
     │▒▒▒▒▒▒▒▒▒▒▒▒▒▒▒▒▒▒▒▒▒▒▒▒▒▒▒▒▒▒▒▒▒▒▒▒▒▒▒▒▒▒▒▒▒▒▒▒▒▒▒▒▒│ ← Bottom border
     └───────────────────────────────────────────────────────┘

     │◄───────────── Window outer bounds ────────────────►│
/* Decoration dimensions */
#define TITLE_BAR_HEIGHT 24
#define BORDER_WIDTH     1
#define BUTTON_SIZE      20
#define BUTTON_MARGIN    2

/* Decoration colors */
#define TITLE_ACTIVE     0x4A90D9  // Focused window
#define TITLE_INACTIVE   0x808080  // Unfocused window
#define TITLE_TEXT       0xFFFFFF  // White text
#define BORDER_COLOR     0x404040  // Dark gray
#define BUTTON_CLOSE_BG  0xE81123  // Red
#define BUTTON_HOVER_BG  0x606060  // Gray

/* Draw window decorations (title bar, border, buttons) */
void wm_draw_decorations(window_t* win) {
    int stride = gfx.pitch / 4;

    // Window outer bounds
    int outer_x = win->x - BORDER_WIDTH;
    int outer_y = win->y - TITLE_BAR_HEIGHT - BORDER_WIDTH;
    int outer_w = win->width + 2 * BORDER_WIDTH;
    int outer_h = win->height + TITLE_BAR_HEIGHT + 2 * BORDER_WIDTH;

    // Choose title bar color based on focus
    uint32_t title_color = (win->flags & WIN_FOCUSED)
                           ? TITLE_ACTIVE : TITLE_INACTIVE;

    // 1. Draw border
    draw_rect(outer_x, outer_y, outer_w, outer_h, BORDER_COLOR);

    // 2. Draw title bar background
    fill_rect(win->x - BORDER_WIDTH + 1,
              win->y - TITLE_BAR_HEIGHT,
              win->width + 2 * BORDER_WIDTH - 2,
              TITLE_BAR_HEIGHT,
              title_color);

    // 3. Draw title text
    draw_string(win->x + 4, win->y - TITLE_BAR_HEIGHT + 4,
                win->title, TITLE_TEXT, title_color);

    // 4. Draw close button (X)
    int close_x = win->x + win->width - BUTTON_SIZE - BUTTON_MARGIN;
    int close_y = win->y - TITLE_BAR_HEIGHT + BUTTON_MARGIN;
    fill_rect(close_x, close_y, BUTTON_SIZE, BUTTON_SIZE, BUTTON_CLOSE_BG);

    // Draw X on close button
    draw_line(close_x + 5, close_y + 5,
              close_x + BUTTON_SIZE - 5, close_y + BUTTON_SIZE - 5,
              TITLE_TEXT);
    draw_line(close_x + BUTTON_SIZE - 5, close_y + 5,
              close_x + 5, close_y + BUTTON_SIZE - 5,
              TITLE_TEXT);
}

/* Hit test: which part of window was clicked? */
typedef enum {
    HIT_NONE,
    HIT_TITLE_BAR,
    HIT_CLIENT,
    HIT_CLOSE_BUTTON,
    HIT_MINIMIZE_BUTTON,
    HIT_MAXIMIZE_BUTTON,
    HIT_RESIZE_BORDER,
} hit_result_t;

hit_result_t wm_hit_test(window_t* win, int mouse_x, int mouse_y) {
    // Check close button
    int close_x = win->x + win->width - BUTTON_SIZE - BUTTON_MARGIN;
    int close_y = win->y - TITLE_BAR_HEIGHT + BUTTON_MARGIN;
    if (mouse_x >= close_x && mouse_x < close_x + BUTTON_SIZE &&
        mouse_y >= close_y && mouse_y < close_y + BUTTON_SIZE) {
        return HIT_CLOSE_BUTTON;
    }

    // Check title bar
    if (mouse_y >= win->y - TITLE_BAR_HEIGHT && mouse_y < win->y) {
        return HIT_TITLE_BAR;
    }

    // Check client area
    if (mouse_x >= win->x && mouse_x < win->x + win->width &&
        mouse_y >= win->y && mouse_y < win->y + win->height) {
        return HIT_CLIENT;
    }

    return HIT_NONE;
}
Next Phase Preview: Window management needs mouse input for clicking, dragging, and resizing. In Phase 14, we'll add PS/2 mouse support so users can interact with our windowing system!
What You Can Build
Phase 13 Project: A graphical desktop environment! Your OS now has drawing primitives, text rendering, double-buffered display, and basic windowing. You can display multiple overlapping windows with title bars.
Let's bring it all together with a complete graphics demo that showcases everything we built:
/*
 * graphics_demo.c - Complete Phase 13 Graphics Demo
 * Demonstrates: Framebuffer, Drawing, Fonts, Double Buffer, Windows
 */

#include "graphics.h"
#include "font.h"
#include "window.h"

/* External: PSF2 font data (embedded or loaded) */
extern uint8_t _binary_font_psf_start[];

/* Initialize the graphics subsystem */
void graphics_init(boot_info_t* boot_info) {
    // 1. Initialize framebuffer from boot info
    fb_init((uint32_t*)boot_info->framebuffer.address,
            boot_info->framebuffer.width,
            boot_info->framebuffer.height,
            boot_info->framebuffer.pitch);

    // 2. Initialize double buffering
    gfx_init(fb.buffer, fb.width, fb.height, fb.pitch);

    // 3. Load font
    font_init(_binary_font_psf_start);

    printf("[GFX] Graphics initialized: %dx%d @ %d bpp\n",
           fb.width, fb.height, fb.bpp);
}

/* Draw a simple pattern to test graphics */
void draw_test_pattern(void) {
    // Clear to gradient background
    for (int y = 0; y < (int)gfx.height; y++) {
        uint8_t blue = 128 + (y * 127 / gfx.height);
        uint32_t color = make_color(32, 64, blue);
        draw_hline(0, y, gfx.width, color);
    }

    // Draw colorful rectangles
    fill_rect(50, 50, 200, 150, COLOR_RED);
    fill_rect(100, 100, 200, 150, COLOR_GREEN);
    fill_rect(150, 150, 200, 150, COLOR_BLUE);

    // Draw shapes
    draw_circle(500, 300, 80, COLOR_YELLOW);
    fill_circle(500, 300, 40, COLOR_CYAN);
    draw_rect(400, 200, 200, 200, COLOR_WHITE);

    // Draw some lines
    for (int i = 0; i < 360; i += 15) {
        int x2 = 800 + (int)(100 * cos(i * 3.14159 / 180));
        int y2 = 300 + (int)(100 * sin(i * 3.14159 / 180));
        draw_line(800, 300, x2, y2, COLOR_MAGENTA);
    }

    // Draw text
    draw_string(50, 400, "Hello from Phase 13!",
                COLOR_WHITE, COLOR_BLACK);
    draw_printf(50, 420, COLOR_CYAN, COLOR_BLACK,
                "Resolution: %dx%d", gfx.width, gfx.height);
    draw_printf(50, 440, COLOR_GREEN, COLOR_BLACK,
                "Font: %dx%d pixels", font_width(), font_height());
}

/* Create demo windows */
void create_demo_desktop(void) {
    // Create a few demo windows
    window_t* win1 = wm_create_window(100, 150, 300, 200, "Terminal");
    window_t* win2 = wm_create_window(250, 200, 350, 250, "File Manager");
    window_t* win3 = wm_create_window(450, 100, 280, 180, "System Info");

    // Fill window 1 with terminal-like content
    if (win1) {
        for (int i = 0; i < win1->width * win1->height; i++) {
            win1->buffer[i] = 0x1A1A2E;  // Dark terminal background
        }
        // Draw some fake terminal text (coordinates relative to window)
        // ... (would need window-local draw functions)
    }

    // Fill window 2 with file manager look
    if (win2) {
        for (int i = 0; i < win2->width * win2->height; i++) {
            win2->buffer[i] = 0xF0F0F0;  // Light gray
        }
    }

    // Fill window 3 with system info
    if (win3) {
        for (int i = 0; i < win3->width * win3->height; i++) {
            win3->buffer[i] = 0xFFFFFF;  // White
        }
    }

    // Focus the top window
    focused_window = win3;
    if (win3) win3->flags |= WIN_FOCUSED;
}

/* Main graphics demo entry point */
void graphics_demo(boot_info_t* boot_info) {
    graphics_init(boot_info);

    // Option 1: Draw test pattern (no windows)
    // draw_test_pattern();
    // gfx_flip();

    // Option 2: Full windowed desktop
    create_demo_desktop();
    wm_composite();  // Draw all windows to screen

    printf("[GFX] Desktop rendered successfully!\n");
}
Phase 13 Exercises
Exercise 1: Gradient Title Bars
Beginner
Goal: Make window title bars use a vertical gradient instead of a solid color.
Hints:
Modify wm_draw_decorations()
Use fill_rect_gradient() for the title bar area
Choose colors: lighter at top, darker at bottom
Exercise 2: Bitmap Image Loading
Intermediate
Goal: Load and display a BMP image as a desktop wallpaper.
PSF Fonts:/usr/share/consolefonts/ on Linux; PC Screen Fonts
QEMU Testing:-enable-kvm -vga std for fast graphical output
Color Picker: Use hex colors directly (e.g., 0xRRGGBB); web tools work
Benchmarking: Draw 1000 lines, time with RDTSC; measure fill_rect vs memset
Screenshot: QEMU: screendump filename.ppm in monitor
Milestone Achieved: You've implemented a complete graphics stack from scratch! This is the foundation of every graphical operating system. Modern systems add GPU acceleration, but the concepts remain identical.
A graphical system needs input! In Phase 14, we'll add mouse support for window interaction and implement high-precision timers for smooth animations and scheduling.
Continue the Series
Phase 12: Modern Booting with UEFI
Review UEFI boot services and GOP framebuffer setup.