x86 Assembly Series Part 0: Development Environment, Tooling & Workflow
February 6, 2026Wasil Zafar35 min read
Set up a complete x86/x86-64 assembly development environment with assemblers (NASM, MASM, GAS), debuggers (GDB, WinDbg), IDEs, and build automation tools for professional low-level development.
Introduction: Setting Up Your Assembly Environment
Series Overview: This is Part 0 of our 25-part x86/x86-64 Assembly Mastery Series. Before writing any assembly code, we need a proper development environment with assemblers, debuggers, and build tools configured correctly.
Before we write a single line of assembly, we need to set up a professional development environment. This foundational step is often overlooked, but having the right tools configured correctly will save countless hours of frustration.
Key Insight: Assembly development requires understanding the complete toolchain—from assembler to linker to debugger. Each tool plays a critical role in transforming human-readable code into executable machine instructions.
Choosing Your Platform
Assembly development can target multiple platforms. Your choice affects which tools and workflows you'll use:
Platform
Linux (Native or WSL)
Recommended for beginners. Linux provides the cleanest assembly development experience with excellent tool support.
NASM + GCC + GDB = powerful combination
ELF binary format is well-documented
syscall interface is straightforward
WSL2 on Windows provides near-native experience
Platform
Windows Native
Required for Windows-specific development or when targeting PE executables.
MASM integrated with Visual Studio
WinDbg for kernel debugging
PE/COFF binary format
Different calling conventions (Microsoft x64 ABI)
Platform
macOS (Apple Silicon or Intel)
macOS provides Unix-like development experience with some x86 considerations.
Intel Macs: Native x86-64 execution, ideal for learning
Apple Silicon: Use Rosetta 2 or cross-compile with QEMU
Homebrew provides NASM and GCC
LLDB (instead of GDB) is the default debugger
Cross-Development Environments
Cross-development means writing and compiling code on one platform to run on another. This is essential for embedded systems, OS development, and when your target differs from your host.
Real-World Analogy: Think of cross-development like writing a recipe in English (host) for a chef who only reads French (target). You need a translator (cross-compiler) to bridge the gap.
Setting Up WSL2 for Cross-Platform Development
Windows Subsystem for Linux 2 (WSL2) is the best way to get a Linux environment on Windows for assembly development:
Important: The gcc-multilib package is crucial—it allows compiling both 32-bit and 64-bit code on the same system.
Cross-Compiling for Different Targets
Linux / WSL
# Compile 32-bit x86 on 64-bit Linux
nasm -f elf32 program.asm -o program.o
ld -m elf_i386 program.o -o program

# Compile 64-bit x86-64 (default on modern Linux)
nasm -f elf64 program.asm -o program.o
ld program.o -o program

# Cross-compile for Windows PE format on Linux
nasm -f win64 program.asm -o program.obj
x86_64-w64-mingw32-ld program.obj -o program.exe
Host Platform
Target Format
NASM Flag
Linker Command
Linux 64-bit
ELF64 (Linux)
-f elf64
ld
Linux 64-bit
ELF32 (Linux 32-bit)
-f elf32
ld -m elf_i386
Linux
PE64 (Windows)
-f win64
x86_64-w64-mingw32-ld
Linux
Flat binary (Bootloader)
-f bin
None (direct binary)
Installing Assemblers
NASM (Netwide Assembler)
NASM is the recommended assembler for this series—it's cross-platform, well-documented, and uses Intel syntax.
# Install via Homebrew (macOS ships with an older NASM)
brew install nasm

# Verify installation
nasm --version
Windows
# Using Chocolatey (run as Administrator)
choco install nasm

# Or download installer from https://www.nasm.us/
# Important: Add NASM to your PATH after manual installation
nasm --version
MASM (Microsoft Macro Assembler)
MASM is Microsoft's assembler, tightly integrated with Visual Studio. It's the standard choice for Windows assembly development and uses Intel syntax.
Two MASM Versions: MASM comes in two flavors: ml.exe (32-bit) and ml64.exe (64-bit). Both are included with Visual Studio's C++ workload.
Option 1: Install with Visual Studio
Windows Only
# During Visual Studio installation, select:
1. "Desktop development with C++" workload
2. Under "Individual Components", ensure:
   - MSVC v143 (or latest) build tools
   - C++ ATL for latest build tools (x86 & x64)

# After installation, MASM is located at:
C:\Program Files\Microsoft Visual Studio\2022\Community\VC\Tools\MSVC\[version]\bin\Hostx64\x64\ml64.exe
Option 2: Visual Studio Build Tools (Smaller Download)
If you don't need the full IDE, install just the build tools:
Windows Only
# Download Visual Studio Build Tools from:
# https://visualstudio.microsoft.com/downloads/#build-tools-for-visual-studio-2022

# After install, open "x64 Native Tools Command Prompt"
# This sets up the environment with correct paths

# Test MASM
ml64 /?
MASM Hello World Example
; hello_masm.asm - 64-bit Windows Console
INCLUDELIB kernel32.lib

; External Windows API functions
EXTRN GetStdHandle:PROC
EXTRN WriteConsoleA:PROC
EXTRN ExitProcess:PROC

.data
    msg     db "Hello from MASM!", 13, 10, 0
    msgLen  equ $ - msg

.data?
    written dq ?

.code
main PROC
    ; Get stdout handle
    mov     ecx, -11                    ; STD_OUTPUT_HANDLE
    call    GetStdHandle
    mov     rbx, rax                    ; Save handle

    ; Write to console
    sub     rsp, 40                     ; Shadow space + 5th arg
    mov     rcx, rbx                    ; Handle
    lea     rdx, msg                    ; Buffer
    mov     r8d, msgLen                 ; Length
    lea     r9, written                 ; Bytes written
    mov     qword ptr [rsp+32], 0       ; Reserved
    call    WriteConsoleA
    add     rsp, 40

    ; Exit
    xor     ecx, ecx
    call    ExitProcess
main ENDP
END
Windows (x64 Native Tools Command Prompt)
ml64 /c hello_masm.asm
link hello_masm.obj /subsystem:console /entry:main
hello_masm.exe
GNU Assembler (GAS)
GAS is part of the GNU Binutils and comes pre-installed with GCC. It uses AT&T syntax by default but can also use Intel syntax.
AT&T vs Intel Syntax: GAS traditionally uses AT&T syntax (source, destination order with % and $ prefixes). Most assembly programmers find Intel syntax more readable. Fortunately, GAS supports both.
Installing GAS
Linux GAS comes with binutils (usually pre-installed):
sudo apt install binutils

# Verify - GAS is invoked via 'as' command
as --version
macOS
# Xcode Command Line Tools includes 'as'
xcode-select --install

# Or install GNU binutils via Homebrew
brew install binutils

# Important: macOS 'as' is Clang's integrated assembler, not GNU as
# For GNU as, use the Homebrew version explicitly:
#   /usr/local/opt/binutils/bin/as   (Intel Mac)
#   /opt/homebrew/opt/binutils/bin/as (Apple Silicon)
as --version
# Assemble and link
as hello_gas.s -o hello_gas.o
ld hello_gas.o -o hello_gas
./hello_gas
macOS Difference: macOS uses the Mach-O binary format instead of ELF. The as command on macOS is Clang's assembler, and linking requires different flags:
# macOS: Use Mach-O format and different linker flags
as hello_gas.s -o hello_gas.o
ld -macos_version_min 10.13 -e _start -static hello_gas.o -o hello_gas
Key differences: macOS requires underscore-prefixed symbols (_start → __start), uses Mach-O instead of ELF, and syscall numbers differ from Linux (macOS x86-64 syscalls are offset by 0x2000000).
GAS via GCC (Recommended for C Interop)
# Compile assembly with GCC (handles linking automatically)
gcc -nostdlib hello_gas.s -o hello_gas

# Or for inline assembly in C
gcc -c -masm=intel program.c -o program.o
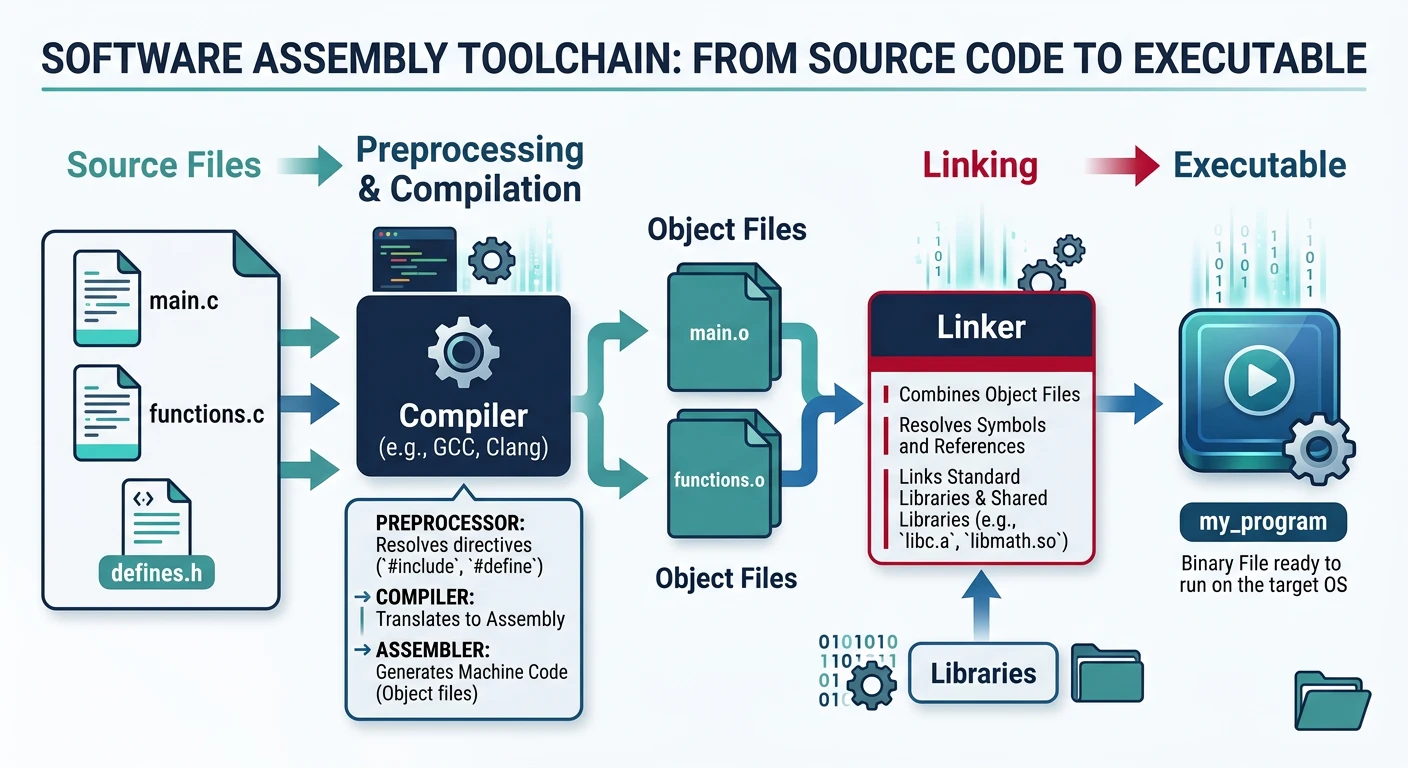
Even though we're writing assembly, compilers and linkers are essential tools. Compilers help with C interop and disassembly analysis, while linkers combine object files into executables.
Assembly toolchain overview — compilers translate C to assembly/object code while linkers combine object files and resolve symbols into final executables
Real-World Analogy: Think of the assembler as a translator who converts your instructions to a foreign language (machine code). The linker is like a book publisher who takes all the translated chapters, adds the table of contents, and binds them into a complete book (executable).
GCC (GNU Compiler Collection)
GCC is more than a C compiler—it's a complete toolchain for compiling and linking programs. It integrates seamlessly with assembly.
Linux (Debian/Ubuntu)
sudo apt install build-essential

# Install both 32-bit and 64-bit support
sudo apt install gcc-multilib

# Verify installation
gcc --version
ld --version    # GNU linker comes with GCC
macOS
# Xcode Command Line Tools (includes Clang aliased as 'gcc')
xcode-select --install

# Important: macOS 'gcc' is actually Clang
gcc --version    # Shows "Apple clang version ..."

# For real GNU GCC, install via Homebrew
brew install gcc
gcc-14 --version    # Use versioned binary (e.g., gcc-14)

# Note: gcc-multilib is NOT available on macOS
# Use -m32 flag with Clang or cross-compile via Docker/QEMU
Windows
# Option 1: MSYS2 (recommended for GNU toolchain on Windows)
# Download from https://www.msys2.org/
# In MSYS2 UCRT64 terminal:
pacman -S mingw-w64-ucrt-x86_64-gcc

# Option 2: Chocolatey
choco install mingw

gcc --version
Using GCC with Assembly
# Compile C file to see assembly output
gcc -S -fverbose-asm -O2 program.c -o program.s

# Use Intel syntax (easier to read)
gcc -S -masm=intel -O2 program.c -o program.s

# Compile assembly to object file using GCC
gcc -c program.s -o program.o

# Link assembly with C runtime (for printf, etc.)
gcc program.o -o program

# Compile and link in one step (recommended for beginners)
gcc main.c helper.asm -o program
Practical Exercise: Examine Compiler Output
Understanding compiler output helps you write better assembly:
// simple.c
int add(int a, int b) {
    return a + b;
}

int main() {
    int result = add(5, 3);
    return result;
}
# Generate assembly with different optimization levels
gcc -S -masm=intel -O0 simple.c -o simple_O0.s  # No optimization
gcc -S -masm=intel -O2 simple.c -o simple_O2.s  # Standard optimization
gcc -S -masm=intel -O3 simple.c -o simple_O3.s  # Aggressive optimization

# Compare the outputs - you'll learn optimization patterns!
Clang / LLVM
Clang is an alternative to GCC with better error messages and faster compile times. LLVM provides a modular compiler infrastructure.
Linux
sudo apt install clang llvm
clang --version
macOS Clang is the default compiler (pre-installed with Xcode tools):
# Usually pre-installed; if not:
xcode-select --install
clang --version
Windows
# Included with Visual Studio C++ workload, or standalone:
# Download from https://releases.llvm.org/download.html
# Or via Chocolatey:
choco install llvm
clang --version
All Platforms Usage is identical once installed:
# Clang works like GCC for assembly workflows
clang -S -masm=intel program.c -o program.s
clang program.s -o program
Linkers: ld, lld, and link.exe
The linker combines object files, resolves symbols, and creates the final executable. Understanding linkers helps debug "undefined reference" errors.
What Linkers Do:
Combine multiple object files (.o or .obj)
Resolve external symbol references (e.g., printf)
Apply relocations (adjust addresses for final layout)
Create executable headers (ELF, PE) with entry point
GNU ld (Standard Linux Linker)
Linux / WSL
# Direct invocation for standalone assembly
ld program.o -o program

# Link 32-bit binary
ld -m elf_i386 program.o -o program

# Link with libraries
ld program.o -lc -dynamic-linker /lib64/ld-linux-x86-64.so.2 -o program

# Specify entry point (default is _start)
ld program.o -e main -o program

# Create position-independent executable (PIE)
ld -pie program.o -o program
lld (LLVM Linker - Faster Alternative)
LinuxmacOS
# Install
sudo apt install lld    # Linux (Debian/Ubuntu)
brew install llvm        # macOS (lld included with LLVM)

# Direct usage
ld.lld program.o -o program

# Use through GCC/Clang (recommended)
gcc -fuse-ld=lld program.o -o program
clang -fuse-ld=lld program.o -o program
Microsoft Linker (link.exe)
Windows Only
# From x64 Native Tools Command Prompt
link program.obj /OUT:program.exe /SUBSYSTEM:CONSOLE /ENTRY:main

# Common options:
#   /SUBSYSTEM:CONSOLE   - Console application
#   /SUBSYSTEM:WINDOWS   - GUI application (no console)
#   /ENTRY:symbol        - Override entry point
#   /DEBUG               - Generate debug info (PDB)
#   /INCREMENTAL:NO      - Disable incremental linking
Common Linker Scripts
For bare-metal and bootloader development, you'll need custom linker scripts:
# Use the linker script
ld -T minimal.ld bootloader.o -o bootloader.bin
IDEs & Editors
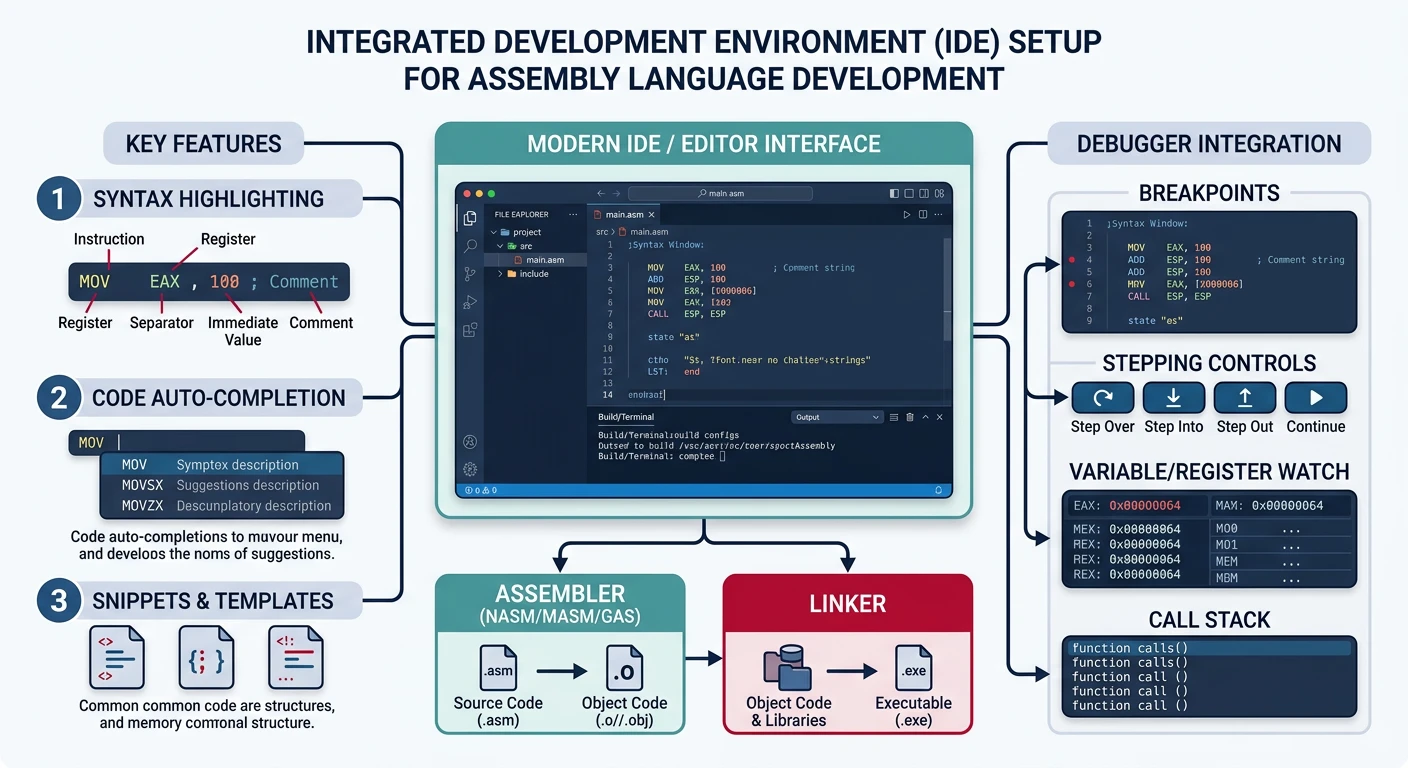
A good editor with syntax highlighting, snippets, and integrated debugging transforms your assembly development experience. Here are the top choices:
Recommended IDE and editor configurations for assembly development — syntax highlighting, build task integration, and debugger setup
Visual Studio Code (Recommended)
VS Code strikes the perfect balance between a lightweight editor and a full IDE. With the right extensions, it's the best choice for assembly development.
Platform-Specific VS Code Configuration: The tasks.json and launch.json above target Linux / WSL (ELF format, GNU ld, GDB). Adjust for other platforms:
macOS Change -f elf64 → -f macho64, set "MIMode": "lldb" in launch.json
Windows Change -f elf64 → -f win64, replace ld with link.exe or gcc (MinGW), use "type": "cppvsdbg" for MSVC debugger
Pro Tip: Press Ctrl+Shift+B (Cmd+Shift+B on macOS) to build and F5 to debug. VS Code will automatically run the configured tasks.
Vim / Neovim
For the command-line warrior, Vim offers unparalleled efficiency once mastered. Neovim adds modern features like LSP support and Lua configuration.
-- For Neovim - add to ~/.config/nvim/init.lua
-- Requires Packer or lazy.nvim plugin manager

-- Install asm-lsp for assembly language server
-- First: cargo install asm-lsp

require('lspconfig').asm_lsp.setup{
    filetypes = { "asm", "nasm", "vmasm" },
}
Visual Studio
Visual Studio is the premier choice for Windows-centric assembly development with MASM. The integrated debugger is particularly powerful.
Creating an Assembly Project
# Creating a MASM project in Visual Studio 2022:

1. File → New → Project
2. Search "Empty Project" (C++)
3. Name your project (e.g., "AsmProject")
4. Right-click project → Build Dependencies → Build Customizations
5. Check "masm(.targets, .props)" → OK

6. Add assembly file:
   - Right-click Source Files → Add → New Item
   - Select C++ File but name it "main.asm"

7. Configure assembly file properties:
   - Right-click main.asm → Properties
   - Item Type: Microsoft Macro Assembler
   - Click OK

8. Configure linker (for 64-bit console app):
   - Project → Properties → Linker → System
   - SubSystem: Console (/SUBSYSTEM:CONSOLE)
   - Linker → Advanced → Entry Point: main
Visual Studio MASM Template
; main.asm - Visual Studio x64 MASM template
.code

main PROC
    ; Your code here
    mov     rax, 42         ; Return value
    ret
main ENDP

END
Build with Ctrl+Shift+B, debug with F5. Visual Studio's debugger shows registers and memory natively.
Useful Visual Studio Features for Assembly
Disassembly Window: Debug → Windows → Disassembly (Ctrl+Alt+D)
Registers Window: Debug → Windows → Registers (Ctrl+Alt+G)
Memory Window: Debug → Windows → Memory
Watch Window: Monitor specific addresses or register values
Step Into Assembly: Enable "Show Disassembly" when stepping through C code
Editor Comparison Summary:
VS Code
Best overall; cross-platform, extensible, great for NASM + GDB
Vim/Neovim
Fastest for experts; SSH-friendly, minimal resource usage
Visual Studio
Best for Windows/MASM; unmatched debugging, heavy resource usage
Debuggers
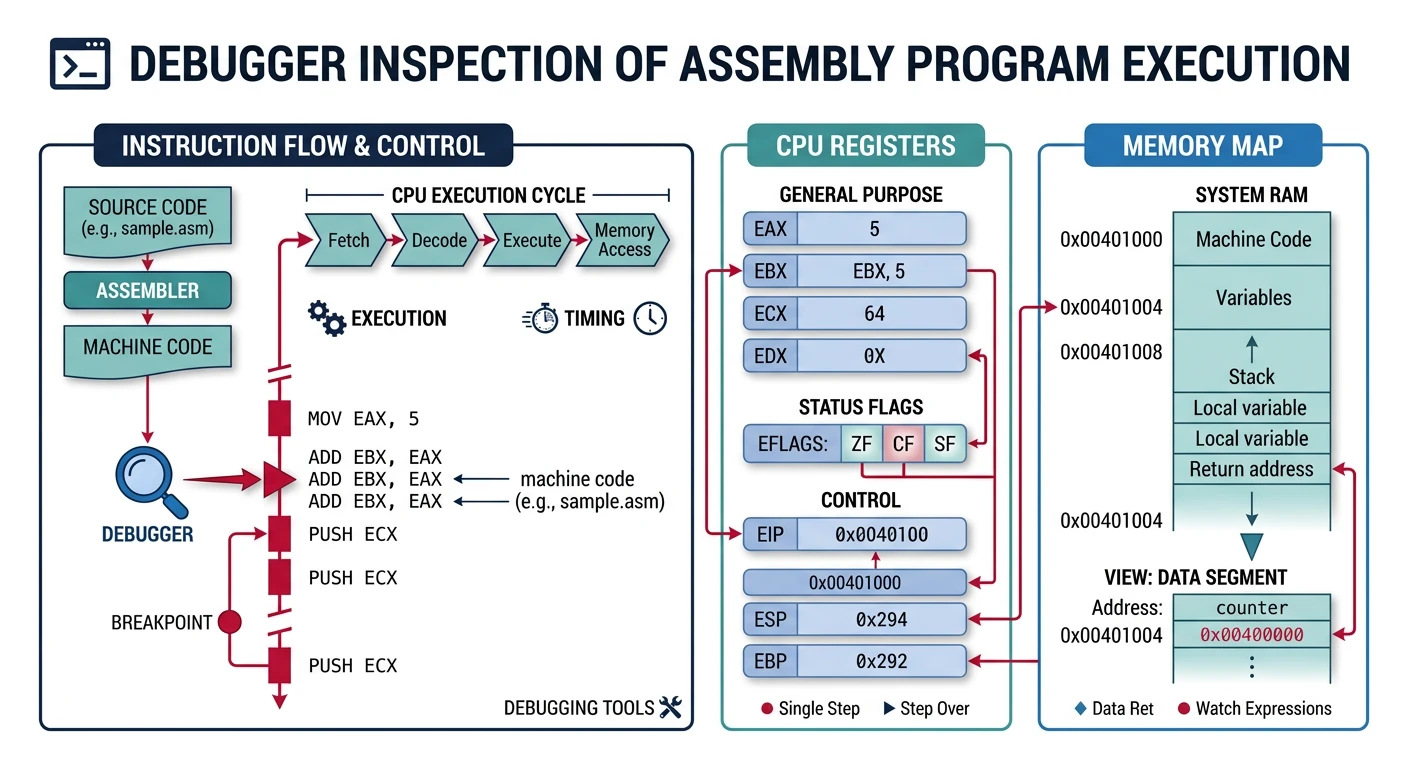
A debugger is your most important tool after the assembler. It lets you step through code instruction by instruction, examine registers, and understand exactly what the CPU is doing.
Debugger interface showing register state, memory contents, and instruction-level stepping through an assembly program
Debug Symbols Are Essential: Always assemble with debug information enabled. Without symbols, debugging becomes guesswork.
# Linux: NASM with DWARF debug symbols (ELF format)
nasm -f elf64 -g -F dwarf program.asm -o program.o

# macOS: Mach-O format with DWARF debug symbols
nasm -f macho64 -g program.asm -o program.o

# Windows: Win64 format with CodeView debug symbols
nasm -f win64 -g -F cv8 program.asm -o program.obj
GDB (GNU Debugger)
GDB is the standard debugger for Linux and works well with any assembler. Mastering GDB is essential for any serious assembly programmer.
# macOS default debugger is LLDB (recommended over GDB)
lldb --version

# GDB is available but requires code-signing to work on macOS
brew install gdb

# After install, you MUST code-sign GDB for macOS security:
# 1. Open Keychain Access → Certificate Assistant → Create Certificate
#    Name: "gdb-cert", Type: Code Signing, check "Let me override defaults"
# 2. Sign GDB:
codesign -s "gdb-cert" $(which gdb)
# 3. Restart your Mac for changes to take effect
macOS: LLDB vs GDB Quick Reference — LLDB is recommended on macOS (works out of the box, no code-signing needed):
GDB Command
LLDB Equivalent
run
run
break _start
b _start
info registers
register read
x/10i $rip
disassemble -c 10
x/16xb $rsp
memory read -s1 -c16 -fx $rsp
stepi / si
si
nexti / ni
ni
set $rax = 42
register write rax 42
disassemble
disassemble --frame
Essential GDB Commands Reference
Command
Short
Description
run [args]
r
Start program execution
break *address
b
Set breakpoint at address (use * for raw addresses)
break _start
b
Set breakpoint at symbol
stepi
si
Step one instruction (into calls)
nexti
ni
Step one instruction (over calls)
continue
c
Continue until next breakpoint
info registers
i r
Display all registers
info registers rax
i r rax
Display specific register
x/10i $rip
—
Examine 10 instructions at RIP
x/16xb $rsp
—
Examine 16 hex bytes at stack pointer
x/s address
—
Examine as string
disassemble
disas
Disassemble current function
set $rax = 42
—
Modify register value
quit
q
Exit GDB
GDB Memory Examination Format
# x/[count][format][size] address
# Format: x=hex, d=decimal, i=instruction, s=string, c=char
# Size: b=byte, h=halfword(2), w=word(4), g=giant(8)

x/10xg $rsp       # 10 giant words (64-bit) in hex from stack
x/20i $rip        # 20 instructions from instruction pointer
x/s 0x402000      # String at address
x/32xb &buffer    # 32 bytes in hex from buffer label
Complete GDB Session Example
Linux
# Assemble with debug info
nasm -f elf64 -g -F dwarf hello.asm -o hello.o
ld hello.o -o hello

# Start debugging
gdb ./hello

(gdb) set disassembly-flavor intel    # Intel syntax
(gdb) break _start                    # Break at entry
(gdb) run                             # Start execution

# Now we're at _start
(gdb) info registers                  # Show all registers
(gdb) x/5i $rip                       # Show next 5 instructions
(gdb) stepi                           # Execute one instruction
(gdb) info registers rax rbx          # Check specific registers
(gdb) x/s 0x402000                    # Examine string data
(gdb) continue                        # Run to completion
(gdb) quit                            # Exit
GDB Configuration (~/.gdbinit)
LinuxmacOS
# Add to ~/.gdbinit for persistent settings
set disassembly-flavor intel
set pagination off
set confirm off

# Show registers after each step (useful for learning)
define hook-stop
    info registers rax rbx rcx rdx rsi rdi rsp rbp rip
    x/3i $rip
end

# Custom command to show stack
define stack
    x/16xg $rsp
end
WinDbg (Windows Debugger)
WinDbg is Microsoft's debugger, essential for Windows assembly and kernel debugging. It's more complex than GDB but offers unmatched Windows debugging capabilities.
Installing WinDbg
Windows Only
# Install the modern "WinDbg Preview" from Microsoft Store
# Or download from:
# https://learn.microsoft.com/en-us/windows-hardware/drivers/debugger/

# For older WinDbg, install Windows SDK and select:
# "Debugging Tools for Windows"
Essential WinDbg Commands
Command
Description
g
Go (continue execution)
p
Step over (one instruction)
t
Trace into (step into calls)
bp address
Set breakpoint
bl
List breakpoints
r
Display registers
r rax=42
Modify register
u address
Unassemble (disassemble)
db address
Display bytes
dq address
Display quad words (64-bit)
da address
Display ASCII string
k
Display call stack
lm
List loaded modules
q
Quit
WinDbg Symbol Setup: Configure symbol path for meaningful stack traces:
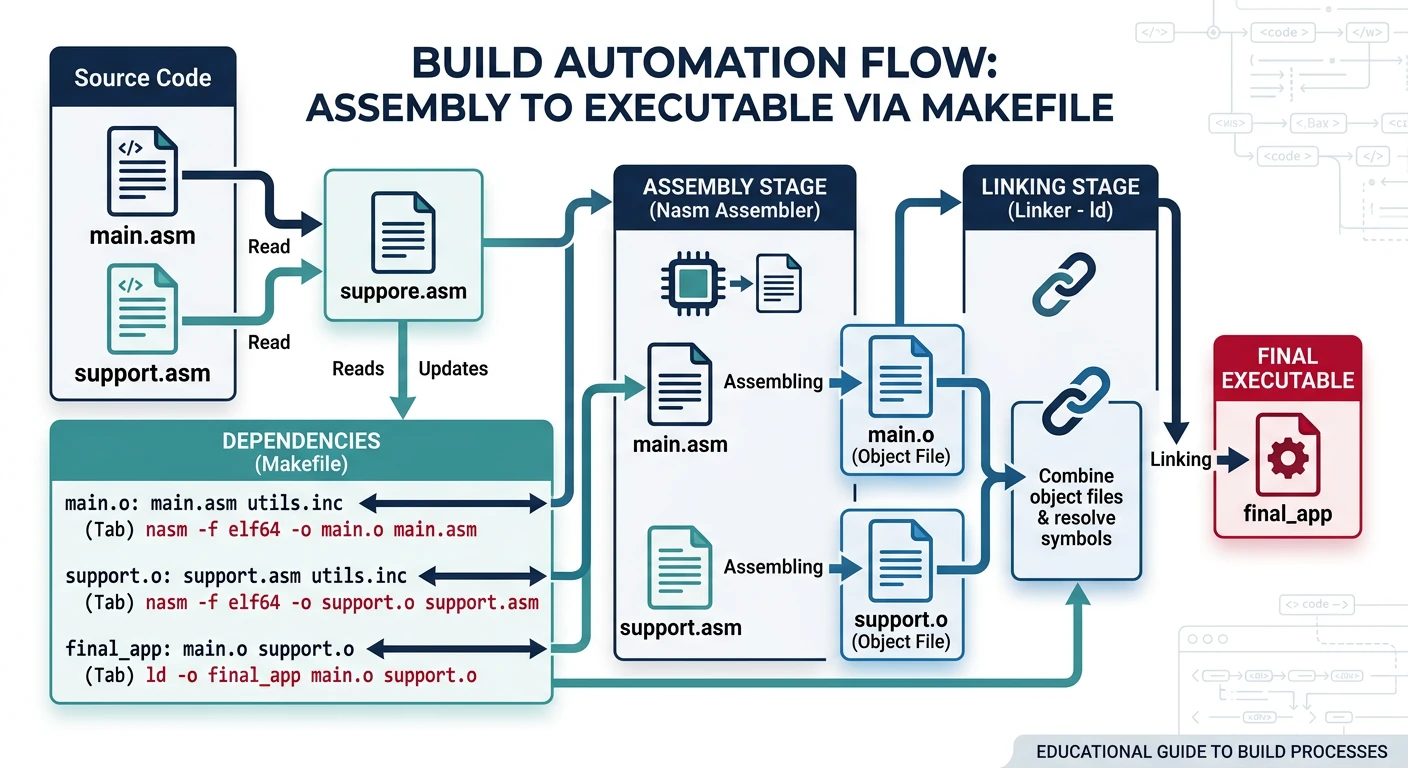
As your assembly projects grow, manually typing build commands becomes tedious and error-prone. Build automation tools like Make and CMake ensure consistent, reproducible builds.
Makefile-driven build automation — dependency graph showing how assembly sources are assembled, linked, and packaged into executables
Real-World Analogy: A Makefile is like a recipe book. Instead of remembering every step to bake a cake, you just say "make cake" and the recipe book handles all the steps in the right order.
Makefiles
Make is the classic build tool. A Makefile contains rules that describe dependencies and commands to build your project.
Example main.asm for Each Platform
Create this main.asm file to test your Makefile. Note the critical differences between platforms:
macOS changes: Replace ASMFLAGS = -f elf64 -g -F dwarf with ASMFLAGS = -f macho64 -g, and the -no-pie flag is not needed on macOS (use -Wl,-no_pie if required). macOS gcc is Clang — use clang explicitly or install GNU GCC via Homebrew.
CMake
CMake is a meta-build system that generates Makefiles (or Ninja, Visual Studio projects, etc.). It's more portable and scales better for large projects.
CMake for Assembly Projects
Cross-Platform This CMake file auto-detects the platform:
# CMakeLists.txt for NASM assembly projects (cross-platform)
cmake_minimum_required(VERSION 3.16)
project(AsmProject ASM_NASM)

# Enable NASM support
enable_language(ASM_NASM)

# Set platform-specific NASM flags
if(APPLE)
    # macOS: Mach-O 64-bit format
    set(CMAKE_ASM_NASM_FLAGS "${CMAKE_ASM_NASM_FLAGS} -f macho64 -g")
elseif(UNIX)
    # Linux: ELF 64-bit format with DWARF debug symbols
    set(CMAKE_ASM_NASM_FLAGS "${CMAKE_ASM_NASM_FLAGS} -f elf64 -g -F dwarf")
elseif(WIN32)
    # Windows: PE/COFF 64-bit format with CodeView debug symbols
    set(CMAKE_ASM_NASM_FLAGS "${CMAKE_ASM_NASM_FLAGS} -f win64 -g -F cv8")
endif()

# Define executable
add_executable(main main.asm)

# Platform-specific linker flags
if(UNIX AND NOT APPLE)
    set_target_properties(main PROPERTIES LINK_FLAGS "-no-pie")
elseif(APPLE)
    set_target_properties(main PROPERTIES LINK_FLAGS "-e _main -static")
endif()
# Build with CMake (all platforms)
mkdir build && cd build
cmake ..
make            # Linux/macOS

# Or use Ninja (faster, all platforms)
cmake -G Ninja ..
ninja

# Windows: Generate Visual Studio project instead
# cmake -G "Visual Studio 17 2022" ..
Cross-platform, IDE integration, scales to large projects
Ninja
Fastest builds, use with CMake for best results
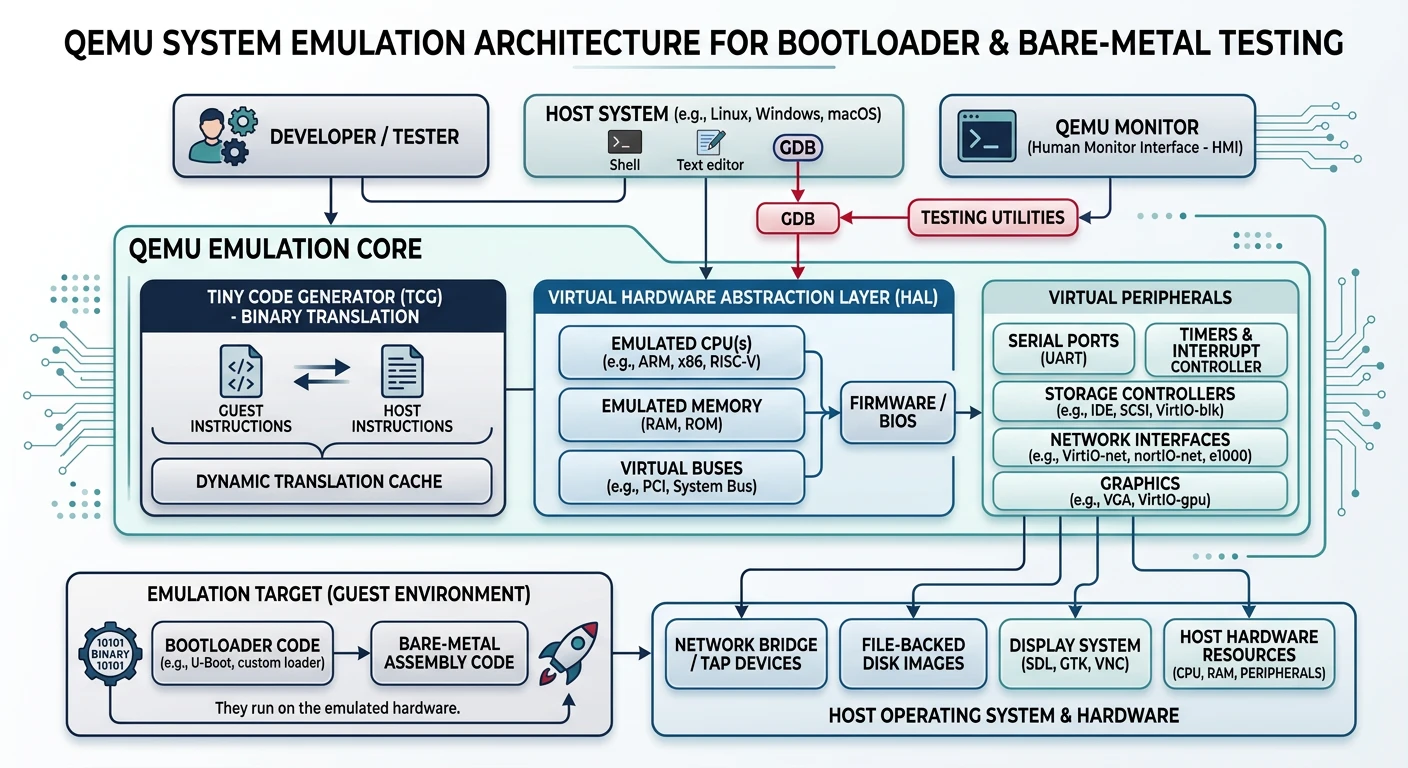
QEMU Setup
QEMU is an essential tool for assembly development. It emulates complete systems, allowing you to test bootloaders, kernels, and bare-metal code without risking your actual hardware.
QEMU system emulation workflow — emulating x86 hardware to safely test bootloaders, kernels, and bare-metal assembly programs
Real-World Analogy: QEMU is like a flight simulator for your code. Just as pilots practice dangerous maneuvers in simulators before real flights, you can test risky low-level code in QEMU without crashing your actual computer.
Installing QEMU
Linux (Debian/Ubuntu)
sudo apt install qemu-system-x86 qemu-user
macOS
brew install qemu
Windows
# Using Chocolatey (run as Administrator)
choco install qemu

# Or download from https://www.qemu.org/download/
# Add QEMU to your PATH after installation
Userland Emulation (qemu-user)
QEMU can run Linux binaries compiled for different architectures. This is useful when cross-compiling or testing 32-bit code on 64-bit systems.
Linux Only (qemu-user is not available on macOS or Windows)
# Run 32-bit ELF on 64-bit Linux (requires multilib)
qemu-i386 ./program_32bit

# Run ARM binary on x86 Linux
qemu-arm ./program_arm

# Cross-compile and test ARM code
arm-linux-gnueabi-as program.s -o program.o
arm-linux-gnueabi-ld program.o -o program
qemu-arm ./program
Note: For most x86 assembly learning, you won't need qemu-user. It's primarily for cross-architecture development.
Bare-Metal System Emulation
This is where QEMU shines for assembly developers. You can boot raw binary files, test bootloaders, and develop kernels.
Running a Bootloader
# Assemble a 512-byte boot sector
nasm -f bin bootloader.asm -o bootloader.bin

# Run in QEMU (floppy disk emulation)
qemu-system-x86_64 -fda bootloader.bin

# Prefer newer AHCI disk interface (-drive)
qemu-system-x86_64 -drive format=raw,file=bootloader.bin

# Boot from CD-ROM image (for larger systems)
qemu-system-x86_64 -cdrom os.iso
Windows-accel whpx — Windows Hypervisor Platform (requires Hyper-V)
Tip: Without acceleration, QEMU uses TCG (software emulation), which is ~10–100× slower. Always enable hardware acceleration when available.
Debugging with QEMU + GDB
The combination of QEMU and GDB is incredibly powerful for debugging bootloaders and kernels:
All Platforms (on macOS, use lldb instead of gdb if GDB is not code-signed)
# Terminal 1: Start QEMU with GDB server, paused
qemu-system-x86_64 -drive format=raw,file=bootloader.bin -s -S

# Terminal 2: Connect GDB
gdb -ex "target remote localhost:1234" \
    -ex "set architecture i8086" \
    -ex "break *0x7c00" \
    -ex "continue"

# Now you can debug your bootloader with full GDB support!
Complete Bootloader Debug Session
# Create a minimal bootloader (boot.asm)
cat > boot.asm << 'EOF'
[bits 16]
[org 0x7c00]

mov ax, 0x0003      ; Set video mode 3 (80x25 text)
int 0x10

mov ah, 0x0e        ; BIOS teletype output
mov al, 'H'
int 0x10
mov al, 'i'
int 0x10
mov al, '!'
int 0x10

jmp $               ; Infinite loop

times 510-($-$$) db 0
dw 0xAA55           ; Boot signature
EOF

# Assemble
nasm -f bin boot.asm -o boot.bin

# Run with debug server
qemu-system-x86_64 -drive format=raw,file=boot.bin -s -S &

# Connect GDB (in new terminal)
gdb << 'GDBCMDS'
target remote localhost:1234
set architecture i8086
break *0x7c00
continue
stepi
info registers
x/10i $pc
GDBCMDS
QEMU Monitor Commands
Press Ctrl+Alt+2 in QEMU to access the monitor console:
# Useful monitor commands
info registers    # Show CPU registers
info mem          # Show memory mapping
info cpus         # Show CPU state
xp /10xb 0x7c00   # Examine physical memory
gdbserver 1234    # Start GDB server
quit              # Exit QEMU
Use include files to share macros and constants across multiple source files:
; include/macros.inc - Shared macros

; Exit program with status code
%macro exit 1
    mov     rax, 60         ; sys_exit
    mov     rdi, %1         ; exit code
    syscall
%endmacro

; Print null-terminated string
%macro print_string 2       ; 1=address, 2=length
    mov     rax, 1          ; sys_write
    mov     rdi, 1          ; stdout
    mov     rsi, %1         ; buffer
    mov     rdx, %2         ; length
    syscall
%endmacro

; Save all caller-saved registers
%macro push_all 0
    push    rax
    push    rcx
    push    rdx
    push    rsi
    push    rdi
    push    r8
    push    r9
    push    r10
    push    r11
%endmacro

%macro pop_all 0
    pop     r11
    pop     r10
    pop     r9
    pop     r8
    pop     rdi
    pop     rsi
    pop     rdx
    pop     rcx
    pop     rax
%endmacro
; src/main.asm - Using include files
%include "include/macros.inc"
%include "include/constants.inc"

section .data
    msg:    db "Hello, Assembly!", 10
    len:    equ $ - msg

section .text
    global _start

_start:
    print_string msg, len   ; Use macro
    exit 0                  ; Use macro
Git Best Practices for Assembly
Version control is crucial when experimenting with low-level code. A broken bootloader can lock up your emulator—having version history is a lifesaver.
Commit Message Convention
# Format: type(scope): description

feat(bootloader): implement A20 line enabling
fix(syscall): correct register preservation order
docs(readme): add build instructions for Windows
refactor(math): optimize multiply routine with shifts
test(io): add unit test for keyboard input handler

# Types:
# feat     - New feature or functionality
# fix      - Bug fix
# docs     - Documentation only
# refactor - Code change without functionality change
# test     - Adding or modifying tests
# chore    - Build system, tooling changes
Branching Strategy
# Main development
git checkout -b feature/keyboard-driver

# Experimental/risky changes
git checkout -b experiment/new-memory-layout

# Bug fixes
git checkout -b fix/stack-corruption

# Keep main branch stable
git checkout main
git merge --no-ff feature/keyboard-driver
Tagging Milestones
# Tag working states before major changes
git tag -a v0.1-bootloader-working -m "Basic boot sector loads second stage"
git tag -a v0.2-protected-mode -m "Successfully enters protected mode"
git tag -a v0.3-interrupts -m "IDT and basic interrupt handling"

# List tags
git tag -l

# Checkout old working state if needed
git checkout v0.1-bootloader-working
Development Workflow
Recommended Workflow:
Branch: Create feature branch for new work
Develop: Write code, test in QEMU frequently
Commit: Small, logical commits with clear messages
Test: Verify with multiple test cases
Debug: Use GDB if issues arise
Document: Add comments explaining WHY, not just WHAT
Merge: Merge back to main when stable
Documenting Assembly Code
Assembly code needs more comments than high-level code. Document intent, not just actions:
; BAD: Comment restates the code
mov     ax, bx          ; Move bx to ax

; GOOD: Comment explains WHY
mov     ax, bx          ; Preserve sector count before BIOS call clobbers bx

; EVEN BETTER: Block comment for complex sequences
; Enable A20 line using keyboard controller method
; This allows accessing memory above 1MB by disabling
; the legacy 8086 address wraparound behavior.
; Note: Fast A20 (port 0x92) is faster but not universal.
wait_kbd:
    in      al, 0x64
    test    al, 0x02
    jnz     wait_kbd
    mov     al, 0xD1        ; Write output port command
    out     0x64, al
    ; ... rest of A20 enable code
Critical Tip: Commit working code before making changes. In assembly, a single-byte error can cause hard-to-debug crashes. Having a "last known good" commit is invaluable.
Next Steps
With your development environment set up, you're ready to begin writing assembly code. In the next article, we'll cover assembly language fundamentals and write our first programs.
Continue the Series
Part 1: Assembly Language Fundamentals & Toolchain Setup
Learn what assembly really is, understand the build pipeline, and write your first programs for Linux and Windows.