x86 Assembly Series Part 1: Assembly Language Fundamentals & Toolchain Setup
February 6, 2026Wasil Zafar25 min read
Understand what assembly language really is, how it relates to machine code and micro-ops, and master the build pipeline from source to executable. Write your first assembly programs for Linux and Windows.
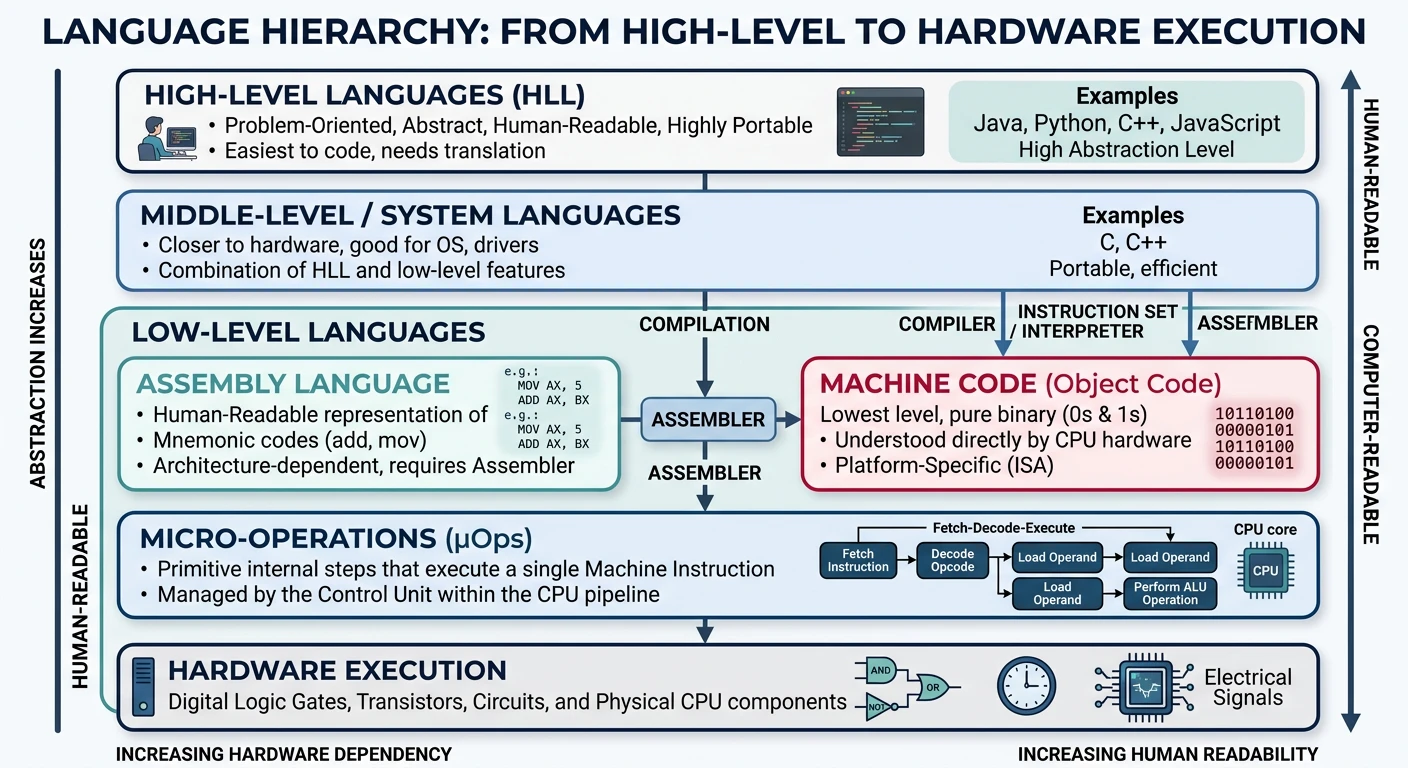
Core Understanding: Assembly language is a human-readable representation of machine code. Each assembly instruction typically maps to one CPU instruction, making it the lowest-level programming language that's still readable by humans.
When you write in a high-level language like Python or C++, your code gets transformed through multiple stages before the CPU can execute it. Assembly language sits just one step above raw binary machine code.
The programming language hierarchy — from human-readable high-level languages down through assembly to binary machine code executed by the CPU
Concept
The Language Hierarchy
From human to machine:
High-Level Languages (Python, Java, C++) → Human-friendly abstractions
Assembly Language → Human-readable CPU instructions
Machine Code → Binary opcodes the CPU decodes
Micro-operations → Internal CPU operations (invisible to programmers)
Assembly vs Machine Code vs Micro-ops
These three levels of code representation are often confused. Let's clarify each with concrete examples:
Real-World Analogy: Think of it like cooking instructions:
Assembly = "Sauté the onions for 5 minutes" (human instructions)
Machine Code = Recipe in a foreign language you can't read (encoded instructions)
# Disassemble raw binary with ndisasm (comes with NASM)
ndisasm -b 64 raw.bin

# Output shows:
# 00000000  48C7C02A000000    mov rax,0x2a
macOS
# View raw bytes with hexdump
hexdump -C raw.bin

# Disassemble a compiled Mach-O binary with otool
make clean && make
otool -t -v ./main
Micro-operations (μops)
Modern x86 CPUs internally break down complex CISC instructions into simpler RISC-like micro-operations. This is invisible to programmers but affects performance:
Assembly instruction:   add [rbx], rax
                        (Add RAX to memory at address in RBX)

Internal μops (simplified):
  1. μop: Load value from memory address in RBX → temp register
  2. μop: Add RAX + temp → result register
  3. μop: Store result → memory address in RBX

This single assembly instruction becomes 3 micro-operations internally!
Why Micro-ops Matter: Instructions that look simple might decompose into many μops, affecting:
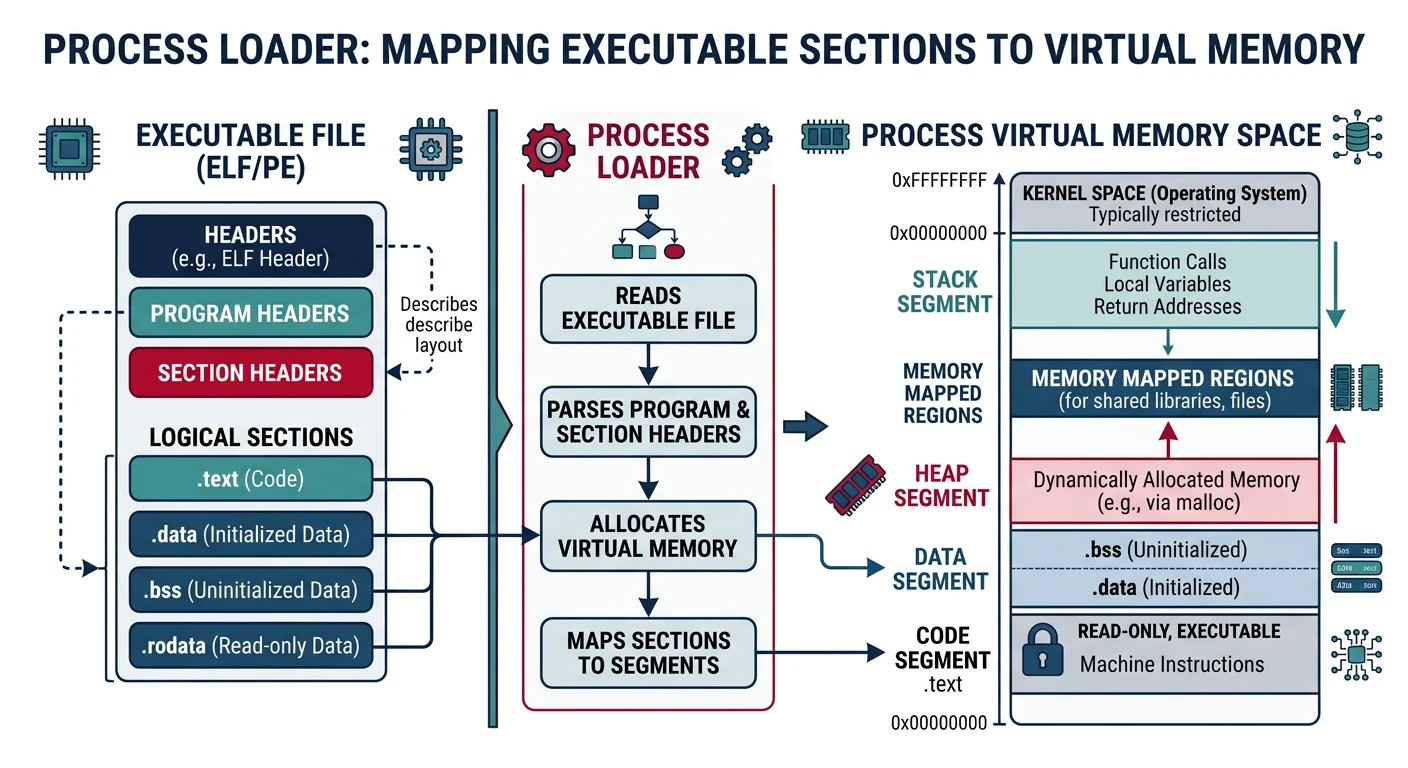
# Trace system calls during program load (Linux)
strace ./hello 2>&1 | head -30

# Key syscalls you'll see:
# execve("./hello", ...)         - Execute the program
# mmap(NULL, ..., PROT_READ)     - Map ELF header
# mmap(0x400000, ..., PROT_EXEC) - Map .text section
# mmap(0x600000, ..., PROT_WRITE)- Map .data section
# write(1, "Hello, World!\n", 14)- Our actual syscall!
# exit_group(0)                  - Exit
Exercise: Watch Your Program Load
# Use GDB to observe the loader
gdb ./hello

(gdb) starti              # Stop at the very first instruction
                          # (This is in the dynamic linker, not your code!)

(gdb) info proc mappings  # Show memory map
(gdb) info files          # Show loaded sections

(gdb) break _start        # Break at your entry point
(gdb) continue            # Run to _start
(gdb) x/10i $rip          # Examine your code!
Entry Point vs Main
There's often confusion about where execution actually begins:
Program Type
True Entry Point
Notes
Pure assembly (no libc)
_start
Directly to your code
C program (with libc)
_start (in crt0)
C runtime calls main()
PIE executable
Dynamic linker first
Then to _start
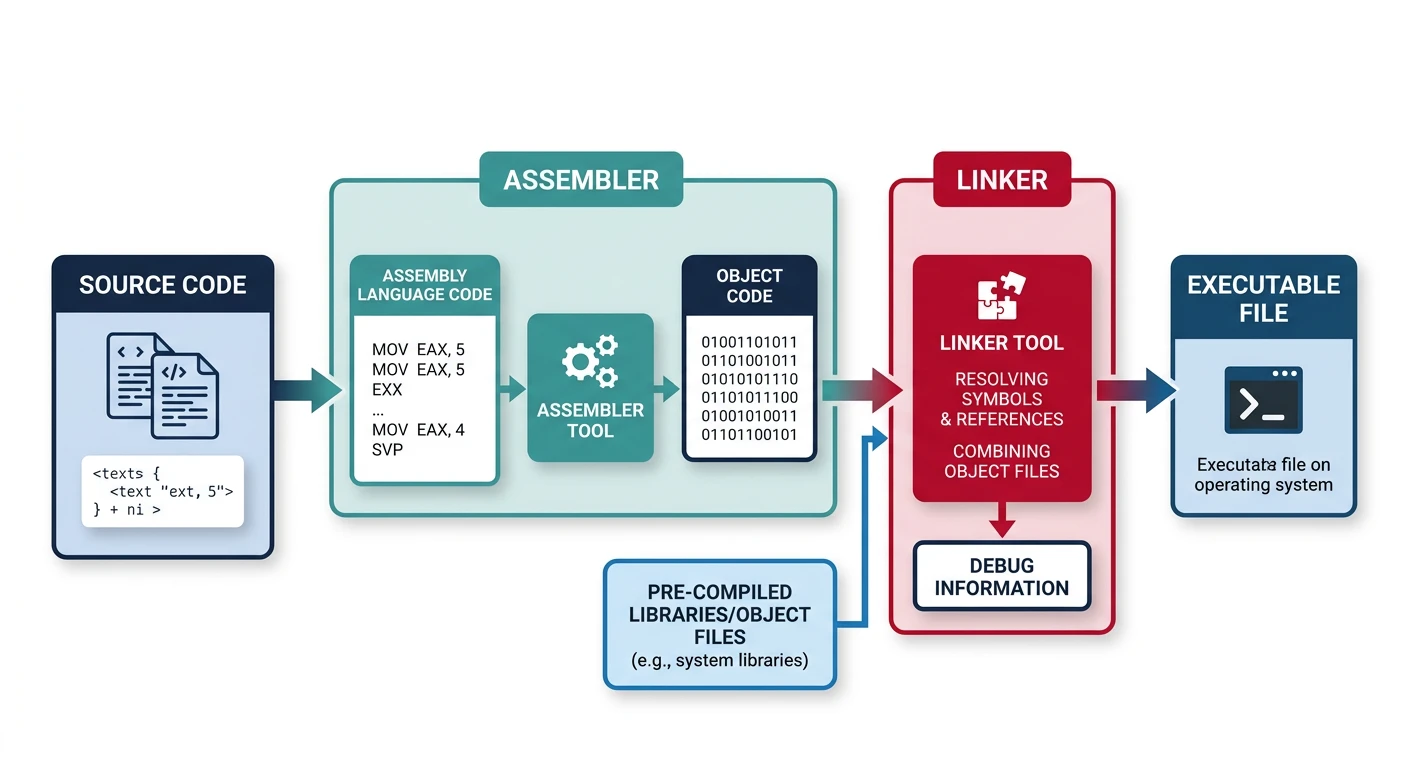
Object File Formats
ELF (Executable and Linkable Format)
Used by Linux, BSD, and many Unix-like systems. ELF files contain organized sections for code, data, symbols, and relocation information.
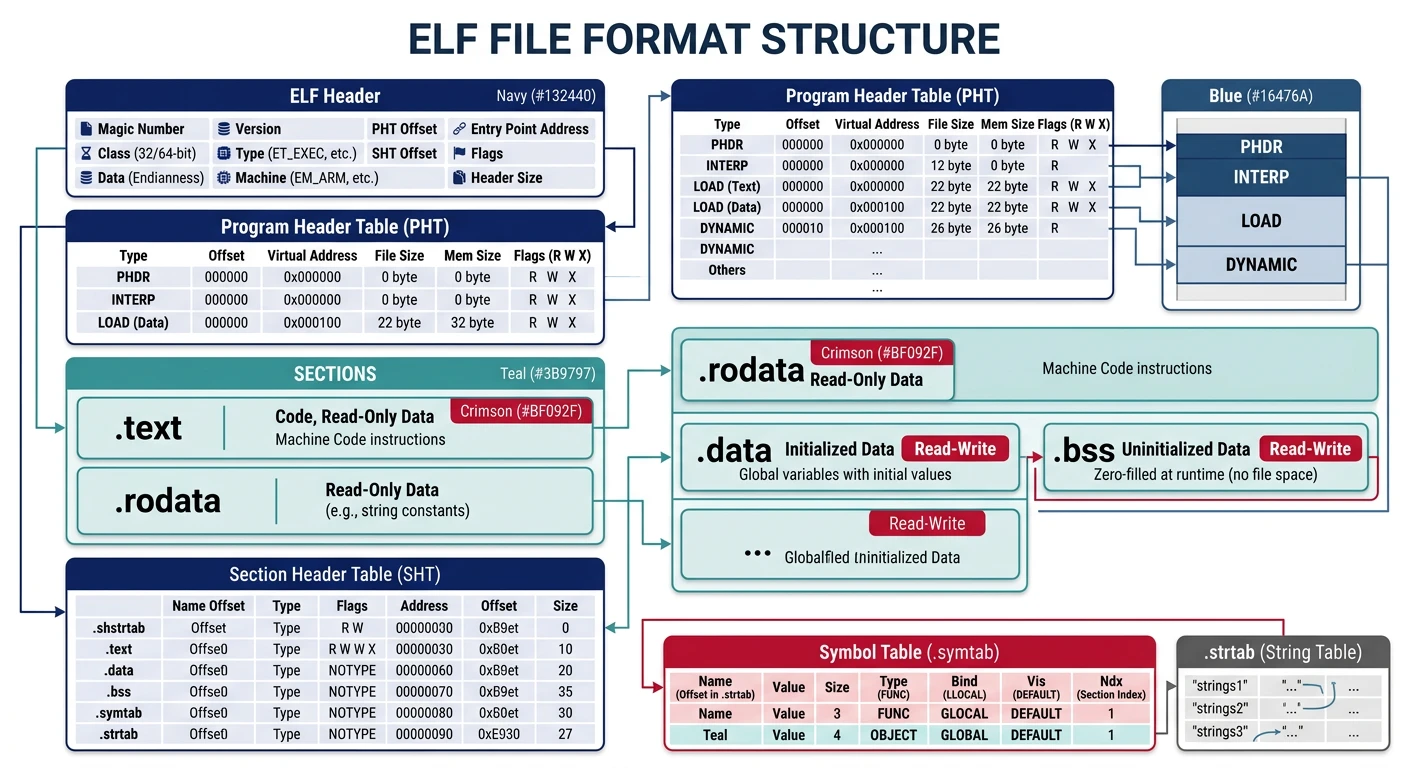
ELF (Executable and Linkable Format) internal structure — header, program headers, section headers, and key sections (.text, .data, .bss, .symtab)
ELF Structure Overview
┌─────────────────────────────────┐
│         ELF Header              │  64 bytes (64-bit)
│    Magic: 7F 45 4C 46           │  Identifies as ELF
│    Class: 64-bit                │
│    Entry Point: 0x401000        │  Where execution begins
├─────────────────────────────────┤
│      Program Headers            │  Describe segments for loading
│   (how to load into memory)     │
├─────────────────────────────────┤
│      Section Headers            │  Describe sections for linking
│   (logical organization)        │
├─────────────────────────────────┤
│         .text                   │  Executable code
├─────────────────────────────────┤
│        .rodata                  │  Read-only data (strings)
├─────────────────────────────────┤
│         .data                   │  Initialized read/write data
├─────────────────────────────────┤
│         .bss                    │  Uninitialized data (zeroed)
├─────────────────────────────────┤
│        .symtab                  │  Symbol table
├─────────────────────────────────┤
│        .strtab                  │  String table (symbol names)
└─────────────────────────────────┘
Used by Windows for .exe and .dll files. PE evolved from COFF format and maintains a DOS stub for backward compatibility.
PE Structure Overview
┌─────────────────────────────────┐
│         DOS Header              │  64 bytes
│    Magic: 4D 5A ("MZ")          │  Mark Zbikowski's initials!
│    PE offset at 0x3C            │
├─────────────────────────────────┤
│         DOS Stub                │  "This program cannot be run..."
│    (Legacy compatibility)       │
├─────────────────────────────────┤
│       PE Signature              │  "PE\0\0" (50 45 00 00)
├─────────────────────────────────┤
│       COFF Header               │  Machine type, section count
├─────────────────────────────────┤
│    Optional Header              │  Entry point, image base, etc.
│    (not actually optional!)     │
├─────────────────────────────────┤
│     Section Headers             │  .text, .data, .rdata, etc.
├─────────────────────────────────┤
│         .text                   │  Executable code
├─────────────────────────────────┤
│        .rdata                   │  Read-only data, imports
├─────────────────────────────────┤
│         .data                   │  Initialized data
├─────────────────────────────────┤
│        .idata                   │  Import table (DLL references)
└─────────────────────────────────┘
Examining PE Files
# Windows: Use dumpbin (from Visual Studio)
dumpbin /headers hello.exe
dumpbin /disasm hello.exe
dumpbin /imports hello.exe

# Linux: Use objdump with PE support
objdump -x hello.exe

# Or use pe-parse/pefile (Python)
pip install pefile
python -c "import pefile; pe = pefile.PE('hello.exe'); print(pe.dump_info())"
History Note: "MZ" in the DOS header stands for Mark Zbikowski, an architect of MS-DOS. Every Windows executable still starts with these bytes—40+ years of backward compatibility!
The ultimate assembly experience: code that runs with no OS, directly on hardware (or emulator). This boot sector prints "Hi" to the screen using BIOS interrupts:
; boot.asm - Simple boot sector (512 bytes, runs at 0x7C00)
; Assemble: nasm -f bin boot.asm -o boot.bin
; Run: qemu-system-x86_64 -drive format=raw,file=boot.bin

bits 16                     ; 16-bit real mode
org 0x7C00                  ; BIOS loads us here

start:
    ; Set up segments (BIOS doesn't guarantee these)
    xor ax, ax
    mov ds, ax
    mov es, ax
    mov ss, ax
    mov sp, 0x7C00          ; Stack below our code

    ; Clear screen (BIOS video interrupt)
    mov ax, 0x0003          ; 80x25 text mode
    int 0x10

    ; Print 'H'
    mov ah, 0x0E            ; Teletype output
    mov al, 'H'
    int 0x10

    ; Print 'i'
    mov al, 'i'
    int 0x10

    ; Print '!'
    mov al, '!'
    int 0x10

.halt:
    hlt                     ; Halt CPU (saves power)
    jmp .halt               ; Loop forever if interrupted

; Boot sector signature (must be at bytes 510-511)
times 510 - ($ - $$) db 0   ; Pad with zeros
dw 0xAA55                   ; Boot signature
Save & Compile: boot.asm
All Platforms (flat binary — no OS-specific linking)
nasm -f bin boot.asm -o boot.bin
qemu-system-x86_64 -drive format=raw,file=boot.bin
Boot Process Explained:
Power on: CPU starts in 16-bit real mode at 0xFFFF0 (BIOS ROM)
BIOS POST: Initializes hardware, tests memory
Boot search: BIOS reads first 512 bytes from boot device
Signature check: Last two bytes must be 0x55, 0xAA
Load & jump: BIOS loads sector to 0x7C00 and jumps there
Your code runs! You now control the entire machine
Slightly More Practical Boot Sector
; boot_msg.asm - Boot sector with string printing
; Assemble & run same as above

bits 16
org 0x7C00

start:
    xor ax, ax
    mov ds, ax
    mov es, ax

    ; Print welcome message
    mov si, welcome_msg
    call print_string

    ; Print hex value demo
    mov si, hex_msg
    call print_string
    mov ax, 0xDEAD
    call print_hex

    jmp $                   ; Infinite loop ($ = current address)

; Print null-terminated string from SI
print_string:
    pusha                   ; Save all registers
    mov ah, 0x0E            ; BIOS teletype
.loop:
    lodsb                   ; Load byte from [SI] into AL, increment SI
    test al, al             ; Check for null terminator
    jz .done
    int 0x10                ; Print character
    jmp .loop
.done:
    popa
    ret

; Print AX as 4 hex digits
print_hex:
    pusha
    mov cx, 4               ; 4 hex digits
.loop:
    rol ax, 4               ; Rotate left, bringing high nibble to low
    mov bx, ax
    and bx, 0x0F            ; Isolate low nibble
    mov bl, [hex_chars + bx]; Convert to ASCII
    push ax
    mov ah, 0x0E
    mov al, bl
    int 0x10
    pop ax
    loop .loop
    popa
    ret

hex_chars: db "0123456789ABCDEF"
welcome_msg: db "Boot sector loaded!", 13, 10, 0
hex_msg: db "Value: 0x", 0

times 510 - ($ - $$) db 0
dw 0xAA55
Save & Compile: boot_msg.asm
All Platforms (flat binary — no OS-specific linking)
nasm -f bin boot_msg.asm -o boot_msg.bin
qemu-system-x86_64 -drive format=raw,file=boot_msg.bin
Exercise: Your First Boot Sector
# Create and test your boot sector
nasm -f bin boot.asm -o boot.bin

# Verify size (should be exactly 512 bytes)
ls -la boot.bin

# Verify boot signature
xxd boot.bin | tail -1
# Should end with: .... 55aa

# Run in QEMU (no OS, no drivers - pure bare metal!)
qemu-system-x86_64 -drive format=raw,file=boot.bin

# Debug with QEMU + GDB
qemu-system-x86_64 -drive format=raw,file=boot.bin -s -S &
gdb -ex "target remote localhost:1234" -ex "set architecture i8086"
Challenge: Modify the boot sector to print your name, then print it in a different color (hint: use AH=0x09 with BL for color attribute).
Next Steps
Now that you understand what assembly is and how the build pipeline works, we'll dive into the CPU architecture that executes these instructions.
Continue the Series
Part 0: Development Environment, Tooling & Workflow
Set up your complete assembly development environment with assemblers, debuggers, and build tools.