Complete Protocols Master Part 1: OSI Model & Protocol Foundations
January 31, 2026Wasil Zafar35 min read
Master the foundational OSI model and understand how protocols work together across network layers. Learn encapsulation, PDUs, TCP/IP comparison, and how data travels from your browser to servers around the world.
Every time you load a webpage, send an email, or stream a video, dozens of networking protocols work together invisibly to make it happen. Understanding these protocols isn't just academic knowledge—it's essential for:
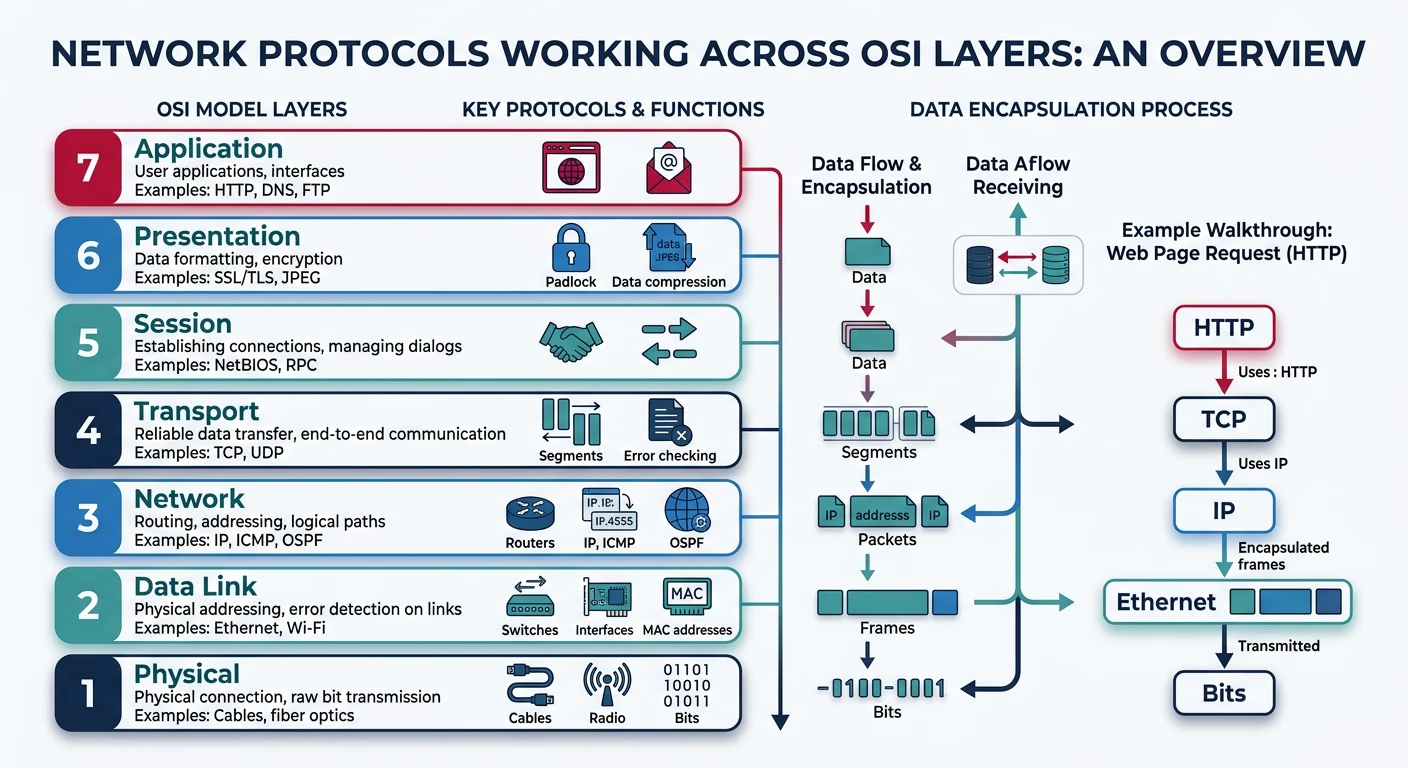
Network protocols collaborate across multiple layers to deliver data from source to destination.
Debugging network issues — Know which layer is causing problems
Building distributed systems — Make informed architectural decisions
Security analysis — Understand attack vectors and defenses
Performance optimization — Identify and fix bottlenecks
Technical interviews — A core topic for backend and infrastructure roles
Series Overview: This is Part 1 of 20 in the Complete Protocols Master series. We'll journey from fundamental OSI layers through every major protocol category—from HTTP and DNS to Kafka and Kubernetes networking—giving you comprehensive knowledge of how data moves across networks.
Key Insight: Understanding protocols at a deep level transforms how you design, debug, and optimize networked systems. This knowledge separates junior developers from senior engineers who can diagnose complex distributed system issues.
The OSI Model: A Universal Framework
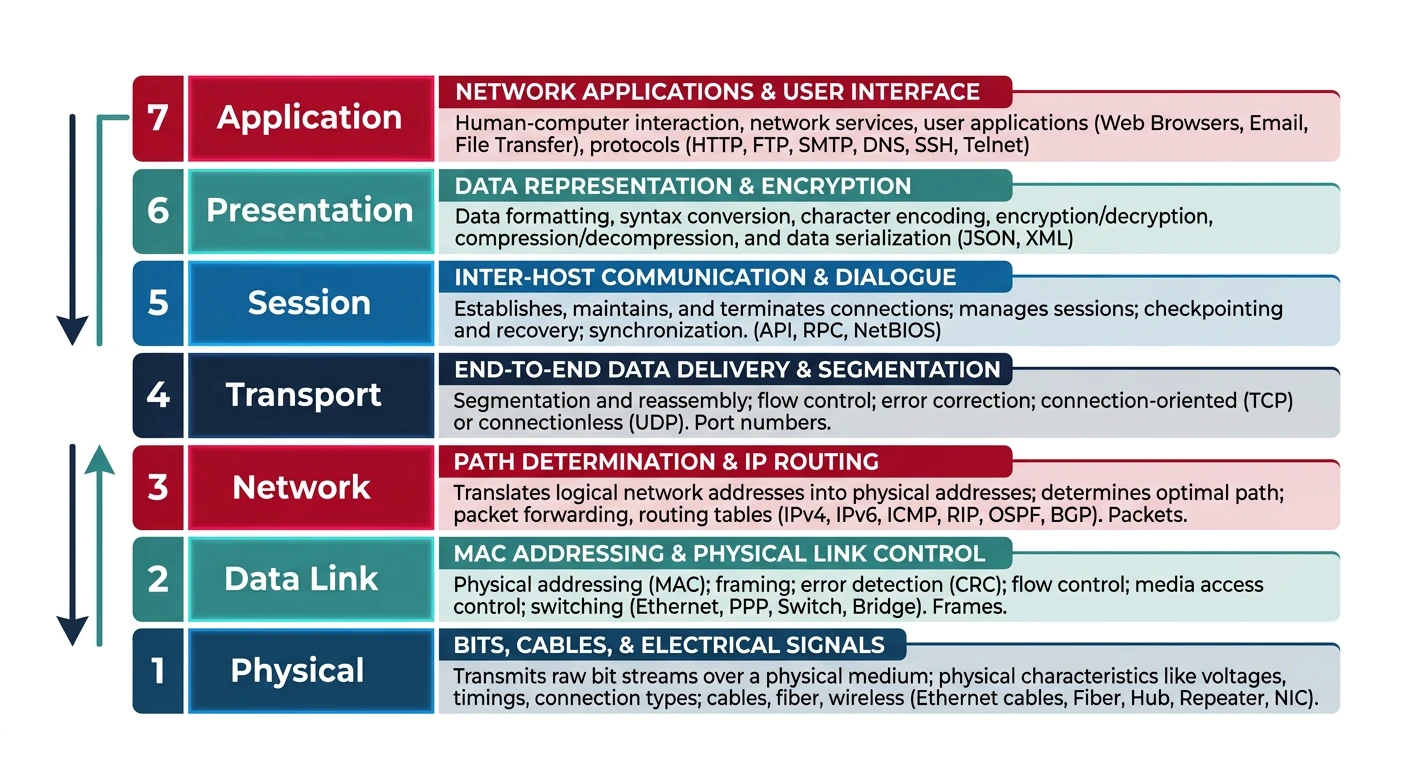
The Open Systems Interconnection (OSI) model is a conceptual framework created by the International Organization for Standardization (ISO) in 1984. It divides network communication into seven distinct layers, each with specific responsibilities.
The OSI model's seven layers provide a universal framework for understanding network communication.
The Postal System Analogy
Think of the OSI model like sending a letter through the postal system:
Real-World Analogy
Letter → Network Data
Layer 7 (Application): You write the letter content — "Dear John, ..."
Layer 6 (Presentation): You choose the language and format (English, formal letter)
Layer 5 (Session): You establish the conversation ("This is in reply to your letter dated...")
Layer 4 (Transport): You decide: regular mail or registered mail with tracking?
Layer 3 (Network): The postal service routes between cities using addresses
Layer 2 (Data Link): The mail carrier navigates your local neighborhood
Layer 1 (Physical): The actual trucks, planes, and roads carrying the mail
Let's explore each layer in detail, starting from the top where users interact:
Layer 7: Application Layer
Layer 7User Interface
Purpose: Human-Computer Interface
The Application Layer is where users interact with network services. It provides protocols for specific applications like web browsing, email, and file transfer.
Common Misconception: The Application Layer is NOT your application software (Chrome, Outlook). It's the protocols your application uses to communicate over the network.
# Layer 7 in action: Simple HTTP request
import requests

# Your browser does this behind the scenes
response = requests.get('https://api.github.com/users/octocat')

# The HTTP protocol (Layer 7) defines:
# - Request methods: GET, POST, PUT, DELETE
# - Headers: Content-Type, Authorization, etc.
# - Status codes: 200 OK, 404 Not Found, 500 Server Error

print(f"Status: {response.status_code}")
print(f"Content-Type: {response.headers['Content-Type']}")
print(f"Data: {response.json()['login']}")
Layer 6: Presentation Layer
Layer 6Data Translation
Purpose: Data Format Translation
The Presentation Layer handles data formatting, encryption/decryption, and compression. It ensures that data from the Application Layer is in a format the receiving system can understand.
Key Functions:
Encryption/Decryption: SSL/TLS encryption
Data Formatting: ASCII, EBCDIC, Unicode conversion
The Session Layer establishes, manages, and terminates connections between applications. It handles session checkpointing and recovery.
Key Functions:
Session Establishment: Creating a logical connection
Session Maintenance: Keeping connections alive
Session Termination: Graceful disconnect
Synchronization: Checkpoints for recovery
Real Examples: NetBIOS, RPC, SQL sessions, NFS sessions
Note: In modern TCP/IP networking, Layers 5 and 6 are often combined with Layer 7. The Session and Presentation layers are more conceptual separations than distinct protocol layers in practice.
Layer 4: Transport Layer
Layer 4End-to-End Delivery
Purpose: Reliable Data Transfer
The Transport Layer provides end-to-end communication services. It segments data, handles flow control, and ensures reliable (or fast) delivery.
Key Protocols:
TCP (Transmission Control Protocol): Reliable, ordered delivery with error checking
UDP (User Datagram Protocol): Fast, connectionless, no guarantee of delivery
QUIC: Modern protocol combining TCP reliability with UDP speed
Key Concepts: Ports, sockets, segmentation, flow control, congestion control
# View MAC address on different operating systems

# Linux/macOS
ip link show
# or
ifconfig | grep ether

# Windows
ipconfig /all
# or
getmac

# Example MAC address format:
# 00:1A:2B:3C:4D:5E (colon notation)
# 00-1A-2B-3C-4D-5E (dash notation)
# 001A.2B3C.4D5E (Cisco notation)

# First 3 bytes: OUI (Organizationally Unique Identifier) - identifies manufacturer
# Last 3 bytes: NIC-specific - unique to the device
Layer 1: Physical Layer
Layer 1Bits on Wire
Purpose: Physical Transmission of Raw Bits
The Physical Layer transmits raw bits over a physical medium. It defines electrical, mechanical, and procedural specifications.
Key Specifications:
Cables: Cat5e, Cat6, fiber optic, coaxial
Connectors: RJ-45, LC, SC
Signaling: Voltage levels, bit timing
Wireless: Radio frequencies, modulation
Devices: Hubs, repeaters, cables, NICs
Speed Reference: Cat5e supports up to 1 Gbps. Cat6 supports 10 Gbps (short distances). Fiber optic can exceed 100 Gbps. Wi-Fi 6 (802.11ax) supports up to 9.6 Gbps (theoretical).
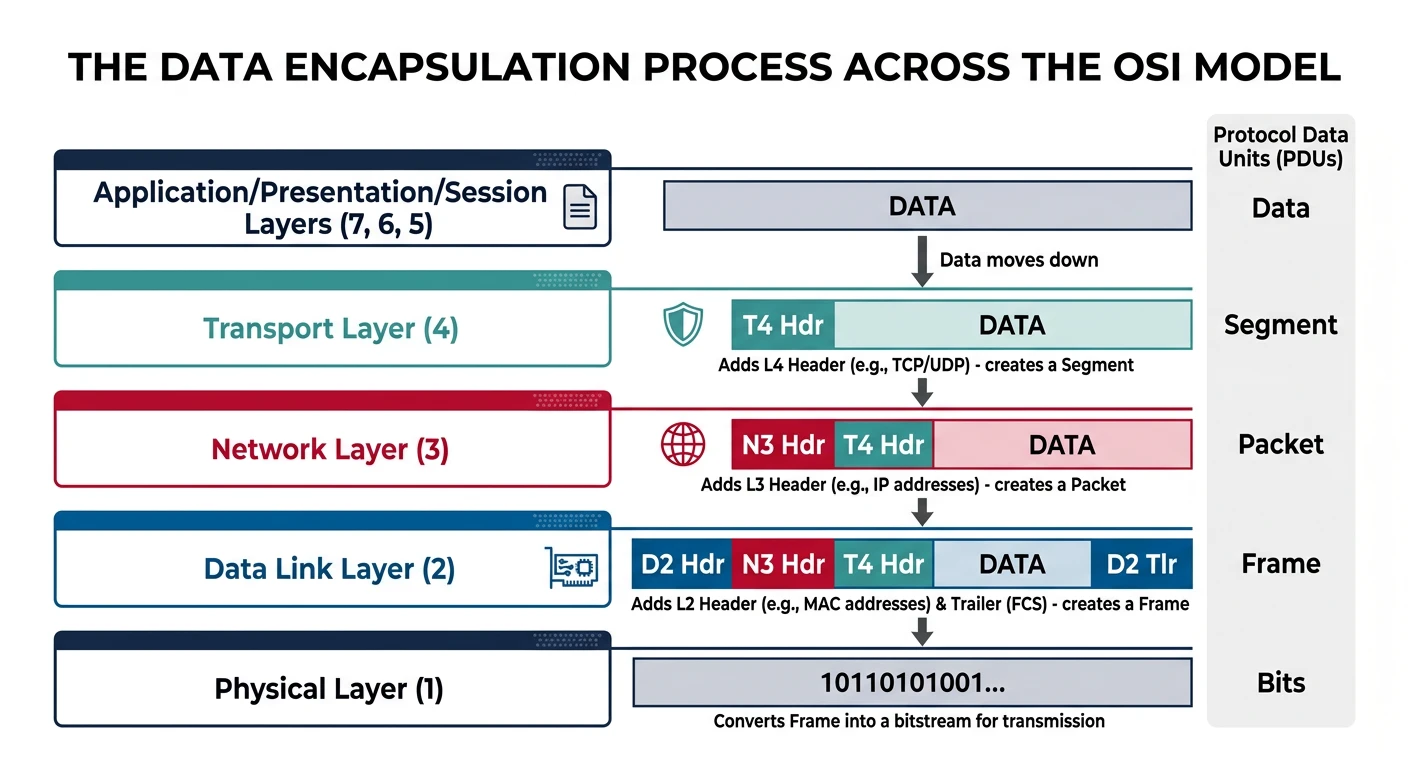
Data Encapsulation: How Data Travels
As data moves down the OSI layers, each layer adds its own header (and sometimes trailer) information. This process is called encapsulation. When data is received, the reverse process (de-encapsulation) strips away these headers.
Data encapsulation adds protocol headers at each layer as data travels from application to physical transmission.
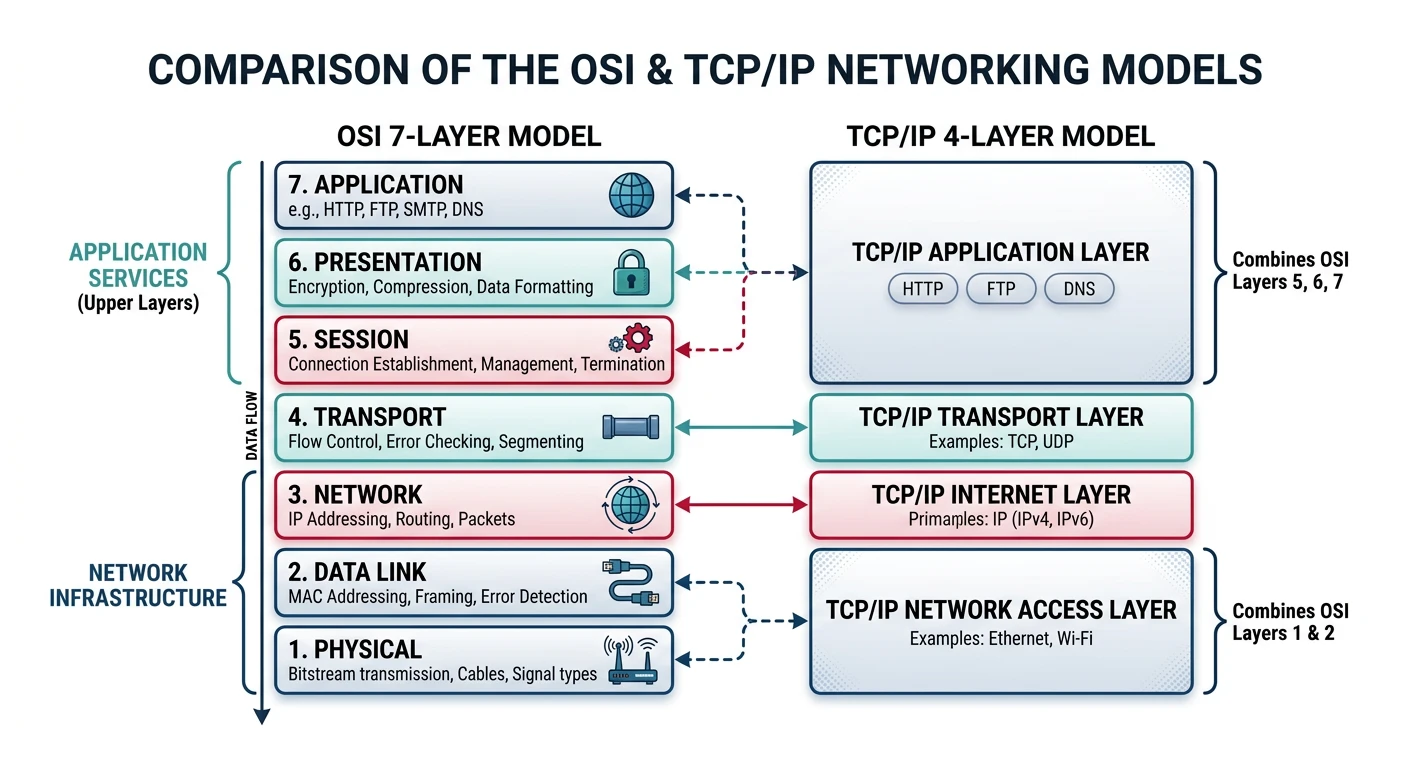
While the OSI model is excellent for understanding concepts, the TCP/IP model (also called the Internet Protocol Suite) is what the internet actually uses. It has four layers instead of seven.
The TCP/IP model consolidates the OSI model's seven layers into four practical layers used by the internet.
Key Comparison
OSI Model vs TCP/IP Model
OSI Model
TCP/IP Model
Protocols
7. Application
4. Application
HTTP, HTTPS, FTP, SMTP, DNS, SSH, DHCP
6. Presentation
5. Session
4. Transport
3. Transport
TCP, UDP, QUIC
3. Network
2. Internet
IP, ICMP, ARP, RARP
2. Data Link
1. Network Access
Ethernet, Wi-Fi, PPP
1. Physical
TCP/IP Layer Details
Layer 4
Application Layer
Combines OSI Layers 5, 6, and 7. Contains all application-level protocols that users interact with directly or indirectly.
Responsibilities: Process-to-process communication, data representation, user services
Layer 3
Transport Layer
Equivalent to OSI Layer 4. Provides end-to-end communication services.
Which Model to Use? Use OSI for learning and discussing concepts. Use TCP/IP for practical implementation. In interviews, be familiar with both and explain how they map to each other.
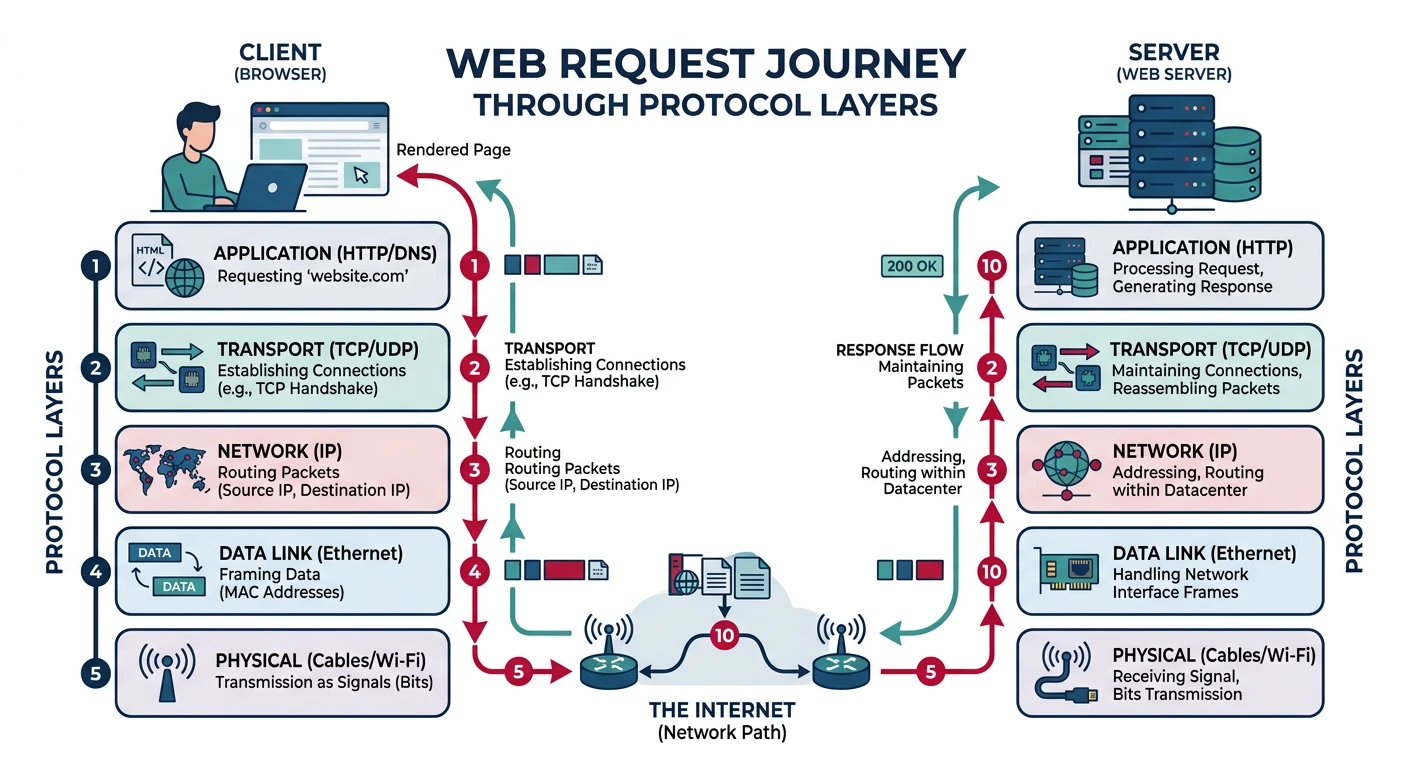
Real-World Example: A Web Request Journey
Let's trace what happens when you type https://www.google.com in your browser:
A web request traverses every protocol layer — from DNS resolution to physical transmission and back.
Step-by-Step
The Complete Journey
DNS Resolution (Layer 7/Application):
Browser checks cache for google.com IP address
If not found, queries DNS server
DNS returns: google.com → 142.250.185.46
TCP Connection (Layer 4/Transport):
Browser initiates TCP three-way handshake
SYN → SYN-ACK → ACK
Connection established to port 443
TLS Handshake (Layer 5-6/Session-Presentation):
Exchange encryption capabilities
Verify server certificate
Establish encrypted session
HTTP Request (Layer 7/Application):
Browser sends: GET / HTTP/1.1
Includes headers: Host, User-Agent, Accept, etc.
Packet Routing (Layer 3/Network):
Source IP: Your computer (e.g., 192.168.1.100)
Destination IP: 142.250.185.46
Routers forward packets across the internet
Frame Transmission (Layer 2/Data Link):
Your NIC creates Ethernet frames
Uses ARP to find router's MAC address
Each hop has different MAC addresses
Physical Transmission (Layer 1/Physical):
Bits transmitted as electrical signals (Ethernet)
Or radio waves (Wi-Fi)
Or light pulses (fiber optic backbone)
Troubleshooting with OSI Layers
When network issues occur, systematically check each layer:
# Layer 1 - Physical: Is the cable plugged in? Link lights on?
# Check interface status
ip link show
# or on Windows
netsh interface show interface

# Layer 2 - Data Link: Can we reach devices on local network?
# Check ARP table
arp -a

# Layer 3 - Network: Can we reach remote networks?
# Ping default gateway
ping 192.168.1.1

# Ping external IP (bypasses DNS)
ping 8.8.8.8

# Trace route to see where packets fail
traceroute google.com  # Linux/macOS
tracert google.com     # Windows

# Layer 4 - Transport: Is the service responding?
# Test specific port
nc -zv google.com 443  # Linux/macOS
Test-NetConnection google.com -Port 443  # Windows PowerShell

# Layer 7 - Application: Is the application protocol working?
curl -I https://google.com

# DNS specific test
nslookup google.com
dig google.com
Troubleshooting Order: Always start from Layer 1 and work up! Most network issues are physical (unplugged cables, bad NICs) or DNS-related. Don't assume the problem is complex until you've ruled out the basics.
Hands-On Exercises
The best way to understand protocols is to observe and interact with them. Let's do some practical exercises.
Exercise 1: Packet Capture with tcpdump/Wireshark
# Capture HTTP traffic (requires root/admin)
# Linux/macOS
sudo tcpdump -i any -n port 80 -A

# Capture DNS traffic
sudo tcpdump -i any port 53

# Capture and save to file for Wireshark analysis
sudo tcpdump -i any -w capture.pcap

# Then open capture.pcap in Wireshark for detailed analysis
# Wireshark can decode all layers and show:
# - Ethernet frame headers
# - IP packet headers
# - TCP/UDP segment headers
# - Application layer data
Exercise 2: Python Socket Programming
Let's create a simple TCP client and server to understand transport layer communication:
# TCP Server (save as server.py)
import socket

def start_server():
    # Create TCP socket
    server_socket = socket.socket(socket.AF_INET, socket.SOCK_STREAM)

    # Allow address reuse (avoid "Address already in use" error)
    server_socket.setsockopt(socket.SOL_SOCKET, socket.SO_REUSEADDR, 1)

    # Bind to all interfaces on port 8080
    server_socket.bind(('0.0.0.0', 8080))

    # Listen for connections (queue up to 5)
    server_socket.listen(5)
    print("Server listening on port 8080...")

    while True:
        # Accept incoming connection
        client_socket, client_address = server_socket.accept()
        print(f"Connection from {client_address}")

        # Receive data (max 1024 bytes)
        data = client_socket.recv(1024).decode('utf-8')
        print(f"Received: {data}")

        # Send response
        response = f"Server received: {data}"
        client_socket.send(response.encode('utf-8'))

        # Close client connection
        client_socket.close()

if __name__ == "__main__":
    start_server()
# TCP Client (save as client.py)
import socket

def send_message(message):
    # Create TCP socket
    client_socket = socket.socket(socket.AF_INET, socket.SOCK_STREAM)

    try:
        # Connect to server
        client_socket.connect(('127.0.0.1', 8080))
        print(f"Connected to server")

        # Send data
        client_socket.send(message.encode('utf-8'))
        print(f"Sent: {message}")

        # Receive response
        response = client_socket.recv(1024).decode('utf-8')
        print(f"Received: {response}")

    finally:
        client_socket.close()

if __name__ == "__main__":
    send_message("Hello from OSI Layer 4!")
Exercise 3: Analyze HTTP Headers
# Inspect HTTP request/response headers
import requests

# Make a request and examine all headers
response = requests.get('https://httpbin.org/get',
    headers={
        'User-Agent': 'OSI-Learning-Client/1.0',
        'Accept': 'application/json',
        'X-Custom-Header': 'Learning Protocols!'
    }
)

print("=== REQUEST HEADERS (Layer 7) ===")
print(f"Method: GET")
print(f"URL: {response.url}")
for key, value in response.request.headers.items():
    print(f"{key}: {value}")

print("\n=== RESPONSE HEADERS (Layer 7) ===")
print(f"Status: {response.status_code} {response.reason}")
for key, value in response.headers.items():
    print(f"{key}: {value}")

print("\n=== RESPONSE BODY ===")
print(response.json())
Exercise 4: Quiz Yourself
Self-Assessment
Test Your Knowledge
What layer does a switch operate at? (Answer: Layer 2 - Data Link)
What layer does a router operate at? (Answer: Layer 3 - Network)
Which PDU contains MAC addresses? (Answer: Frame - Layer 2)
Which protocol provides reliable delivery: TCP or UDP? (Answer: TCP)
What's the difference between IP address and MAC address? (Answer: IP is logical/routable, MAC is physical/local)
Why does TCP use a three-way handshake? (Answer: To synchronize sequence numbers and establish reliable connection)
At which layer does encryption typically occur? (Answer: Layer 6 - Presentation, or Layer 4-5 for TLS)
Summary & Next Steps
Key Takeaways:
The OSI model has 7 layers; TCP/IP has 4 practical layers
Encapsulation adds headers at each layer as data moves down
Each layer has specific PDUs: Data → Segment → Packet → Frame → Bits
TCP provides reliability; UDP provides speed
Troubleshoot from Layer 1 up to systematically find issues
Understanding layers helps you debug, design, and secure systems
Memory Aid
OSI Layer Mnemonics
Top-Down: "All People Seem To Need Data Processing"
Application, Presentation, Session, Transport, Network, Data Link, Physical
Bottom-Up: "Please Do Not Throw Sausage Pizza Away"
Physical, Data Link, Network, Transport, Session, Presentation, Application
Continue the Series
Ready for more? Explore these related articles in the Complete Protocols Master series:
Up Next
Part 2: Physical & Data Link Layers
Explore Ethernet, Wi-Fi, VLANs, and MAC addressing at the lower layers.